
Hello all my artsy friends! I seriously cannot believe we are already at the end of my favorite month of the year. I could swear that October just started yesterday. Instead of wallowing, I decided to get in some soulful art journaling to help me look forward to the start of November - with a quick tip for altering those awesome digital cut outs that are all over the gallery and store. Notice the November title? I created the word art with a cut out from Scrapping with Liz' awesome November Cut Outs set (which is available today in the SOSN sale for 50% off). If you want to create a similar look, just follow the steps below. 1. Bring the cut out of choice onto your digital page (I used a filled cut out on my page). The first step is to create the frame. Select the cut out by holding the Ctrl/Cmd button while clicking on the cut out layer in … [Read more...]
Flipping Text Elements in Photoshop
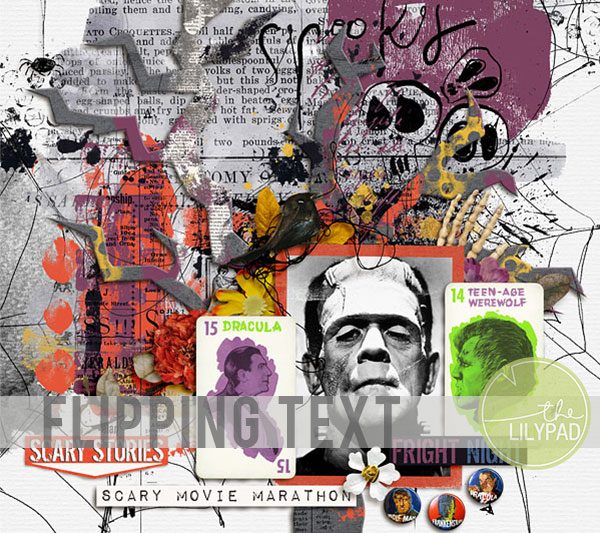
Hello all my artsy friends! I'm just dropping in today with a tip for flipping digital text elements. Many of you may already be familiar with the horizonal flip function in Photoshop and Photoshop Elements - which works perfectly for photos/elements without writing. However, it is a bit trickier when you want to flip the orientation of an element with writing on it. Take a look at the Dracula and Werewolf cards on the layout below: I wanted the cards to be positioned so that they each looked into the Frankenstein photo in the middle. However, the Werewolf card was actually facing the same direction as the Dracula card in the kit (click on layout above for full credits). Normally, I would just use the horizontal flip function to quickly change the orientation of the element. However, if I flip the entire card, the … [Read more...]
Sharing Layouts on Instagram Using Dropbox

Hello and Happy Tuesday, scrappy friends!!I love sharing my layouts on Instagram and looking at all of the inspiration from others who are sharing their layouts there as well. During Digital Scrapbook Day, we hosted an Instagram challenge to share layouts created with The Lilypad products with the hashtag #scrapwithtlp. It was so fun to see all of the layouts shared in that hashtag!!There just may be another event coming up this weekend with our Halloween Bash **hint, hint** where you'll have another opportunity to share your layouts on Instagram.I want as many people as possible to participate in sharing layouts to Instagram and growing our community there, so today I am going to share with you how I share my digital scrapbooking layouts to Instagram using Dropbox.I have shared before my process for sharing layouts on Instagram using a Lightroom plugin. Well, I'm sad … [Read more...]
Hybrid Thank You Card

Hello friends!! It's Monica here and I'm so excited to share with you a hybrid "thank you" card that I recently made. I actually made two cards using the same technique, because if you're going to make one, you might as well make two!Last week my neighbor came over to bring a "welcome to the neighborhood" gift. It was the sweetest gift of fresh flowers, pumpkin pancake mix and vanilla maple syrup, all from Trader Joe's. I wanted to make a thank you card for her and was inspired by this card shared by Jennifer McGuire on Instagram.I love that this card could easily transfer to be made hybrid style since it used all straight edges. I also love the bold patterned paper that was used!Here is the process I used to create these cards:The first thing I did was cut out two card bases (5.5x4.25) using white cardstock paper.I then used a scoring mat and bone … [Read more...]
Photoshop Workspace Setup
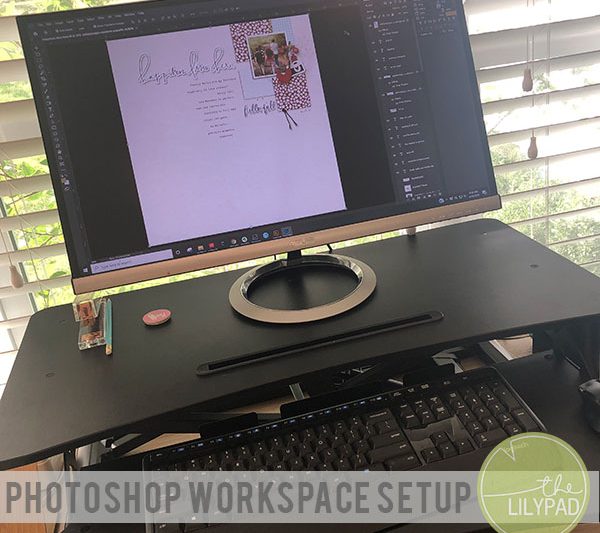
Hi scrappy friends!! It's Monica here to share a little bit about my Photoshop Workspace Setup.One of my favorite things about Photoshop is the ability to personalize it to suit me as a scrapbooker. I love that I can arrange and rearrange panels in my workspace so that it is suited just right for the way I like to work.Today I'm going to show you how I have my workspace set up, but I would also like to encourage you to get on Photoshop (if that's the program you use) and play around with it to arrange your own workspace just right for YOU!First up, here's a screenshot of how my workspace is set up.On the left-hand side, I have all of the tools that I use. Then on the right-hand side, I have two groups of panels. On the inner right, I have a panel for layers and history. I can click on each tab at the top to show that individual panel. On the far right, I have a … [Read more...]
Pumpkin Inspiration
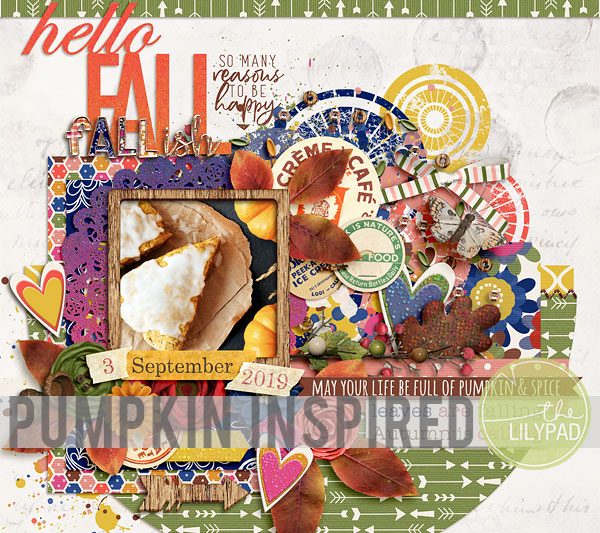
It is the start of September and that means autumn is just around corner in this part of the world! Of course, no matter what the date, nothing screams the start of autumn louder than Pumpkin Spice Lattes (PSL) and Pumpkin scones from your local coffee shop. If you are a fellow PSL fan, or even if you just like autumn, I'm here to inspire you today with a pumpkin spice page and a a quick tip for toning your background to coordinate with your elements. Here is my layout, commemorating my first pumpkin scones of the season. As a bonus, pretty much everything in it is included in today's half-price SOSN sale! (Click on layout for full credits.) Notice the background paper? It actually comes from Little Butterfly Wings' Whities Vol. 2 set. Although I love the texture and visual interest that it adds to the page, the background was a … [Read more...]
Resizing Print and Cut Stickers

Hi scrappy friends!!It's Polly Monica here with a fun tutorial to help you get more out of your digi-supplies by resizing print and cut stickers. When I saw Becca Bonneville's The Universe is Calling Sticker set in the store this weekend I knew they would be perfect for my planner spread a couple of weeks ago. This was the week that we went to see the Apollo 11 Back to the Moon Projection show on the National Mall.I love using print and cut stickers, but often they are just a little too big at the letter size they are made in to fit into my planner. So, I decided to resize these stickers to half their size and fit two pages of stickers on one letter-sized sticker sheet.I will describe my process for doing this and share a video I made that will also walk you through the process if you are more of a visual learner.Here are the steps for resizing your print and cut … [Read more...]
Word Strip Magic
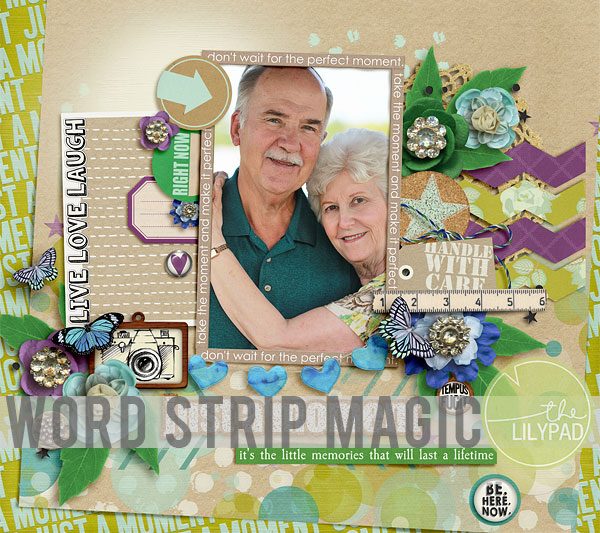
Hello all my artsy friends! I hope everyone is staying cool (or warm, depending on where you live). We are enjoying a "cooling pattern" of highs in the upper 80's this week, but lower humidity. I seriously cannot wait for those "oh so awesome" cool fall days. Since I have been trying to stay inside and take advantage of some creative time, I thought I would stop by and share with you a fun idea for using word strips. I don't know about you, but I love using word strips for journaling, but sometimes there just isn't enough space on the page to fit the ones I want to use. Another creative way to use word strips is to substitute them for other traditional elements. For example, on this page I used a word strip for my subtitle and also used them to create a frame for my photo (click on layout for full credits): The word strips that … [Read more...]
Create Sketches for Mail Art using Digital Designs
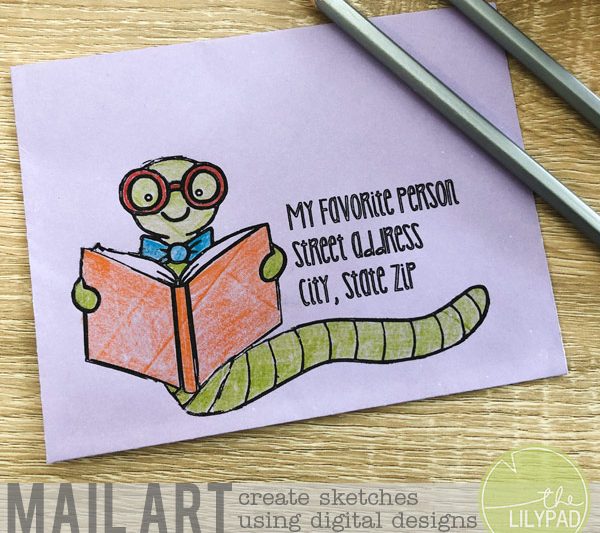
Hi scrappy friends!!!I don't know about you, but I absolutely love getting happy mail. I love sending mail to my friends, too! If you like sending personalized cards and letters, I have a great tutorial for creating mail art envelopes that are sure to delight the recipient.For creating this mail art envelope I used Bookworms Illustrations by Kate Hadfield, Silhouette Cameo 3, Silhouette sketch pens and KG Skinny Latte font.To create mail art like this:-First, create a file the same size as the envelope you'll be using in Silhouette Studio.-Type the address of the recipient using your favorite font. (I didn't use a real address for this tutorial for privacy reasons :))-Copy and paste a digital file into Silhouette Studio. Digital stamps and doodles in SVG or PNG format work best for this.-Next, you need to trace the digital image. Open the Trace … [Read more...]
White Textured Backgrounds in Photoshop

Hello all my artsy friends! I'm dropping in today with a quick tip for creating textured white backgrounds for your digital scrapbooking pages. Are you in love with pure white backgrounds? If you take a look at my Gallery you will see that most of my pages are created on some type of white or white-ish background. I love the pop you get from the contrast between the white background and colored elements - especially bright colors. However, sometimes I get a little bored with smooth backgrounds and want to add a pop of texture to them. One quick and easy way to do this is to use a blocked template with white papers for the background and add elements on top. Take a look at this layout for an example of this technique: See the pop of texture you get with the layered white papers? All I did was use a blocked template and clipped different white … [Read more...]