Word Art Fixes
Hello all my artsy friends! I hope everyone is enjoying this Month of Challenges and getting some inspiration for your January scrapping. I’m just dropping in today with a couple of quick tips on adjusting digital word art to fit in with your page design.
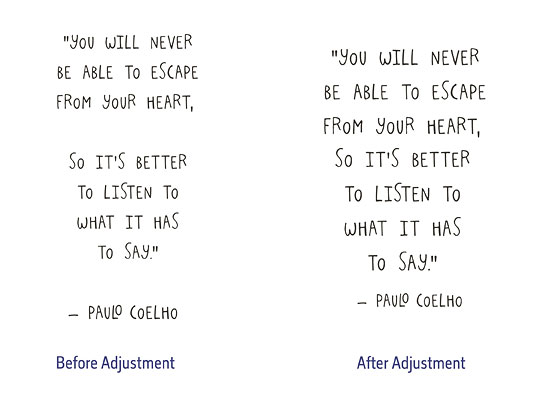
For example, take a look at the word art I used on this page:

I grabbed the quote from Paulo Coelho at the top of the page from Lynne-Marie’s Muse Word Art set, but it didn’t quite fit in the space where I wanted to place it, so I had to make some quick adjustments. Basically, the spacing in the word art made it too long for the space, so cut it up and moved the sections to delete some of the extra space between phrases. I could have simply made the entire quote smaller, but I like the font size in the original piece of word art. Here is what the word art looked like before and after the adjustment:
Here are the steps I took to make the adjustment in Photoshop:
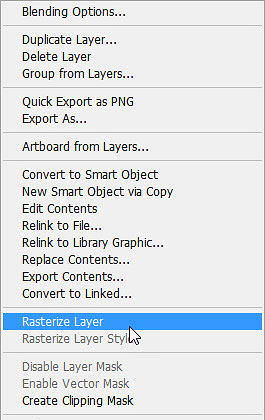
Step 1. Rasterize the word art layer. You can easily do this by right clicking on the word art layer in the layers palette (not the thumbnail of the image) and choosing “Rasterize Layer” from the pop up menu.
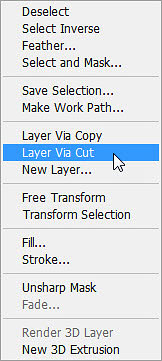
Step 2. Use the rectangular marquee tool to select the first section of text and move it to its own layer. Once you have the section selected, Right>Click inside the selection and choose “Layer via Cut” from the pop up menu. I also selected and cut the second section of the word art and put it on its own layer using the same steps. That left me with three separate sections of the original word art.
Step 3. Now all I had to do was move the sections closer together by activating each section in the layers palette and nudging it with the up and down arrows. Once you have everything where you want it, I suggest that you either merge the layers back together (activate all the layers in the layers palette, right click on one of them and choose “Merge Layers” in the pop up menu), or link them (activate all the layers in the layers palette and click on the Link Layers icon at the bottom of the layers palette) so that they are not separated if you find that you need to move the word art later.

The second trick I used on my layout was to selectively color one of the word art pieces. You will notice that the Empower Your Muse has been recolored to dusty teal and peach. Here is what it looked like before and after the recoloring:

Here are the steps I took to make the adjustment in Photoshop:
Step 1: Rasterize the word art layer. You can easily do this by right clicking on the word art thumbnail in the layers palette and choosing “Rasterize Layer” from the pop up menu.
Step 2: Use the polygonal lasso tool to select out the word(s) you want to recolor. In my case I selected the word “Muse.” Right>Click inside the selection and choose “Layer via Cut” from the pop up menu. Now the word(s) should be on its own layer in the layers palette.
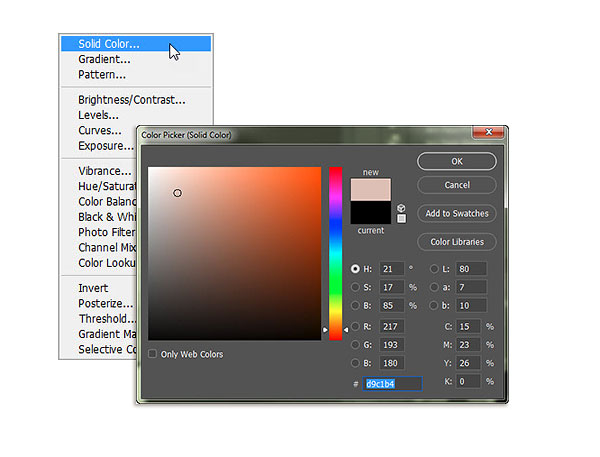
Step 3: Add a Solid Color adjustment layer to each of the word art layers and select your color of choice for each layer. Be sure to clip the color adjustment layer to the word art layer (or the color adjustment will apply to every layer below it). Choose Solid Color from the pop-up adjustments menu (the icon looks like a half-filled circle and is located at the bottom of the layers palette in Photoshop). When the color picker box pops up, you can use the eye dropper tool to choose any color on your layout or choose one within the color picker box itself. I clicked on colors in my layout so that the word art would coordinate perfectly.
And that is all there is to it! I hope you find these tips useful as you are creating this month (and beyond). 🙂
Until next time ~
Judie (HeyJude)


