I can’t get enough of planner stickers! Last month I showed how to make planner stickers from digital supplies. While I really enjoyed my stickers I was getting a little frustrated with having to hand cut out each sticker out. I knew my silhouette machine must be able to solve the problem. Today I have tutorial showing you how to “kiss cut” your stickers and create a sticker sheet on your silhouette machine.
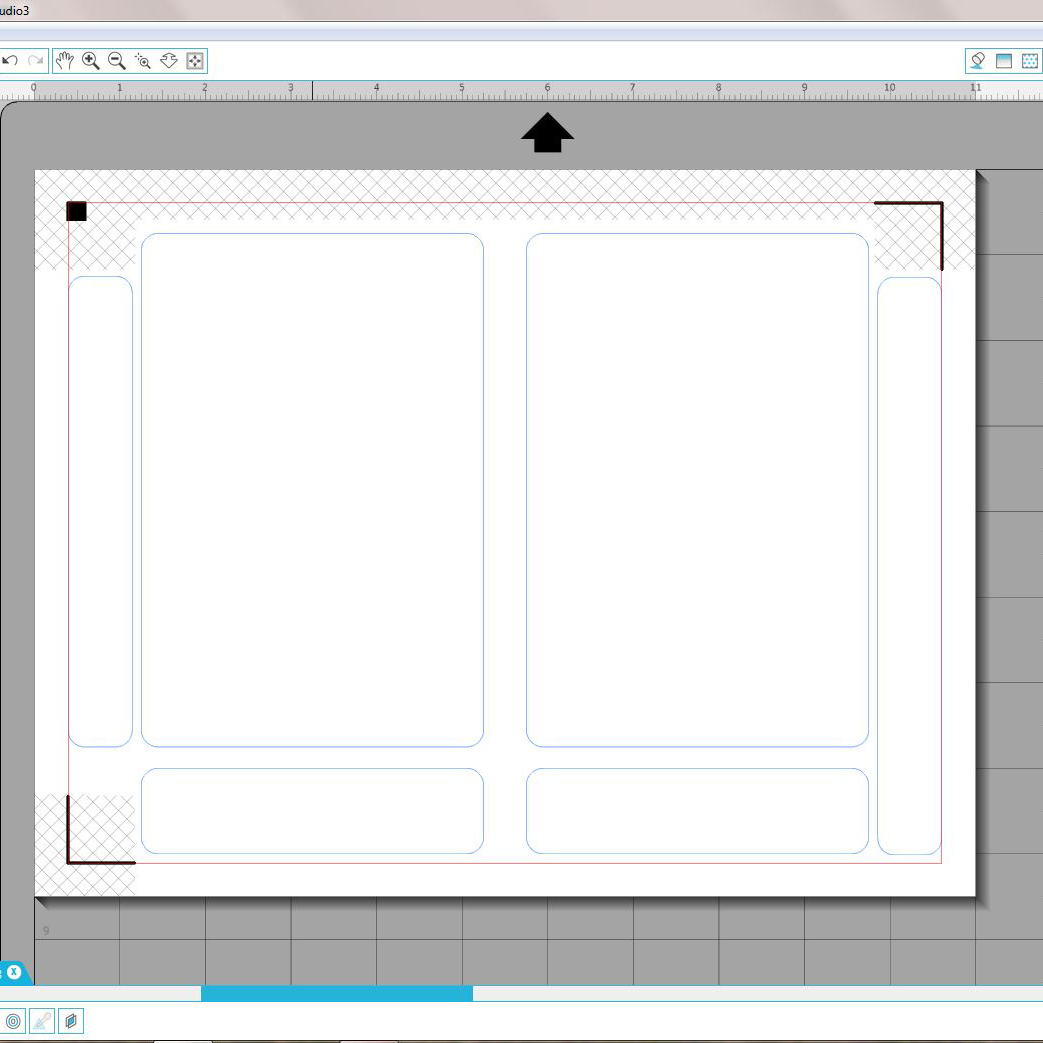
1. Open up a blank document in your silhouette software. Determine the size of sticker sheets you want. Create your sticker sheet using the rounded rectangle tool. I chose 4″ x 6″ for my sticker sheets. I also added a few thinner rounded rectangles to fill in the spaces around my sticker sheets. I did this so that I don’t waste any of my sticker paper.
2. Select all of your rounded rectangles. Go to the line color window at the top of the screen. Change your line color to something other than red. This will help you differentiate your sticker sheets from your stickers.
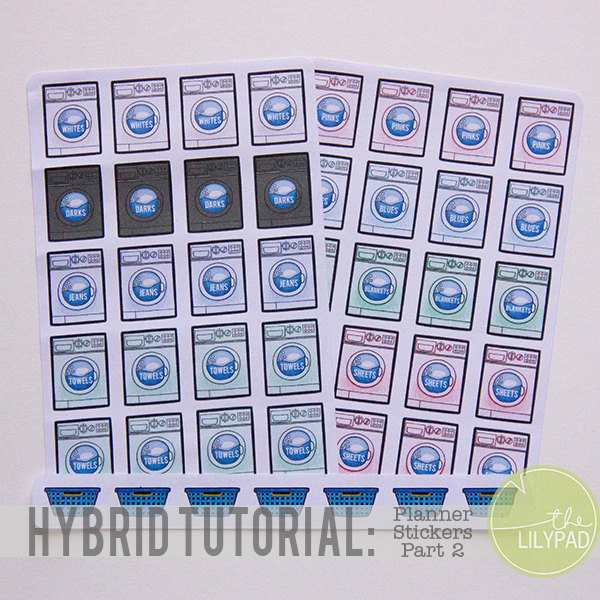
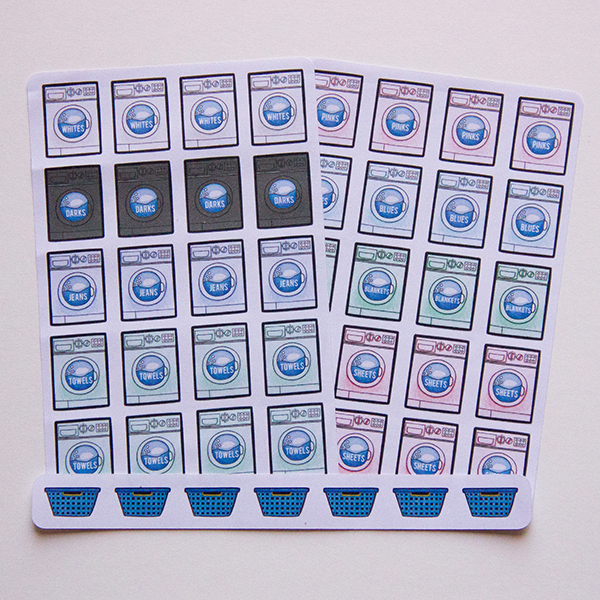
3. Fill your rectangles with digi elements that you can use in your planner. I used Wash Day by Kate Hadfield to create some fun laundry stickers. Be sure to trace your elements as you go! Tip: Do all your tracing and resizing off of your mat, then drag your elements onto the mat to fill in your sticker sheets.
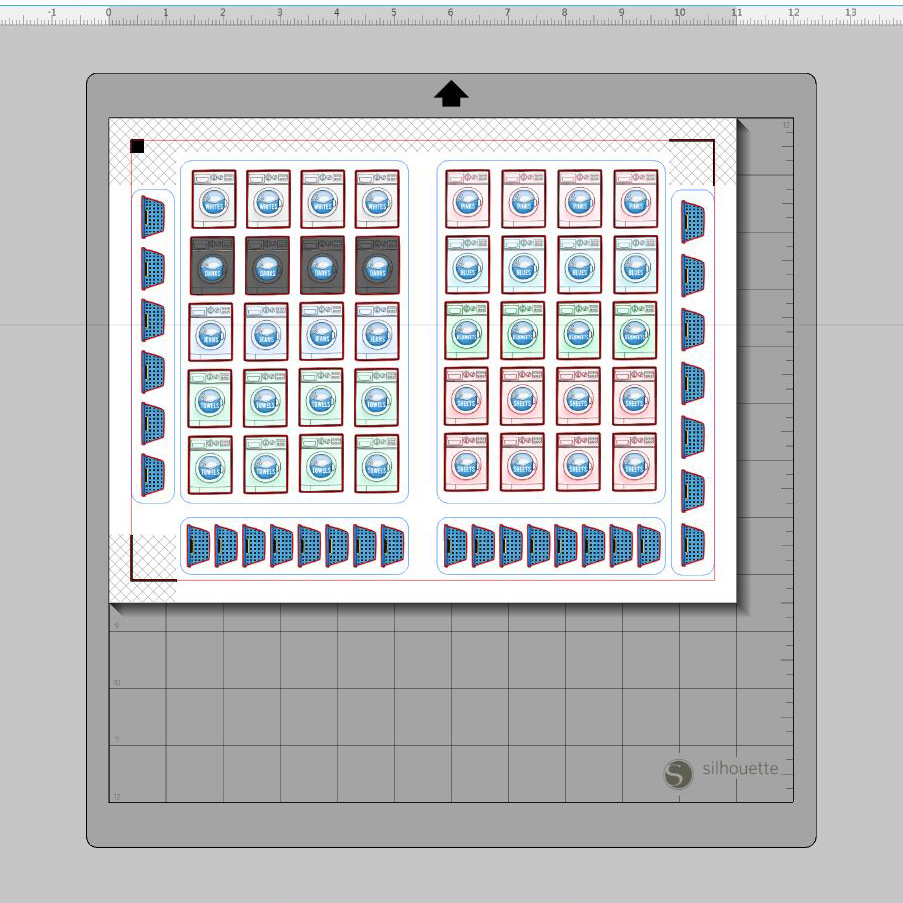
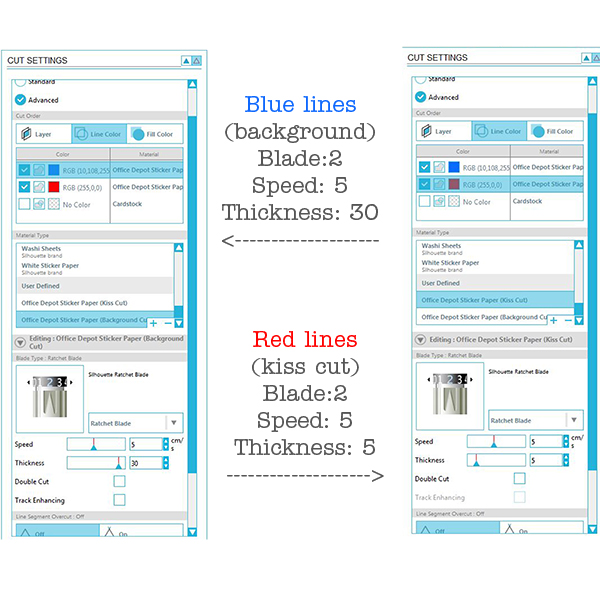
4. Now we are ready to cut. We are going to create cut settings that instruct our cameo to cut differently for our stickers and sticker sheets. First, go to cut settings and click on the advanced button. Then click on the line color tab. Click on the color that you chose for your rectangles. Change the material to cardstock. Change your ratchet to 2. You may also need to adjust your speed and thickness but that depends on your machine. These settings should cut through your sticker paper creating the sticker sheet(background) for your stickers.
5. Click on the color you chose for your stickers. Change your material to sticker paper. Change your ratchet to 2. You may also need to adjust your speed and thickness for this too. These settings should “kiss cut” or very lightly cut the sticker material without going through the background material.
6. Below is a screenshot of my settings that you can try. I did adjust my speed and thickness for both the sticker paper and cardstock.
7. Print your stickers on white sticker paper.
8. Prep your cutting mat with your stickers and cut!
9. Peel your sticker sheets off the mat. Below is a photo with the excess sticker paper being peeled away from my sticker sheets.

10. One additional step that seem people enjoy is weeding their stickers for ease of peeling. Weeding means to take the excess sticker paper from around the stickers. I choose not to weed my stickers and they are still easy to peel off. Below is an example of weeding. The top stickers have been weeded and the bottom stickers have been left alone.

You now have beautiful stickers to be used in your planner!
I hope you have enjoyed this tutorial and found it useful! Be sure and share any planner stickers you make with us! We love to see your creations in TLP gallery!
Love these Jewelle!!
where do you get your sticker paper? Brand, etc?
There are several places you can get sticker paper from. Silhouette sells sticker sheets. I’ve also bought the Avery brand of sticker paper from my local craft store. I’ve noticed lately that both of these are pretty pricy, so I was on the hunt for different paper. My favorite that I have been using lately is the full sheet or half sheet white labels from my office supply store. Avery has a brand, but I bought the office supply brand because it was cheaper. It works nicely! I also know you can go to amazon and search sticker paper. There are different brands on there you could try. I hope this helps and I apologize for not seeing your comment sooner!
Oh how fun! Santa gave me some sticker paper, but I haven’t use it yet. This will be SO helpful when I finally do use it, so I don’t mess it up! :)
Karen I would highly suggest that the first time you try out sticker paper you do a small row as a “test cut”. I can’t tell you how much sticker paper I wasted until I got smart and started test cutting.
Thank you so so much! I just bought a used Cameo yesterday. I was playing around with it and the stickers didn’t cut. I did some research and found out it was the thickness. I have searched and searched and you are the only one who had a general suggestion for the kiss cut. I will try this! Hopefully it will cut this time! Lol.
this is a great tutorial thank you so much. I wish I had found this earlier.
thank you thank you thank you!!!!
I’m glad you found it and find it to be helpful :)
i’m so excited to see your awesome tutorial- can’t wait to print & cut my own planner stickers!
Is it possible to cut stickers with a Silhouette, but without using a mat?
I have never tried to do this without a mat. I cannot say whether it is possible or not. Sorry!
Such a helpful post. I have learned a little through trial and error, but I am asking my Silhouette to make two different cuts at the same time. Can all that be done with one cutting even if the blade numbers differ?
If you look up at my screenshots above you will notice that the blade is set the same as well as the speed. I only changed the thickness on some of the cutlines. This tells the machine how hard to press on the material to cut. If the thickness is a lower number the machine won’t press as hard thus the cut won’t be as deep on the material. So essentially you are only asking your machine to cut at different thickness which it is perfectly capable of doing. Let me know if you have any more questions about that!
I just wanted to say thank you for these instructions! I haven’t been able to kiss cut to save my life! The thickness setting was my issue. I used the settings you had screenshots of and it worked perfectly. Thanks again!
I’m so glad you found these helpful!
I was just wondering which mat you are using and if you have a general preference on which mat works best for kiss cutting stickers?
I have only used the Silhouette brand mats. Since I haven’t used anything different I can’t really say I have a preference. But the Silhouette mats worked just fine for me.
~Jewelle
For some reason I tried these settings, and I am using Avery sticker labels (8 1/2 x 11) to cut on, and all of a sudden when I use these settings it is cutting all the way through the paper on all my cuts. (I am doing a very similar kiss cut sticker project with a border and kiss cut stickers inside). I tried first before I tried the two different colored lines method of cutting to just adjust my settings for the kiss cut part to what you had suggested for yours, and it went just fine. Then when I added in the border, it all went haywire and cut everything through the paper so I just have a bunch of stickers.
ALSO I hope you might be able to help me with this – when cutting the straight borders on my sticker sheets, the Silhouette Portrait starts to cut them at an angle. I adjusted the speed down on the borders a little bit but it didn’t seem to help. AND, I can’t get registration marks to work! I need to print about 100+ sticker sheets so I need to have these be very uniform.
So far this machine seems like a bigger waste of money, but I hope to figure it out. Thanks in advance for any and all help you can provide!
I’m having the same issue with my Avery Label paper. I have tried all kinds of different settings and it still goes all the way through OR drags and makes a big mess! If you find something that works I’d appreciate it if you would share the knowledge! CindyJadeRD@gmail.com
If you add anything to your images after you have defined your cut settings, it will cause your cut lines to go “haywire.” You need to go back and readjust your cut lines in the cut settings box.
Im wanting to start making my own sticker sheets and was looking at buying the silhouette, I was wondering…does the silhouette print AND cut? Or do you print on your home printer first and then transfer to the silhouette? Im just trying to figure out how this works….What all do I need to START making my own sticker sheets?
The silhouette does not print. The silhouette reads registration marks that you have printed an your paper to cut out the designs that were also printed on the paper. To start making your own stickers you would need a cutting machine, a printer, and sticker paper. Those are all the physical supplies you would need.
you need to print on your printer first and then transfer your page to silhouette
I’ve been trying to get a perfect kiss cut and always have issues—thank you for sharing your technique and your settings, it’s worked perfectly!
Your welcome!
Hi!
Hoping you might be able to help me with registration marks. I’ve only ever been able to use the factory default settings.
Whenever I use someone elses studio3 file that has reg marks and cut settings all ready to go – my cameo won’t cut.
I hope this makes sense – it’s been bugging me since day 1. I lose so much space and have to redo everything I download!
Thanks :)
Hi Nicky!
It is hard to say from your description exactly what the problem is. One thing you might check is if your printer is cutting off part of the registration mark when you are printing with the extended marks. This happened to me with my first printer. Unfortunately some printers don’t start printing as close to the edge of paper as needed to use the extended registration marks. Give it a try and see if that helps.
this was so helpful! thank you for sharing!
Thanks a lot for sharing those infos, I wasn’t sure about how to set up the cutting thickness of stickers.
I’m not sure how to word this so hopefully it makes sense:
When you’re cutting the stickers and then cutting the sticker sheets, do you have to physically change the blade in the cutter? Or it just goes deeper automatically?
Thanks.
Thank you SO MUCH for sharing this information! I was having a very hard time figuring some of this stuff out on my own, but now I’m able to make sticker sheets without a problem. Again, thanks so much for sharing this info <3