Background stamps
Using background stamps can add a little extra oomph to your page. Whether you use a single stamp or multiple stamps to create your design, it is a little touch that can impact your page in many ways.
The TLP store has a multitude of stamps to choose from. You can find the stamp section HERE. When using a stamp, it is a flat product that can be resized, recolored and/or textured. You can layer multiple stamps together. Dimension can be added to stamps by applying a style to them. One of my favorite things to add to a stamp is a gesso or paint style such as Gesso Paint Styles or Metallic Paint Styles by Mommyish.
When using a background paper, a texture or pattern can be stamped onto it, creating a tone-on-tone effect (choosing a color for the stamp that is close to the background paper color) or you can create a colorful stamped pattern to compliment your photo or color scheme of your page.
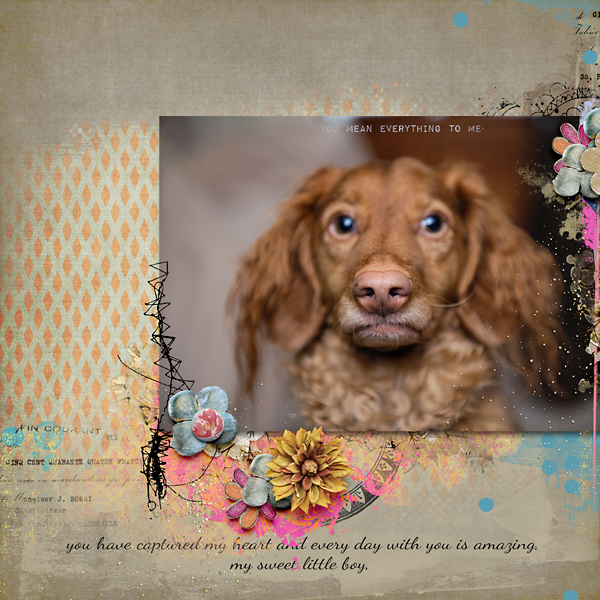
For my sample page, I created an inverse mask (hold ALT key while clicking onto the mask icon at the bottom of the layers palette in Photoshop), with a brush I then stamped the patterned paper overtop the background paper. Then I stamped along the right edge with a variety of stamps, to create a border to draw your eye toward the photo and then travel downwards to the stamped clustering along the bottom of the photo. I enlarged a stamp to stamp a light colored texture to the background paper at the bottom, then I duplicated the layer and dragged it upwards to the top of the page and reduced opacity to blend it in, reducing visibility, so the texture is only slightly visible. At the top right and bottom left side I added a text stamp.
If you create a grouping of stamp layers that you wish to use again, open a new transparent file, I prefer to arrange in tile fashion (window, arrange, tile vertically). With the stamped layers highlighted, drag those layers onto the new transparent file, then name and save as a psd file. Then you can open it anytime and use some or all of your stamp layers in future page designs. You may wish to include elements and paper pieces with your stamped layers also.
For a faded look to your stamped background or to eliminate or reduce the visibility of an unwanted area of your background stamping, you can select the erase tool and a texture brush set to low opacity, and lightly erase some of the stamped design, or you can create a layer mask and use a texture brush to remove some of the design (which is what I did in my sample page, to remove a bit of the text from the left side).
The possibilities are endless and so much fun. I hope I have inspired you to start stamping!