Hi everyone! Sarah, here with another installment of Simply Hybrid. This month I’ve created a greeting card, starting simple and then each step adding one or two elements to showcase a variety of different looks based on the same original card.
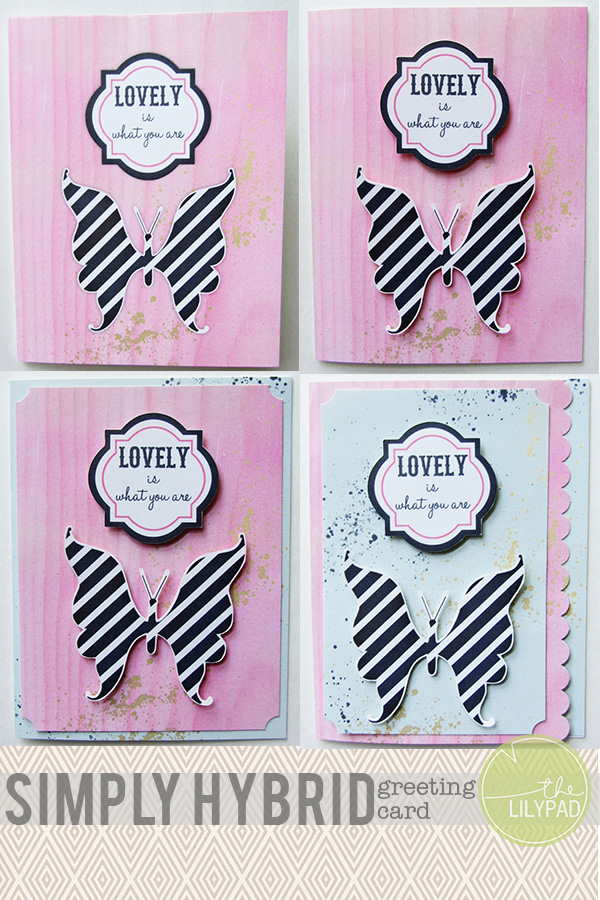
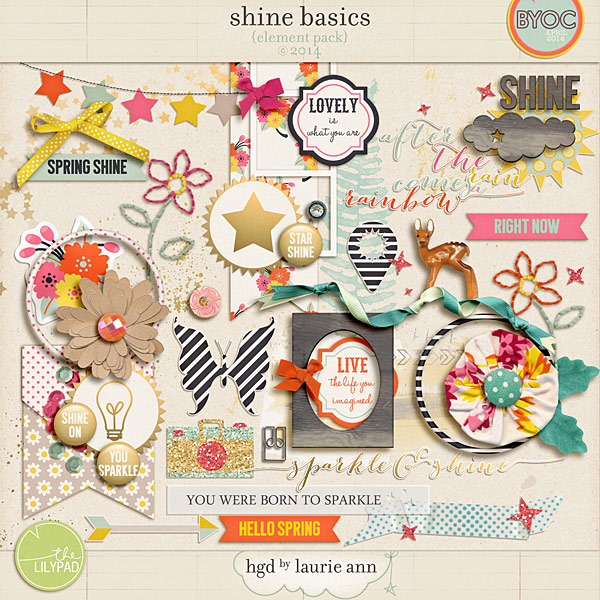
I chose Shine by Laurie Ann to use for this card. My starting point is almost always something that stands out to me in the preview and in this case it was the label that reads “Lovely is what you are.” in the elment pack and the woodgrain paper with the paint spatter in the paper pack.

When I need a fast, simple card, I’m always amazed at the impact placing a patterned paper and a couple of elements on a card front and printing it off as a single piece piece. For this card I set up a canvas of 5.5″ high and 8.5″ wide, this is the same as half a sheet of letter paper which folded in half is 4.25″x5.5″ and is a fairly standard size for homemade greeting cards. Next I placed the pink woodgrain patterned paper on the right half of my canvas (making sure to leave the left side blank) and placed the elements where I wanted them. I added a light shadow to the elements and the printed my card landscape on sheet of letter size cardstock (I used Neenah Bright White cardstock). After the card was printed I cut out the card in the original 5.5″ x 8.5″ size, making sure to trim around the edge of the pink paper on the top, bottom and right side, but leaving left hand side, which will become the back of the card, attached. Next I folded the card in half leaving me a 4.25″x5.5″ card.

For my next card, I started with the same base, but instead of placing my elements on the base, I printed them off separately and cut them out. Once my card base was printed, cut and folded in half, I placed each element on the card with a couple of foam dots to give the card a little dimension.

Next I decided to make may card base blue instead, and placed a couple of the paint spatters included in the kit on the card front. When I printed my elements I also cropped the pink woodgrain paper a half inch smaller than the card front (in this instance 3.75″x5″) and printed the pink woodgrain rectangle as well. I then took a decorative corner punch and punched each corner of the pink woodgrain paper and adhered it to the card once it was cut and folded. Again I placed the label and butterfly on the card using pop dots.

For the last card I began again with a blue base, but this time I cropped the pink woodgrain paper to the same size as the card front (4.25″x5.5″) and punched the edge with a scalloped border punch before adhering it to the card. I also cropped a piece of the blue paper (with the same added on paint spatters as before) to place on top of the scalloped woodgrain paper (for this card I cropped it to 5″x3.5″). I used the same corner punch that I used in with the previous card to punch each of the corners before adhering it to the card. Again I placed the label and butterfly on the card using pop dots.

I love how you can get such a variety of looks just by adding a little bit extra on each card. Hopefully this inspires you to make your own hybrid greeting card. Be sure to post if you have any questions about any of these steps. I look forward to seeing your hybrid projects!
[…] Simply Hybrid: Greeting Card – 1 freebie(s)? […]