I’ve been a pocket scrapper since 2012. In the almost three years that I’ve been a pocket scrapper I have probably collected thousands of digital journal cards and I don’t use nearly as many as I have in my stash. I’m always looking for new fun ways to use my collection of journal cards and I thought I’d share with you some hybrid mini albums that I’ve made recently using some of the awesome journal cards available here at The Lilypad.
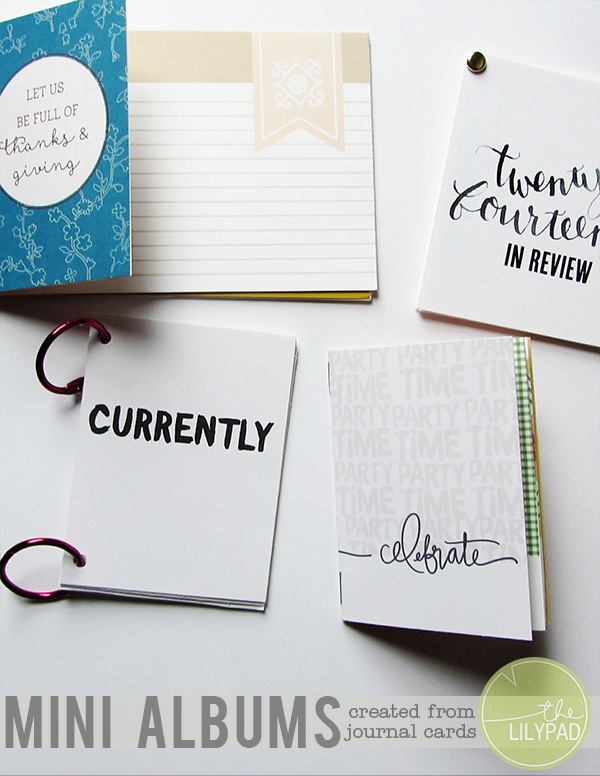
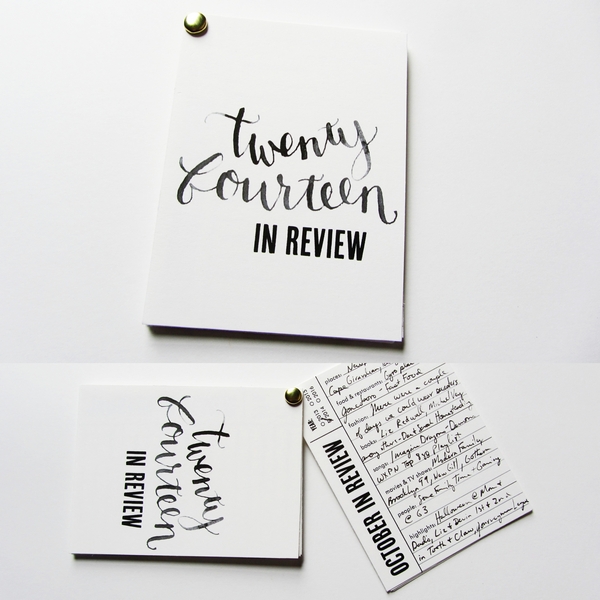
For this first one I printed out each of the cards from the Month in Review Cards pack from Designs by Lili. I also printed the Twenty Fourteen Journal Card freebie from Paislee Press to use as the cover. I cropped the In Review from one of Lili’s cards and placed it on the cover as well to tie it in with the rest of the album. Once each card was printed, I trimmed them with a paper trimmer, punched a hole in the upper left hand corner and bound everything together with a standard brass brad from the office supply store. These cards were printed one sided so on the opposite side of each card it might be fun to add your favorite picture from the month.
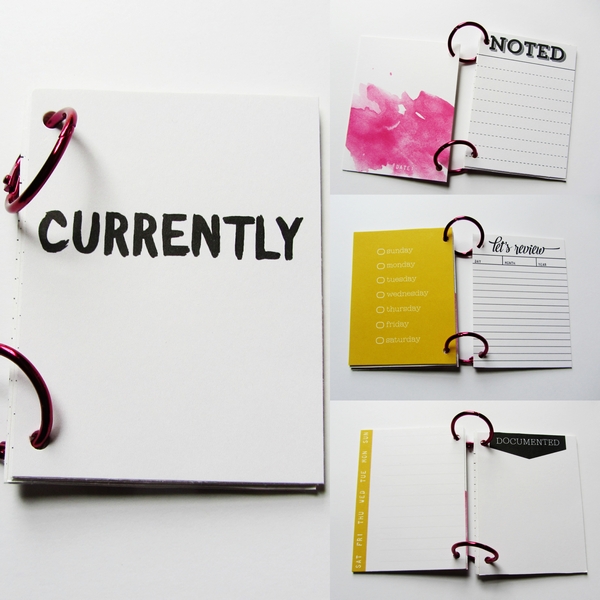
For this next album, I printed quite a few of the cards from Carded v.7: Noted by Allison Pennington. These cards will make such a fun space to write about my day to day life. Once I cut the cards out I adhered them back to back and punched holes on one side so I could add the book rings. Using book rings affords me the ability to add more pages as I run out of space. I love the idea of creating a thick little mini album like this to document a trip or event.
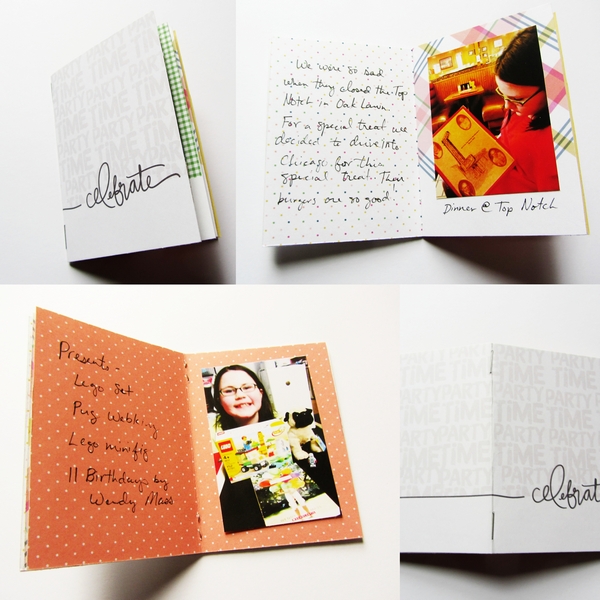
Speaking of which, how about a sweet little booklet to record an event? I created this one using One Little Bird’s Fete Journaling Cards and Scrapbook Kit to document my daughter’s 11th birthday for her. To begin with I used one of the 4×6 journaling cards for the cover and placed it in the center of the top half of an 8×10 canvas. I then created another page by placing two 3×4 journaling cards next to each other and placed these in the center of the bottom half of the same canvas. I printed these out and again using an 8×10 canvas I picked two background papers from the kit and placed one in the top half and one on the bottom half and printed on the reverse side of page with the journaling cards. This way I could make sure that the back of each 6×4 area was completely covered with background paper. I repeated this process again using two 3×4 journaling cards for each page and printing background paper on the back. Then I cut out each 6×4 area and folded them in the center. To bind it I laid it flat on a standard office stapler and stapled the spine at the top and bottom. I found with the four sheets of cardstock I had no issues going through all the pages. Once I had it printed and bound I added photos and journaling so that my daughter can remember this special day.
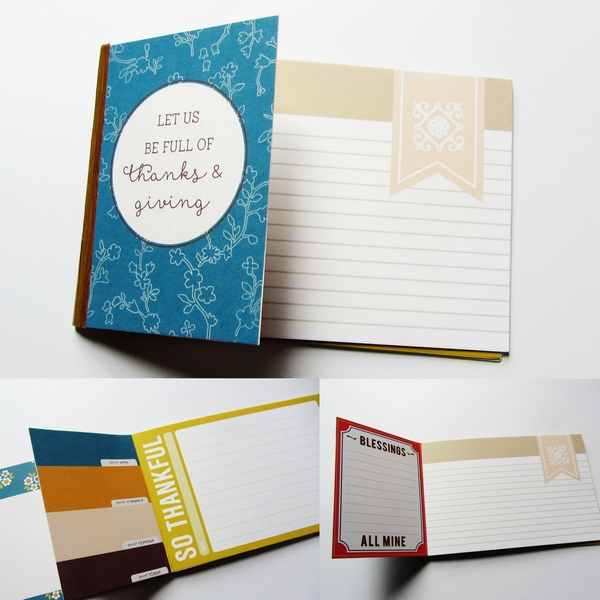
For this last album I used the new Memory Pockets Monthly Kit, Gather, to create a small gratitude album. I used the back to back bookbinding method (check out this video by Heidi Swapp for a really awesome demo of the method) to put the album together. I printed a 3×4 card to use as the front cover and a 4×6 card to use as the back cover. For the inside pages I placed a 4×6 and 3×4 card next to each other on an 8×10 canvas (you can fit two on each page longways this way). I did this a few more times making sure to alternate which side of the 4×6 the 3×4 card is placed so that I had an equal number of pages in both orientations. This album is printed out single sided as well. To bind the book together you fold each page at where the two journaling cards meet and glue the back of the first set of pages together matching up the backs of the 4×6 cards (make sure your 4×6 card is the one on the right of the front page, and on the left of the back page) add more pages in matching 3×4 back to back and 4×6 back to back and then adhering the front and back covers once you get the rest of the album bound together. Of course, you can make an album using the same sizes of cards on both sides and the square pocket cards are really fun for this method as well. I finished my album by covering the spine with a piece of washi tape to make it look neater. I think this will be an awesome place to record my blessings this month.
Hopefully this inspires you to create some mini albums out of your stash of digital journaling cards. If you do, make sure you upload them to the Hybrid Projects gallery. I’d love to see your creations!

These are all so awesome Sarah! I really want to make one now! I love the recently album and the gratitude one too!
Those are wonderful. And so inspiring!
Love these Sarah! Clever and creative. A great gift idea.
These are FANTASTIC Sarah! Great post with awesome inspiration!
wow these are amazing! so inspiring and fantastic!
Love the back to back method! So easy!
— Dalis
Love these. I need to use more of my cards and this is perfect.