Felty Fall Crafts for Kids
If you have little ones, or will be entertaining a younger crowd for Thanksgiving (or any holiday), you know the importance of keeping little hands busy. Otherwise they poke anything within reach, weave underfoot while you’re dicing and stirring, distract you until the pot boils over, and so on. You get my drift. I have three boys preschool age and younger, and I’ve come up with a few ways to hopefully keep them entertained while I cook Thanksgiving dinner this week. The first project I made a dozen copies for a busy bag swap and it was a huge success. The second I whipped up in just a few minutes on a whim. Both are easy, and best of all, require no sewing!
To get started, you’ll want a large pack of felt sheets in assorted colors. I bought mine at Michael’s and Hobby Lobby, but if you can’t find a variety pack, I used red, green, white, yellow, black, brown, and tan. The only other “tools” you need are sharp scissors, a permanent marker like a Sharpie, a hole punch (Crop-a-Diles work great), a pen or pencil that will draw on the felt to trace your shapes, and gallon-size Ziploc bags to store it all!
Felt Pizza
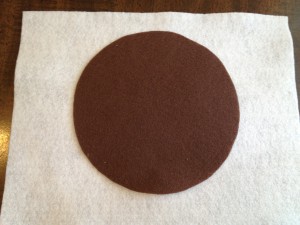
Step One: For the crust, use a brown or tan sheet and cut out the largest circle you can fit on there. If you are geometrically challenged like I am, find a bowl or plate to trace around.
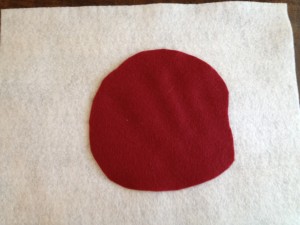
Step Two: For the sauce, take the red sheet and cut out a rough, free-hand circle slightly smaller than your crust. This is where a little wavy unevenness is good, it adds to the authenticity!
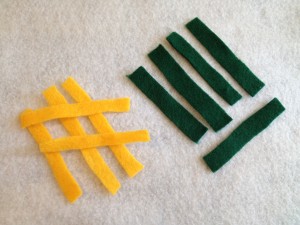
Step Three: To make the green peppers and cheese, cut thin strips (roughly 1/4 to 1/3″) the length of the sheet, then snip into pieces about 3″ long. I chose to make my cheese a little thinner and longer than the green peppers to differentiate them a bit.
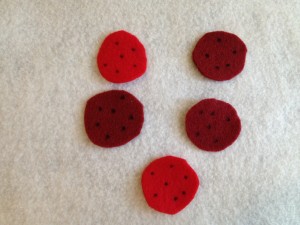
Step Four: Grab those red sheets again, and start cutting pepperoni, approximately 1 1/2″ circles. I actually used a different shade of red for my pepperonis than for the sauce, but it doesn’t matter. If you prefer a more uniform look, you could trace your circles before cutting them out, or if you happen to own a 1 1/2″ circular punch, try using that to quickly punch your circles. After the pepperonis are cut out, use the Sharpie to dot 6-7 times to create that signature pepperoni look.
Step Five: More circles! For olives, use a sheet of black felt and cut circles between 3/4″ to 1″ across. Then grab your Crop-a-Dile or hole punch and punch out the center of each “olive.”

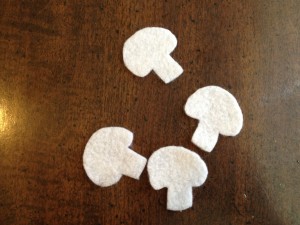
Step Six: Time for mushrooms! I left the worst for last. To make my mushrooms, I drew a vaguely mushroom-like shape onto paper and cut it out, then used that as a template to trace onto white felt. These were a little trickier to cut out, but not bad.
And that’s it! Dump it all in a Ziploc-type baggie and let the kids go to town creating their pizza masterpieces.
Now, if you really want to take this craft to the next level, how about printing off a few “menus” and giving your little waiter or waitress an “order book” to take down those orders? I’ll even give you the menu template I created! I used the same template several times and kept altering the amount of each ingredient to create eight different menu sheets. Older preschoolers can practice counting and matching while following the menus, while the littlest ones can just enjoy sticking the ingredients on.
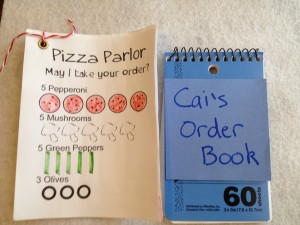

Download here. Feel free to add color before printing and customize however you like; I was out of color ink when I made mine, so I printed in black and white and just colored in the pepperoni and green pepper by hand. I printed four to a sheet and then glued the pages together, punched holes in the corners, and bound them together.
For the order book, take a little memo book and decorate the front cover. You could go super-simple (like I did) or get fancy and dig out your digi supplies to decorate a cool cover.
Felt Tree and Leaves
This one is much simpler, and more fall-inspired. We are doing a “thankful tree” at our house this month (taped up a big kraft paper tree to the wall, and adding paper “leaves” every day with things we’re thankful for), and I thought my sons would enjoy a felt version to play with while mommy cooks up a storm this week.
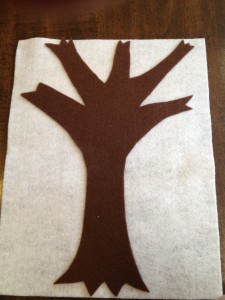
Step One: Draw a tree on a sheet of brown felt. Make sure the limbs are nice and thick. Cut it out. This is what I came up with (and since I can’t draw worth peanuts, I’m sure you can do even better!):
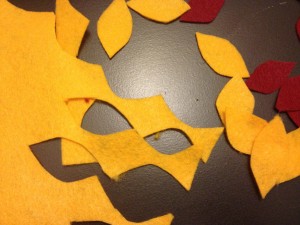
Step Two: Cut out a bunch of leaves in different colors of felt. This is a great way to use up all the leftover scraps from the pizza-making. I started with typical “leaf-ish” colors – dark red, green, cream – but quickly decided it didn’t matter and added blue and bright yellow. I decided on five leaves per color per child, but you can do however many you want. Or until your wrist falls off from cutting.
And that’s it! You could certainly go the extra mile and draw lines down each leaf to simulate veins, or add other bits like felt apples, acorns, etc. The sky’s the limit! I plan to also give each child a full sheet of felt to place their tree on while playing with it, so it doesn’t slide around the table too much, and give a sort of “background” for “falling leaves.”
Hope you’ve enjoyed this crafty little deviation from scrapbooking! If you have any more clever ideas for felt activities, or any other quick-and-easy busywork activities, please share with us in the comments or in the forum. I’m always looking for fresh, fun ways to entertain my kiddos!
Happy Thanksgiving to my fellow Americans this week!