Photoshop Shortcuts: Font Edition
There are so many Photoshop Shortcuts out there. At some point every year I download and print the massive Keyboard Shortcut list that Adobe puts out with each new version of Photoshop. I read them all and optimistically try to implement them into my workflow but I never stick with it. They just seem too daunting and I can rarely remember them so I always end up giving up and using the slow method of using the menus. There are some shortcuts, however, that I do use on a regular basis. Today I thought I’d share a couple text related shortcuts I use.
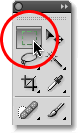
Drag Selection
The first thing I do when I want to start using the Text tool is to use the Rectangular Marquee tool to draw a text box. You can find your Rectangular Marquee tool on the Side Bar. It looks like a dotted rectangle.
With the Marquee tool, you can click and drag out your text box. If you want it to be a perfect square, just hold down Shift while clicking and dragging. Quite often after I’ve created my text box, I want to move it to a new location and then change its size. However once you release the mouse, you can move your text box, but you cannot resize it. You have to erase it and create another one.
Shortcut: If you drag out your text box (do not release the mouse yet) and now hold down Spacebar, it will let you drag the undefined selection to a new location and once there, you can resize the box.
Browse Fonts
Once I have my text box and have typed my journaling, I quite often want to view my journaling using some other fonts to determine which one looks the best. I used to go up to the Font Toolbar and go up and down the font list choosing different fonts to preview which one is the best. Not anymore.
Shortcut: You can test your fonts easily by selecting your text, then clicking your mouse in the Font Family box (seen in blue in the below diagram). You can now scroll up and down the font list with your mouse and preview how the fonts look in your layout.
![]()
Scale Font Size
Once I’ve chosen my font, I quite often want to resize my journaling. I used to select my journaling and then go up to Font Size in the Text toolbar and try various sizes until I found the right one. This was so frustrating. I now have a much easier method.
Shortcut: Select the text you would like to resize and then place your cursor over the Font Size tool like the diagram below. You can then pull your mouse to the left to make your font size smaller or to the right to make your font size bigger. Alternatively you could select the text that you want to scale the font size, press Cmd (Ctrl for PC users) + Shift + > or < to increase / decrease font size.

Applying Text
Lastly, I always hated that I couldn’t simply approve and escape text editing mode by pressing the ENTER button rather than having to click that darn check mark every time.
Shortcut: Just press CMD (or Ctrl if on PC) + ENTER and you exit out of text editing mode. Easy peasy.
I hope you’ll find the above shortucts useful to your workflow. If you know of any other great shortcuts, please let me know in the comments.
Tiki