Ghosted Titles in Photoshop
I hope everyone had a fabulous holiday weekend! I’m dropping in today with a quick tip for creating the look of ghosted titles in Photoshop. A ghosted title is one that is made to blend in with the background paper with a very subtle effect. Take a look at this page, for example:

Notice the ghosted title “Beacon of Hope” on the background? I created it with just a couple of quick steps in Photoshop (or PSE) with an outer glow style.
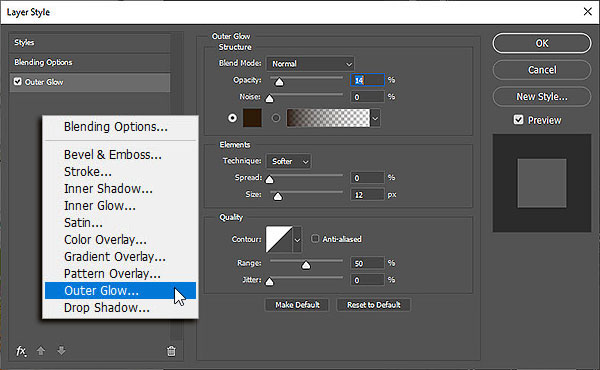
Start by using either a block-ish font or a digital alpha. (I used a digital alpha on my page.) Create your title (or just background words) and then merge the letters together on to one layer in the layers palette. Now clip a copy of the background paper to the merged letters. The letters will disappear when you do this. However, never fear because you can quickly make the letters reappear by applying an outer glow style to the letter layer. You can see the settings I used below. The opacity setting will vary depending on the color of the background paper and how embedded you want the letters to appear. Because I was working with a white background, I set my opacity fairly low. You can also adjust the size of the outer glow to make the letters more or less embedded.
Why an outer glow as opposed to a drop shadow? Because the outer glow shows on all edges of the letters. A drop shadow will only show on certain sides depending on the angle you set. Keep this in mind the next time you want a lift on all sides of an element (or paper). I often use an Outer Glow style when I stack background pages and want a shadow to appear on all sides of the paper.
I hope you have fun playing with this technique!
Until next time ~
Judie (HeyJude)


