Digitizing Sketches
Hello all my artsy friends, and congratulations on making it through the first week of MOC 7! If you haven’t started on the daily challenges yet, no need to fret – you still have the rest of the month to complete them. 🙂 I hosted an Inspiration Board Challenge this weekend that included a sketch and I thought I would show you how to digitize hand-sketched works to include on digital pages by sharing two techniques with you.
This is my sample page for the Inspiration Board Challenge:

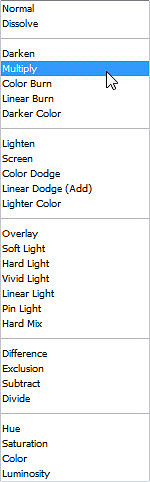
The sketches in the frames are just photos of the sketches (you could also scan your sketch if you want to). The larger sketch is blended into the background paper with the Multiply Blend Mode. It worked perfectly with the background paper on this page. You can find the blend mode menu at the top of the layers palette in Photoshop. My suggestion is to play around with different blend modes to find the one that works best with your sketch.
Sometimes the blending mode method works perfectly, but other times you might want just the lines from the sketch and not the sketching paper to use on your digital layout. I used the sketched lines on this layout:

You can tell it is just the sketched lines because you can clearly see the textured background paper (which is the effect I wanted). Here is a quick way to get just the drawn lines from your sketch.
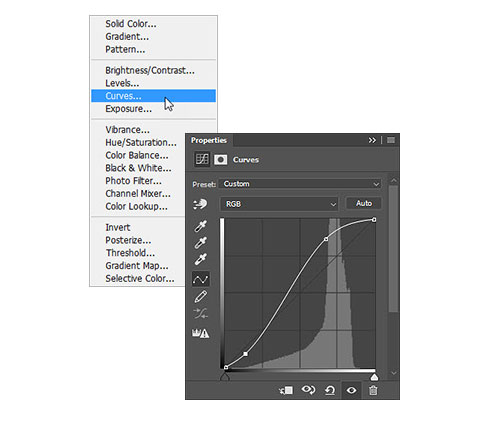
Step 1. This step is optional, but I find it to be very helpful. You will first want to boost the contrast on your sketch by making the background lighter and the lines darker. There are several methods for achieving this, but I like to use a Curves adjustment. You will find Curves in the Fill/Adjustment layer menu at the bottom of the layers palette in Photoshop. The settings depend on your sketch. Basically, you want to boost the whites and darks by making an S curve in the Curves menu. This is what my adjustment looked like:
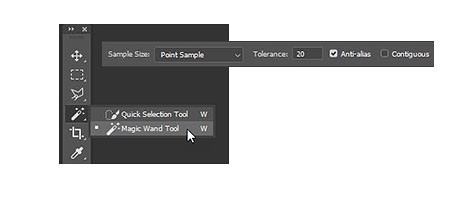
Step 2. In this next step, you will “select” the sketch off of the background. I like to use the Magic Wand Tool for a quick selection. You can find the tool in the Tools Panel in Photoshop (usually with the Quick Selection Tool). The Magic Wand tool makes selections based on colors. You are selecting the darker colors in your sketch (which is why Step 1 can really help with the process). Select the Magic Wand tool and set the tolerance to a lower number (I chose 20) and also make sure that the Contiguous box is not checked.
Now, click on the dark lines in the sketch and you will see “marching ants” surrounding the selection. If your first click did not select the entire sketch, just keep clicking on it until you are happy with the selection. This is what my selection looked like:

Step 3. Now you need to move the selection to its own layer. You can do this easily with the shortcut Ctrl>J. Once the selection is on its own layer you can see what it looks like by turning off the other layers. Do this by clicking on the eye icon next on the left side of the other layers in the layers palette. This is what my selected sketch looked like:
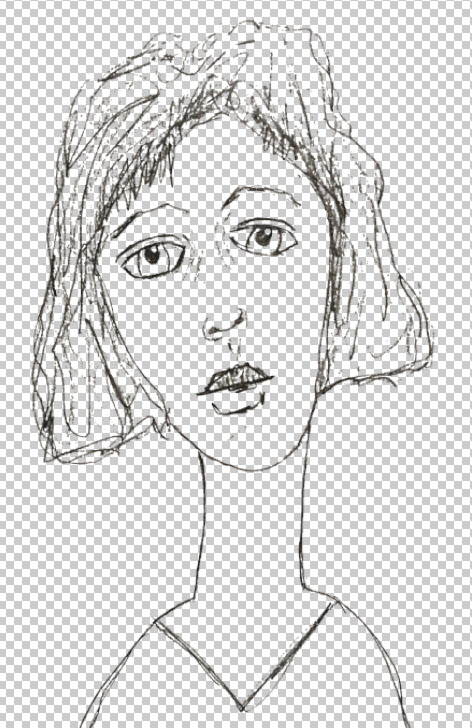
The checkerboard background signifies transparency.
Step 4. The final step is to place the sketch on your layout. You can easily do this by grabbing the transparent sketch layer and moving it over to your layout. If you want to save the sketch as its own file for future use, you can either save just the sketch layer as a PNG (which will preserve the transparency), or save it as a layered PSD or TIFF file. I saved mine as a PSD file to preserve all of the layers in case I want to adjust it for another layout later.
Design Tip: You might have noticed that my sketch has blue eyes on my layout. I created this effect by adding a piece of blue digital paper under the sketch layer, applying a reverse mask (Alt>Mask icon) and then “painting” in the blue paper with a small brush set to white (for reveal).
And that is all there is to it! I hope you have fun playing with this technique on your layouts. 🙂
Until next time ~
Judie (HeyJude)


