Customized Photo Edges
Hello all my artsy friends! I am back with another quick tip to help you customize your photo edges to match the color scheme of your digital pages.
We have a fabulous SOSN 50% off sale today with all kinds of digital kits loaded with fall colors and goodness. I used several of kits in the sale to make this page (click on layout for full credits):

Notice how the edges of the four centered frames are colored to match the papers and elements? It is a super easy process to create that look (especially if you are using one of Fiddle-Dee-Dee’s templates, like I did). All you need to do is add a stroke around the photo spot and then select a color from one of the papers or elements on the page. I will walk you step by step through the process.
Step 1: Add a stroke
If you are using one of Fiddle-Dee-Dee’s templates, a stroke is already added to the photo spots, so you can skip this step and move on to Step 2. If you are not using a template with a pre-added stroke, you can easily add one yourself. Simply select the photo spot in the layers palette and then click on the Layer Styles button (fx) at the bottom of the palette and choose “Stroke” in the pop up menu.
When the Stroke settings panel appears, choose the size and position of your stroke. The settings on my page are Size 20 and Position Center. (See Step 2 for a photo of the Stroke settings panel.) When you are finished selecting your settings, click OK in the top right corner of the panel to make sure you like the size you chose.
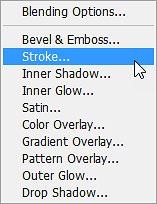
Step 2: Add/Change the Color of the Stroke
To change the color of your stroke, simply re-open the Stroke settings panel by double-clicking on the Stroke icon just below the photo spot in the layers panel. Don’t click on the eyeball shaped icon next to the word “Stroke” or you will turn off the style. (If you accidentally click on the eyeball, just click again to turn the Stroke style back on.)
![]()
Now you should see the Stroke settings pop up panel. Click on the Color box in the middle of the panel to set the color of the stroke.

Once you click on the Color box, you should see the Color picker panel appear, and your cursor will turn into an eyedropper. Click on an element or paper on your page that has the color you want to use for the stroke.
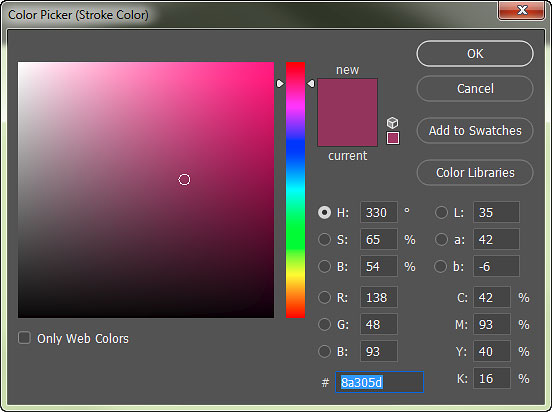
If you want to apply the same color to multiple strokes (like I did on my page), the easiest way to make sure the color you pick stays the same is to copy the hex code at the bottom of the box (it is highlighted in blue in the screenshot above). Now when you open the color picker box for the next stroke, you can just paste the hex code that you copied from the first one in the same box.
How easy was that?! BTW, if you want a really quick way to add strokes to your photo spots, consider picking up Fiddle-Dee-Dee’s Shadows {Dressed Up} set. It includes an awesome style that adds both a drop shadow and a stroke to your photo spots. I hope you have fun adding color-coordinated strokes to your photos. 🙂
Until next time ~
Judie (HeyJude)


