How To: Vinyl Wall Art

I love changing the decor in my home to reflect the seasons and the holidays. I really like finding ways to use my stash to create fun, new, removable wall decals at home using decor vinyl and my silhouette portrait. After a little learning and some trial and error, I’ve come up with this tutorial to help you do the same, so here is ‘How To: Vinyl Wall Art!’
STEP 1: Choose and prepare your element!

Decide which element you’d like to use to create your wall art piece. I decided on this fun Christmas Tree doodle from Little Butterfly Wings ‘Xmas Doodles‘ pack for DYD. I had a spot on my wall in mind right by our console table & shoe storage unit in the hallway and realised I didn’t need the lovely writing this time, so I cropped it out.

Once I’d cropped the writing out, I was left with exactly what I wanted for my wall art (see above). Then I chose to ‘save for web’ as a PNG file with transparency. Once I had saved it somewhere that I could find it again, I opened it in Silhouette Studio.
STEP 2: Open and trace in Silhouette Studio!
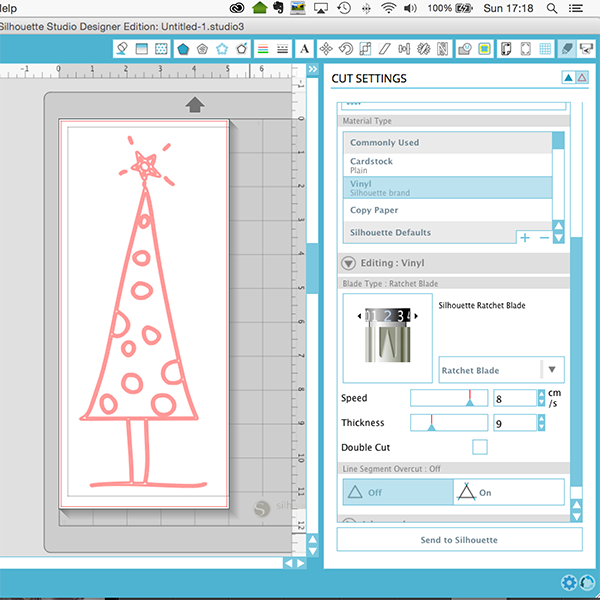 When you have your element opened up in Silhouette Studio, you’ll need to trace it so you get good smooth cut lines to create you decal. If you need help with tracing, there’s a huge amount of information available on the Silhouette website. When you’ve traced your design, you’ll need to set your machine up to cut vinyl. I get the feeling that this is trial and error, but for me (and with the vinyl I use), I use the cut settings above but with my blade ratcheted down to between 3 and 4.
STEP 3: Prepare Vinyl and make the Cut!

In order to create wall art, you need two products and a cutting machine. Firstly, you need removable indoor decor vinyl, second you need transfer tape or transfer paper and of course a Silhouette or similar. The products I’ve used are just some of many options!

Having prepared your image, then imported it to Silhouette Studio and traced it, you need to cut a piece of vinyl that will fit your cut file on to it and place it with the backing paper down on to the adhesive cutting mat. Once you’ve cut it out, you’ll need to remove the whole vinyl piece with backing paper from the mat and weed out every piece of vinyl that you do not want.

When you’ve weeded out your wall decal, you will need to cover it with transfer paper or transfer tape so that when you eventually peel away the back you will have the exposed adhesive side of the vinyl sticking outwards and the adhesive side of the transfer paper also sticking outwards so you have one single item to stick to your wall.

When you’re ready to put your decal on the wall, start by making sure your patch of wall is clean and dry and that you have tested to make sure your brand of vinyl won’t damage your paint or papering. Then, peel a small section of the backing paper away and working in whatever direction feels comfortable to you, place your design (on the transfer paper) on the wall, and smooth down whilst gently removing the backing paper.
When you’ve finished removing the backing paper and your whole design is on the wall (still with transfer paper), take some time to firmly smooth over your whole decal to make sure the vinyl has adhered to your wall. Then, carefully and slowly start to peel away the transfer paper making sure that the vinyl stays on the wall.

When your decal is in place, check that none of the edges are lifting and gently press them down with a patting motion to make sure none are lifting. And then the fun part, start dressing your home or shelves around your decal!

You can use all sorts of elements and word art pieces to create wall art. Above I also used two pieces of word art from Just Jaimee‘s December 2014 Storyteller kit (releasing on Black Friday) to create this festive decal above our key tray. When choosing word art pieces or elements for wall art, be mindful of choosing pieces with strong lines and that will work well in a single colour silhouette to get the best results.

This is our finished, festive console table (which also keeps our sneakers and shoes kinda hidden) – if you have any questions about how to do any step in the process I’ve set up a thread in the forum here, I’d love to know all your awesome tips on working with Vinyl!


