The Lilypad

The Lilypad
Menu
  • home
  • store
  • forum
  • gallery
  • blog
  • tutorials
  • chat
  • newsletter
  • About
    • About Us
    • The Lilypad Team
    • FAQs
  • contact us

Tutorial: Shadowing Wave

February 5, 2014 by The Lilypad 35 Comments

Hi there! Amanda R here today.

Many girls are asking me how I shadowing my pages, I will show you how it is really easy!
Seven years ago, a friend told me that she’d miss the realistic shadows of her paper pages but she was very lazy to warp them with the warp tool in Photoshop, so she was doing it by the distort filter! And that way, Michelle Filo has changed my scrap, because I was too lazy to warp my shadows too! I use PSCS6 but you can do it in all PS versions.

1- do your shadow like always (the color I usually do mine is #2c1901 but you can use any you want)

2- create a separate layer for your shadow

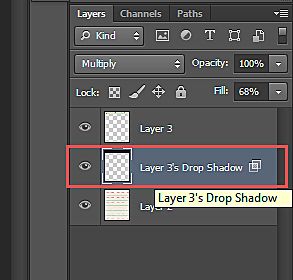
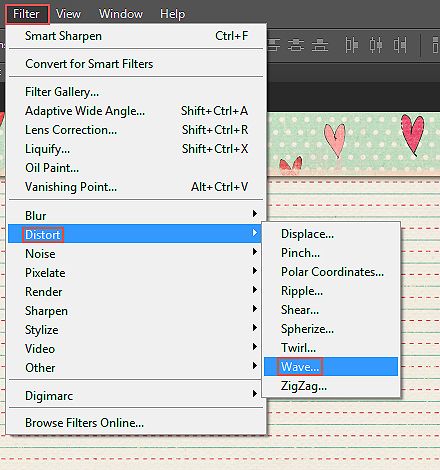
3- with that layer shadow activate, go to Filter – Distort – Wave:

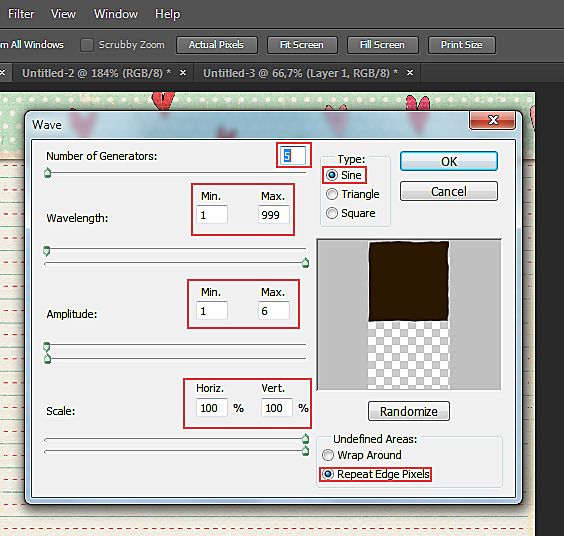
and use these settings:

Number of Generations: 5, Type: Sine, Wavelenght: Min.1 Max.999, Amplitude: Min.1 Max.6, Scale: Horiz. 100% Vert. 100%, Randomize: Repeat Edge Pixels

And voilá, you’ve done it!!! EASY! It’s exactly what she told me!

a. the shadow 

b. the shadow distorted by the fiter

but after so many years I’ve done a little more. Sometimes I run the filter twice, maybe more time, until I have my shadow look how I want.

c. the shadow distorted by the filter 2x

Sometimes after the distortion I use the Warp tool (Edit – Tranform – Warp) just a little, but it’s rare.

You can use it for every shadow you think it’ll be cool to see warped. And I noticed that depends the position of the element in your page, the shadows will be different.

They are all three shadowing with and distorted by the same settings, but as you can see, they are subtle different.

Sometimes when I don’t like how the shadow looks, I duplicate the element, move it around the page and run the filter until I like it, then, I move back the element and shadow and place it above the original element and finally I discard it.

Sometimes after the distortion, the shadow don’t fit the direction of the rest of my elements’ shadows,  so, I simply nudge it for the side I want it.

As I love actions and I do them all the time to make my life easier so, I did my ‘wave’ action. It’s here for you.

Hope you like it and if you need something you can leave a comment here.
And the papers and heart used here are from “Teen Love” kit by Lynne-Marie and it’s on sale today!


Stay up to date with the latest products, news and site wide events by signing up for our newsletter below!

Trend Watch – Big and Bold
Hybrid Tutorial: Dressing Up Card Envelopes

Comments

  1. Jenifer J (rfeewjlj) says

    February 5, 2014 at 4:44 PM

    Cool – thx for the tut!! :)

    Reply
  2. Laura O'Donnell says

    February 5, 2014 at 4:52 PM

    thank you for sharing this!

    Reply
  3. Judy says

    February 5, 2014 at 5:11 PM

    Looks good, as I don’t have PS but use PSE, do you think the action would work in PSE? Also the link to the action no workie. Thanks Judy.

    Reply
  4. Lynne says

    February 5, 2014 at 7:19 PM

    Thanks so much for the tutorial!

    Reply
  5. Christa says

    February 5, 2014 at 8:49 PM

    Very neat Andrea! Thanks for the tutorial and the action. (Those with PSE 11 and above can also use the action :) )

    Hugs!!

    Reply
  6. Christa says

    February 5, 2014 at 8:51 PM

    Reply
  7. Amanda Resende says

    February 5, 2014 at 9:20 PM

    thanks girls!! hey judy, try again, the link is good. and christa said it works with PSE 11 and above ;)

    Reply
  8. Judy says

    February 5, 2014 at 9:24 PM

    Hi Amanda, I was able to download and have tried it out and it works!! Thank you so much for the tutorial and the Action.

    Reply
  9. Diane says

    February 5, 2014 at 9:46 PM

    This is great! Thank you for sharing Amanda! <3

    Reply
  10. Dalis says

    February 5, 2014 at 10:39 PM

    You rock. I do that with my papers (only when I remember… LOL!!!).

    — Dalis

    Reply
  11. Jenni says

    February 5, 2014 at 11:53 PM

    Thank you so much for this – I will use it daily :)

    Reply
  12. kyky says

    February 6, 2014 at 1:22 AM

    thanks so much for the tut..and for the action ^__^

    Reply
  13. Trista says

    February 6, 2014 at 1:50 AM

    Amanda this is a real time saver. Thanks so much!! I do something similar but with more steps, so I created an action for it, but it is not nearly as effective as yours. Thanks for sharing your tips and for the action!!

    Reply
  14. Donna Espiritu says

    February 6, 2014 at 2:21 AM

    thank you for sharing your awesomeness, amanda! <3

    Reply
  15. Meibritt says

    February 6, 2014 at 2:34 AM

    Thank you so much for this tutorial and the action.

    Reply
  16. KarenC says

    February 6, 2014 at 10:01 AM

    Thank you, Amanda!! I can’t wait to try this.

    Reply
  17. heather says

    February 6, 2014 at 6:20 PM

    You are awesome!! Thanks for sharing that!

    Reply
  18. Lisa says

    February 6, 2014 at 8:57 PM

    This is great! Thanks so much

    Reply
  19. Dutch_Diva (Petra) says

    February 7, 2014 at 3:00 PM

    Ohhh thanks so much for this tutorial Amanda! Dalis mentioned it today in the chat so I had to check it out as I always admire your layouts :) I always do the warp thing but this looks so much more realistic! Love it! Thank you for taking the time to take the screen shots and blogging about it! <3

    Reply
  20. Karen Poirier-Brode says

    February 7, 2014 at 7:04 PM

    OK, this is probably dumb. I was able to make a separate layer for my shadow once and do this BUT I cannot figure out what I did to get that separate layer to do this again. What obvious step am I missing? I just cannot figure it out.

    Reply
  21. Karen Poirier-Brode says

    February 7, 2014 at 7:21 PM

    I figured it out! Sometimes you just have to play!

    Reply
  22. Diane G says

    February 8, 2014 at 10:20 AM

    I just saw this today and it looks very cool and so useful! I hope the link still works! Thank you!

    Reply
  23. Soco says

    February 8, 2014 at 3:31 PM

    Wow! Thank you, Amanda!!! I just made a page using your tutorial and I LOVE how the shadows look! It’s amazing!!! Thank you very much!!! ♥

    Reply
  24. Laurel says

    February 9, 2014 at 10:46 PM

    This is awesome. I’ve tried to download the action, and every time I do, I only get the action text. Has anyone else had a problem? Any suggestions? I’m running PSE 12 on a mac.

    Reply
  25. Judy says

    February 9, 2014 at 11:38 PM

    Laurel, I had this same situation. What I did was I simply deleted the txt at the end, leaving the atn in place and voila it turned into a workable file. I am also running PSE 12 on a mac so this should work for you also.

    Reply
  26. Laurel says

    February 9, 2014 at 11:39 PM

    Thanks so much, Judy! Worked like a charm :)

    Reply
  27. celeste says

    February 21, 2014 at 3:43 PM

    i just run the wave on the shadow on a new layer though not on the paper i’m shadowing.

    Reply
  28. Pam says

    June 4, 2014 at 2:31 PM

    Thank you so much for your tutorial. I am definitely giving it a try.

    Reply
  29. RMH84DK says

    October 22, 2014 at 2:46 PM

    how do I make a separate layer for my shadow?

    Reply
    • The Lilypad says

      October 24, 2014 at 11:55 PM

      There are different ways to achieve this in different photo editing programs. What photo editing software are you using?

      Reply
  30. Lynne-Marie says

    December 10, 2014 at 7:55 PM

    I learned something new today!! Thank-you so much for this!

    Reply
  31. ViVre says

    February 19, 2015 at 10:53 AM

    Great tutorial. Something totally new for me! Thanks.

    Reply
  32. Natali says

    February 20, 2015 at 2:41 AM

    Thank you so much for your tutorial.

    Reply

Trackbacks

  1. CraftCrave | DigiFree | CraftCrave says:
    February 6, 2014 at 10:09 PM

    […] Tutorial: Shadowing Wave – 2 freebie(s) […]

    Reply
  2. GIS CT: Channeling Emily Pitts | Heather's Adventures in Lesotho says:
    May 28, 2014 at 8:04 AM

    […] of her large, stacked titles so I knew that would be part of my design. I also used the tips from this tutorial to make the papers look like they were cut by hand. Finally, I have to point out my supply list: […]

    Reply

Leave a Reply Cancel reply

Your email address will not be published. Required fields are marked *

Search the Blog

Categories

  • Art Journal
  • Behind the Designs
  • Blog
  • Blog Category
  • Breaking the rules the right way
  • BYOC
  • Challenges
  • Contest
  • Crafts
  • Create Crate Monthly
  • Dear Polly
  • Document Your December
  • DSD
  • Font Finds
  • Freebies
  • Frontpage Blog
  • Gallery Inspiration
  • General
  • Hybrid
  • iDSD
  • iNSD
  • Interviews. Meet…
  • Journal Pad
  • LilyPad Lovin'
  • Love Yourself
  • Lyrical
  • M3
  • Member Spotlight
  • Memory Pockets Monthly
  • Mixed Media Beginners
  • Mixed Media Monthly
  • Mobile Fun
  • Monday Mash-up
  • Month of Challenges
  • Monthly Muse
  • New Products
  • Organize Your Pad
  • Pad Polls
  • Photography
  • Pocket Pages
  • Polly Picks
  • Printable Projects -Hybrid
  • Project Parade
  • Recipes
  • Scrapping Secrets
  • Snappin' Sundays
  • SOSN
  • SOSN Same but Different
  • SOSN Stash Mash
  • Speed Scrap
  • Template Tuesday
  • The Lighter Side of Life
  • Thoughtful Thursday
  • Tips and Tricks
  • TLPMobileHighlights
  • Trend Watch
  • Tutorial Thursday
  • Tutorials
  • Uncategorized

Resident Designers

  • A Whimsical Adventure
  • Allison Pennington
  • Amy Wolff
  • Anita Designs
  • Becca Bonneville
  • Bella Gypsy Designs
  • CD Muckosky
  • Designed by Soco
  • Elif Sahin Designs
  • Fiddle-Dee-Dee Designs
  • ForeverJoy Designs
  • Gina Miller
  • Grace in Color
  • Heather Joyce
  • Joyce Paul Designs
  • Just Jaimee
  • Kim Jensen
  • Kristin Aagard
  • Lynn Grieveson
  • Lynne-Marie
  • Mommyish
  • NBK Design
  • ninigoesdigi
  • One Little Bird
  • Paislee Press
  • Paula Kesselring
  • Rachel Etrog Designs
  • Rachel Jefferies
  • Rebecca McMeen
  • Sabrina Dupre
  • Sahlin Studio
  • Sara Gleason
  • Scrapping with Liz
  • Valorie Wibbens

Tags

art journalBehind the DesignBYOCcardchallengesChristmascraftsdigital scrapbookingDocument Your DecemberfallHalloweenhighlightshybridhybrid variety showinstagramjournalingkatrina huntlayoutmash-upmember inspirationmemory keepingmemory pockets monthlymixed mediaMixed Media MonthlyOrganizephoneographyPhotographyplannerPocket Pagespocket scrapbookingprintableproject lifeProject ParaderecipesalescrapbookingsilhouetteSOSNspotlighttemplatetemplate tuesdaytipstips and trickstutorialvideo

Get Around

  • Store
  • Forums
  • Gallery
  • Blog
The Lilypad

Information

  • About Us
  • FAQs + Terms of Use
  • Customer Service
  • Privacy statement

Stay up to date with the latest products, news and site wide events by signing up for our newsletter below!

Copyright © 2007-2015 The Lilypad   


Copyright © 2007-2016 The Lilypad   Credits