Fun With Word Art
Word Art is a very versatile digital product to use in your layout design. There are many ways to incorporate word art; let me show you some of my favorite ways.
Sometimes word art is perfect the way it is and other times there are bit and pieces of it that work even better for your page design. Erase or move the words around, or select part of the word art (I like to use the lasso tool to do this), right click and select “layer via copy” to put the selection on its own layer. Then I erase that area off the original layer so that only the new layer selection will be visible. Then you can manipulate that layer as you wish. Some ideas include enlarging, recoloring, clipping a paper to it and applying a brush or style texture. By altering the word art, you can personalize it for your page and give it a new look.
Applying a stroke or texture to the word art adds a variation to the element. In Photoshop, I have created an action with a shortcut key to easily and quickly apply a white stroke (usually I use white but do sometimes use another color) but this can be done easily and quickly by following the manual steps too (edit>stroke in Photoshop and then adjust the settings). I often will choose a distress brush or style to apply to word art. When using a brush to distress, create a layer mask (click the layer mask icon at the bottom of the layers palette on the right side) , lower the opacity of the brush and then stamp over portions of the word art to distress (take away pigment). You can also paint over top of the word art to apply some color/texture to the word art. Lock the layer pixels first so that your brush stamping will only be applied to the word art. In Photoshop, the lock icon is just above the layers palette (under the blending mode drop down box).
Sometimes you want to use the word art but not the background it is on (if not on a transparent layer). To do this, change the blend mode to see how your word art background blends into the underlying layers. It’s a fast and easy way to use text without using the background it is on and often times if some of the background is still visible (as it may be with multiple light and dark colored tones), you can easily erase that off with a few brush strokes. Sometimes, you may want to duplicate that layer and change the blend mode again, erasing as desired, to achieve the effect you want.
Combining multiple word art elements is a lot of fun. I will duplicate, erase and move parts of various word art elements to create custom word art for my page. After rasterizing the layer, my most used tool is the lasso tool (but is a personal preference, you may prefer another tool) to draw around the word art I wish to alter, to put on its own layer, and then manipulate as desired.
Often, word art comes on a word strip, label, etc. This is another element that can be very useful when you remove the word art from it. In Photoshop, I use the content-aware fill tool, selecting the area with the lasso tool and then selecting the fill tool to examine the surrounding pixels and fill in the selected area to match. Often it takes a few tries to get it just right, but it’s usually a fairly fast process to do. Then I can add another word art element overtop or add some text/journaling and it becomes more personalized for my page.
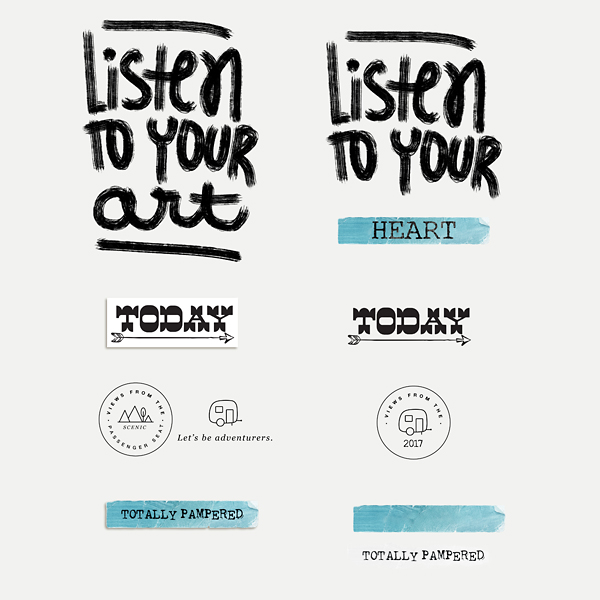
Here are a few samples of ways to use word art.
So, while word art is awesome just the way it’s been created by the designer, it is even just a bit more awesome because you can personalize it to fit your page design and becomes more versatile.
Here’s my page with some word art. I changed the blend mode, distressed and reduced saturation on some of them.

I hope that I’ve inspired you to start using word art in your digital scrapbooking!