Custom Text Boxes in Photoshop
Hello all my artsy friends! I’m dropping in today with a quick tip on making custom text boxes to fit specific element shapes in Photoshop. Have you seen the amazing M3 collection this month? It is filled with artsy goodness and Paula Kesselring has some awesome coordinating Speech Bubbles available in today’s SOSN Sale for 50% off.
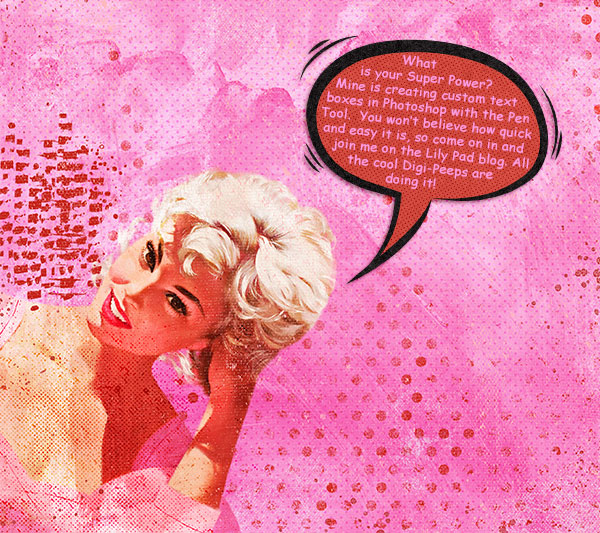
You can just type your text directly on top of these speech bubbles in the standard square or rectangular text box, or you can create a more refined custom text box that fills the shape of the element. Here is an example of the custom text box in action:
Custom text boxes are super-easy to create with the Pen Tool in Photoshop with just a few steps.
Step 1: Place the Element
Bring the element onto your page. Start with the element aligned horizontally. You can always tilt the element (and the text within it) in the final version (like mine).
Step 2: Create the Shape of the Text Box
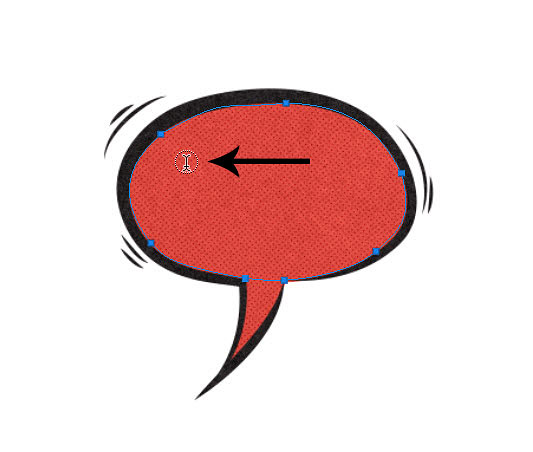
Use the pen tool to draw a shape within the element that you want filled with text. In my example, I drew an oval shape to follow the curves of the speech bubble. Select the Pen Tool from the tools menu and set it to “Path” in the drop down menu at the top of the screen.

Now click and drag it to create the shape. To close out the shape, make sure you end by clicking on the starting point. If you are not a fan of the pen tool, no worries. The shape does not have to be perfect. Remember, you are creating a text box shape – no one will see the outline. This is what my path looks like (you can see it outlined in blue):
Step 3: Add Text
Now, we are ready to add our text. To turn your path into a text box, simply select the Text Tool and click inside the shaped path you created in Step 2. When the text tool is placed inside the path it will turn into a circle like this:
When you click, it will take you to the top of the custom text box to start typing. This method also automatically creates a new layer for the text so that it can be adjusted independently of the underlying element (in this case, the speech bubble). Now, all you need to do is fill the box with text!
Once you are finished adding the text, you can adjust its position by clicking Ctrl T to activate the Transform tool. You will see a rectangular bounding box appear around the custom text box and you can move and adjust the placement of the text if necessary. 
As a last step, I would link the text layer to the underlying element so that they stay together if you end up moving them around the page or tilting them to fit with the design. You can like two (or more) elements together by selecting them in the layers palette and then clicking on the chain link icon at the bottom of the layers palette.
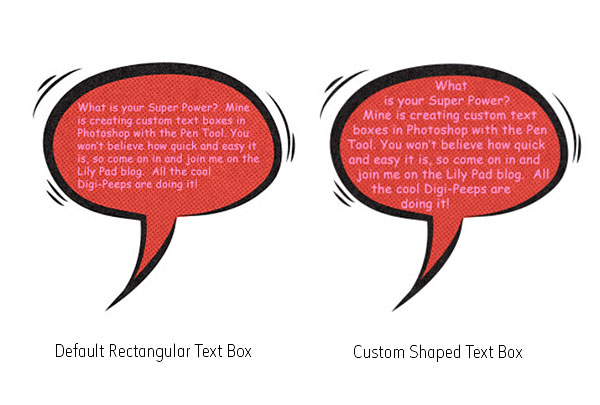
While this may sound like a more tedious process than just using the default rectangular text box, the end result is definitely worth it! Look at the comparison between the default text box and the custom box:
I hope you have fun with this technique! (Don’t forget, you can pick up the text boxes I used in this tutorial for 50% off in today’s SOSN sale!)
Until next time ~
Judie (HeyJude)


