Creating Digital Frames in Photoshop
Hello all my artsy friends! We are moving into the last week of MOC 8 and I hope everyone is ready to finish strong. 🙂 I am just dropping in today with a quick tip for making digital frames in Photoshop when you cannot find what you need in a digital scrapbooking kit. For those of you who are still trying to complete the Day 3 – Crazy Number of Frames Challenge, this tip might come in handy – but it is also helpful for everyday digital scrapping too.
This is my page for the Crazy Number of Frames Challenge:

I used lots of frames from different kits and papers in the January 2020 BYOC collection, but I still needed a couple more to fulfill the challenge. Instead of searching through other kits to find frames, I decided to make some of my own.
Step 1. To make your own digital frame, you first need a base shape. You can make a frame base using the Custom Shape Tool, or you can draw one yourself with the Rectangular Marquee Tool.
Custom Shape Tool. There are custom frame shapes in Photoshop. To access them, activate the Custom Shape Tool (Shortcut “U”), then select the frame shape category and click on your frame of choice.
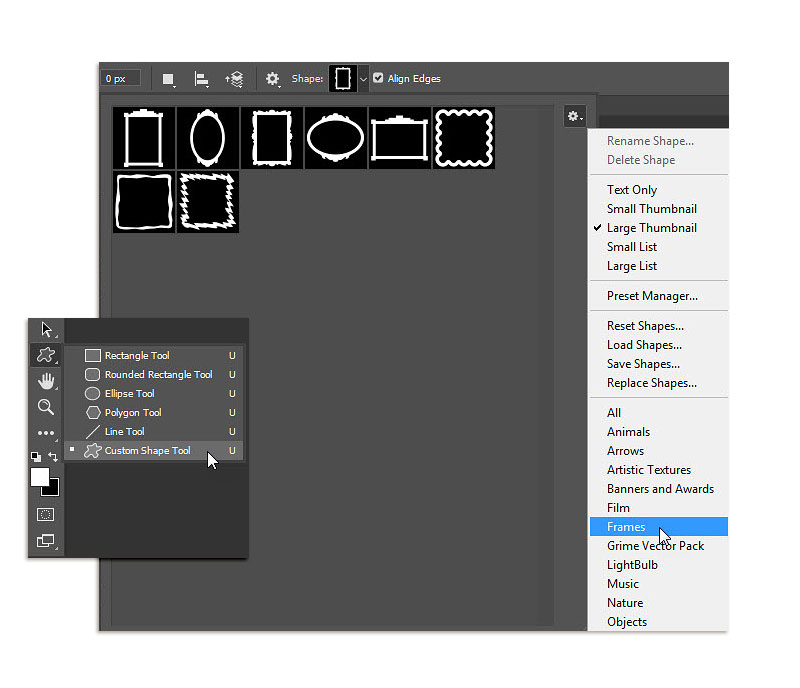
Once you have the frame shape selected, click on the page and drag out the size frame you want. If you would like to maintain the proportions of the shape, hold the Shift key down while you are dragging out the shape. The frame will automatically fill with color, so once you have the frame shape drawn, click “V” to activate the move tool and you can reposition it on the page.
Rectangular Marquee Tool. If none of the custom frame shapes strike your fancy, you can also draw your own frame with the Rectangular Marquee Tool. Activate the tool and draw a rectangle (or square) shape the size you want. Make sure you are working on a blank layer in the layers palette (Shift>Ctrl>N is the shortcut for a new layer), and fill the rectangle with any color. The easiest method of filling the shape is clicking Ctrl or Alt > Backspace (which will fill the shape with the foreground or background colors). Now, you just need to delete the frame opening from the rectangle. Draw the frame opening with the rectangular marquee tool and click on “Delete” to remove it from the frame piece.

Step 2. Now that you have your frame shape done, the next step is to decorate it. There are two great options for this step. You can clip digital paper to the frame shape (either solid or patterned) OR you can use a digital style to transform your frame. Here are some examples of both options:
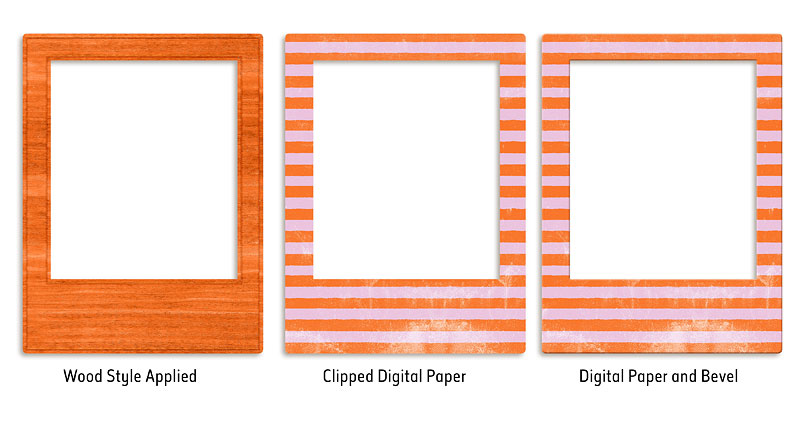
The wood style I used is from Just Jaimee’s Storyteller BYOC January 2020 style set. Digital styles are probably the easiest and quickest way to apply a detailed and dimensional look to the frame. If you just want a cut out paper frame look (like the middle example above), all you have to do is add a piece of digital paper and clip it to the frame base. (To clip the paper to the frame, place it on the layer above the frame and use the shortcut Ctrl>Alt>G.)
Step 3. The last step is optional, if you want your frame to have a dimensional look. If you used a style, the dimension may already be incorporated. But if you clipped paper to your frame shape it will have a flat appearance (like the middle example above). To pump it up a bit, it is super easy to add a bevel effect. First, select the Bevel & Emboss layer style from the “fx” menu at the bottom of the layers palette. When the settings box appears, choose the type of bezel you want (I used inner bevel/smooth on the frames in the example). Then adjust the size to your liking (my size was 9 pixels).

The Shadow mode setting is set to black as a default, but if the black shadowing is too dark, you can change it by clicking on the color box next to Shadow Mode and choose a different color from the color picker box. I adjusted the shadow on the striped paper frame by clicking on the orange color and then making it significantly darkerby dragging the circle picker down to a darker area.

Here is a comparison of a flat clipped paper frame and one with an added bevel (the frame shape was made with the custom shape tool):

And that is all there is to it! I hope this tip comes in handy the next time you find yourself looking for a frame to fit you digital page. 🙂
Until next time ~
Judie (HeyJude)


