January 6: Dispersion (Technique Challenge)

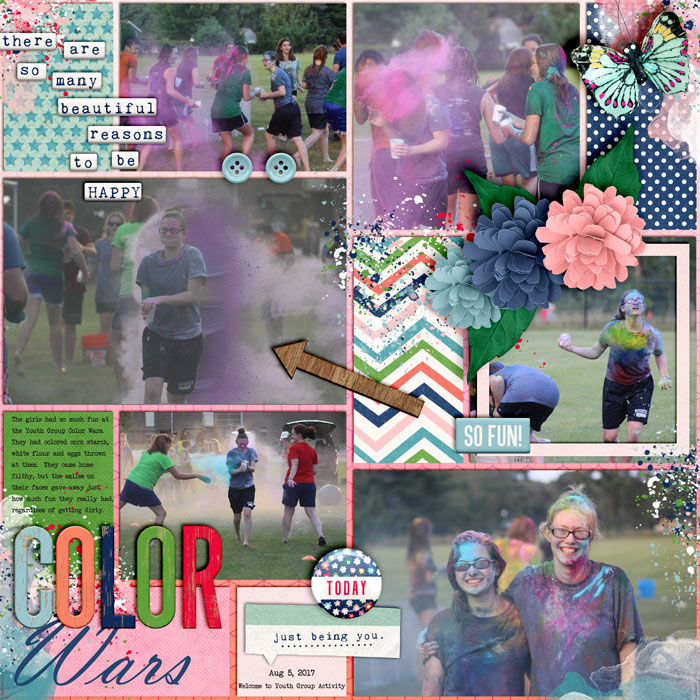
Here is my photo once it's been edited, it is in the middle photo spot on the left side of the layout. This was hard, it took a phone call from my best friend, text messages, screen shots, and LOTS of trial and error (and restarting 2-3 times). I can't say I'm extremely happy with how it turned out, but it's done!
26686047_10204360516889916_346610891507005407_o.jpg

 
Ok, I'm working to make sure I understand where you are stuck. You have 5 layers (top to bottom):
5. (Subject Only) Layer 2 with white layer mask
4. (Subject Only) Layer 2 with black layer mask
3. Layer copy Original Photo
2. Layer Copy Original Photo without subject
1. (Background) Original Photo

Go to layer 5. The subject only with the white layer mask. Using a black brush, splatter it.

I found it easiest to hide Layers 1 and 3 in my list. My background was okay to see, so I left it.


Here's my layer palette: (PSCC)

View attachment 252685


Maybe I'm not understanding how to work with the masks. When I try to use white (background color selected) on the black mask I see nothing even though the black mask is bracketed.
 
ok i finally found a photo that i think it worked with and then i feel like it is best with an art journal type layout so that is what i did.

full
 
It's taken me well over an hour, and I'm an Artisan scrapper, but between the videos and the tips I DID it -in PSE!!!!

I don't love it but I learned a lot from it. Tomorrow I'll scrap a layout using it. And as long as it took me I still appreciate all the great things I now know how to do!

 
Last edited:
This was definitely a challenge but it was fun to learn something new! I got lots of practice too - I must have tried this technique on 12 or 13 different photos. I just did not like the way the effect looked on any of my people photos. I think the backgrounds were too busy so the end effect always looked weird to me. But if I extracted the subject, it looked out of place without the background. The photo I ended up using came to mind after I came across some rain brushes on brusheezy. I also liked that I was dispersing an object rather than a person. I don’t think this technique is something I'll use too often since you really need the right type of photo but it's a neat effect that I will definitely experiment with a little more. Thanks for the fun challenge Jan!

 
Maybe I'm not understanding how to work with the masks. When I try to use white (background color selected) on the black mask I see nothing even though the black mask is bracketed.
CS2 right? Are you seeing red strokes? Or not seeing the brush make any marks at all?
If you aren't seeing anything, try using a regular brush, on a large size to see if you can see something?
 
Y'all. I just knew the challenges were too easy until now! I tried and tried to do the technique with a person, but it just looked goofy. Decided to try it on landscape type photo without doing an extraction (hope that still counts). I realize now that there wasn't enough contrast, but I like the (hopefully) rainy look that I created.


thaks for links - 2 of the links are the same

already did my attempt when isaw this. perhaps will go back and see if it turns out better as it is an interesting technique.

so heres my feeble attempt using default pse scatter brushes - just doesnt look right but oh well.
full


https://the-lilypad.com/forum/galleries/moc-6-day-6-dispersion.327711/


This was soooo much harder than I thought it would be. I had a hard time with getting rid of an unwanted background without erasing to much of my subject. I did learn a lot with this challenge!! I guess that's why they call them challenges huh? Thanks for helping me learn something new today!!!
 
I played with this a lot and finally ended up with an image I liked...not too easy using an old, old, version of PaintShop Pro, but I love the end result. I may use this again some time in the future. Thank you for a very interesting challenge.


I decided to add the image of the bird after I applied the dispersion, I think it's difficult to see on the layout.

 
Last edited:
I forget who @flowersgal had problems with the two images that have masks. White one on top, black mask on the lower layer. Here's @bestcee 's image.

Screen Shot 2018-01-06 at 7.29.07 PM.png

If your mask is not the correct color, click on the mask and in PSE go to Layer, New Adjustment Layer, and select Invert. Then a white mask will turn black and a black mask will turn white depending on which one you choose. HTH!

Screen Shot 2018-01-06 at 7.38.27 PM.png

But remember for this technique white mask is above black mask.
 
Last edited:
I tried the technique on at least 4 other photos first, but they just weren't working for me. Till I found this one :)
Thanks for the challenge and tutorial!
Here's my page. (I used Photoshop's leaf scatter brush for the mask.)
 
Back
Top