Hybrid Bunny Bags & a Masked Digi-Stamping Technique
Hi there!
Now that the leprechauns have gone back to wherever they spend the rest of the year, it’s time to think about Easter. And even if you don’t celebrate Easter, I have a fairly easy gift bag project today as we’re having our family Easter a bit early so I’m trying to be organised (it’s a never-ending theme in my life but anyway) and this is a technique you can use for cards or just in your everyday digiscrapping or hybrid scrapping as well.
In my digi hybriding, I like to try effects I’ve seen paper scrappers or stampers do, and today I’m using a masking technique I have pinned so many times because I think it’s a cool effect. The idea is to make a stamped image look like part of it was purposely not stamped, creating a blank area that highlights some wordart or another stamp or element. (I have tried this with real stamps on cards and I’m just not precise enough, there’s always ‘bleeding’ where some ink escapes and breaks the pattern, or I’m using the wrong ink or something, either way I’m sure it’s easier to do digitally and then print the result so I’m finally giving it a go!
I grabbed this pack of cute bunny sketches called Whimsical Sketchbook No.2 from A Whimsical Adventure and I’m just adding a font layer but a wordstrip is another option if you have a super organised stash (or have the time to search your ‘I unzipped it and it’s all in a giant folder on one of these EHDs’ stash). This pack comes with 10 different bunnies as PNGs and an abr brush file so you can stamp them in whatever size and colour you want – no need for the perfect ink pad or stamp set!

So that you and I can both see the area I’m working on after dragging in a bunny PNG, I’m making a grey rectangle and basing it on the dimensions of my gift bag. That means if I scale the rectangle and bunny accordingly, it will keep the same ‘aspect ratio’ as my bag. (That is, my bag is a portrait orientation rectangle and I want the gifttag label to be a portrait orientation too and have the same width to height ratio as the bag – all I know is I want the exact dimensions of the gift tag to be smaller than the gift bag itself but I’m not sure how much by at this stage).
This is how I make the rectangle the size I want: With the Shape tool active, click the gear button, then you can set the exact size (in this case I typed in that I wanted a 7×9 inch shape) and position it whereever you want.

To centre Anja’s bunny I select all the layers underlined in red in the Layers Palette and then click the middle (red underlined) buttons across the top. Everything is now centred on both the page (that is my printer size) and to the grey rectangle.

It’s probably a bit big for the bag so I unselected the white background and shrunk (scaled) the bunny and rectangle to 75% of their original size. (I could do this step at any time, scaling up is not necessarily going to give such a clean result especially when printed, so I tend to create bigger then shrink later if needed).

I clicked on the T (Type Tool) and picked a font and dragged a text box from the top left corner to the bottom right like the red arrow shows. I typed a sentiment right across the middle of the bunny but it’s black as well (I do want it to look like I used the same ink colour) and is lost among the more solid parts of the bunny when not highlighted like in the screenshot below.

Now here’s the masked stamping effect so you can read the text easily. There’s two ways to do this. They are both fairly easy.
You could use the marquee tool to draw a rectangle around your text and then with the bunny sketch layer active, hit Ctrl+alt+I (or go to Select > Inverse) and mask the bunny layer to hide that part of the bunny stamp. The reason I prefer the other method is if I decide I want to make the mask bigger or smaller, I need to do some undo-ing and redo-ing (it’s more steps and who needs that?)
Instead I kind of ‘faux mask’. I just duplicate the original background rectangle, move that copy to ‘above’ the bunny layer (which will temporarily hide it but don’t worry) and shorten the rectangle by pulling the top middle and bottom middle handles of the Transform control box towards the Happy Easter text and now voila! Parts of the bunny are visible again and the text can be clearly read and it looks like I have stamped the rabbit either in two parts,or with masking tape to hide part of the paper or just perfectly not-inked the rabbit stamp right across the mouth area (which I have never been successful at in real life).

So the benefit is I can adjust that shape size pretty easily, I’m going to shrink it more in a second so the loopy part of the y over laps the ‘white space’, but you can also make a wavy kind of line (like rik rack or anything you wish) and be able to have some flexibility with the dimensions this way, as opposed to the ‘undo-ing’ and redoing of normal masking.
So now, just before printing, because I don’t want to print a big grey area around my bunny, I’m turning the fill layer down to 0% on the large rectangle layer but if I do that for the smaller grey rectangle, I’ll see the full bunny stamp again and lose my text in the ‘blackness’ so I add a Layer Style that makes it the same colour as the default white background, effectively making the rectangle invisible (it won’t print the transform controls box and I’ll just get the stamped bunny and text).

(I used the same process and another of those cute bunny sketches with a different font and just rotated them so I could print both on the same sheet of paper (my ‘canvas’ is my normal printer paper dimension size of A4 so I don’t have to endure the wrath of my printer by messing with it’s preferred settings). I did some quick measuring and decided to shrink both of them a bit more and in the interest of conserving paper, here’s my ready to print file.

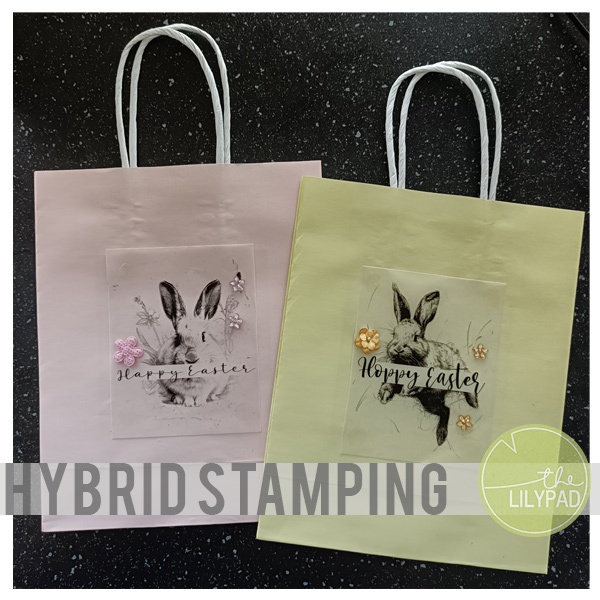
And after a test print on plain paper, here’s my print out on vellum, I decided it’d be better if the whole bag colour shows through a bit, but when it printed this time, it went a bit smudgey (but at least it wasn’t in that masked sentiment area like when I do this with real ink).

… so I added some blingy flowers to cover some of the smooshed ink and also just to give it a bit of something extra. I used Helmar Gemstone glue on the flowers (thick and tacky, more heavy duty but stays white) and StickyDots behind the vellum so the attachment points would be less obvious.

Those bunnies are available until Anja’s shop closes but the technique will work with any kind of digital stamp or sketch. If you use this technique, let me know in the comments or tag me in the gallery. Happy hybriding!