FarrahJobling
FarrahJobling
- Joined
- Dec 17, 2012
- Messages
- 6,974
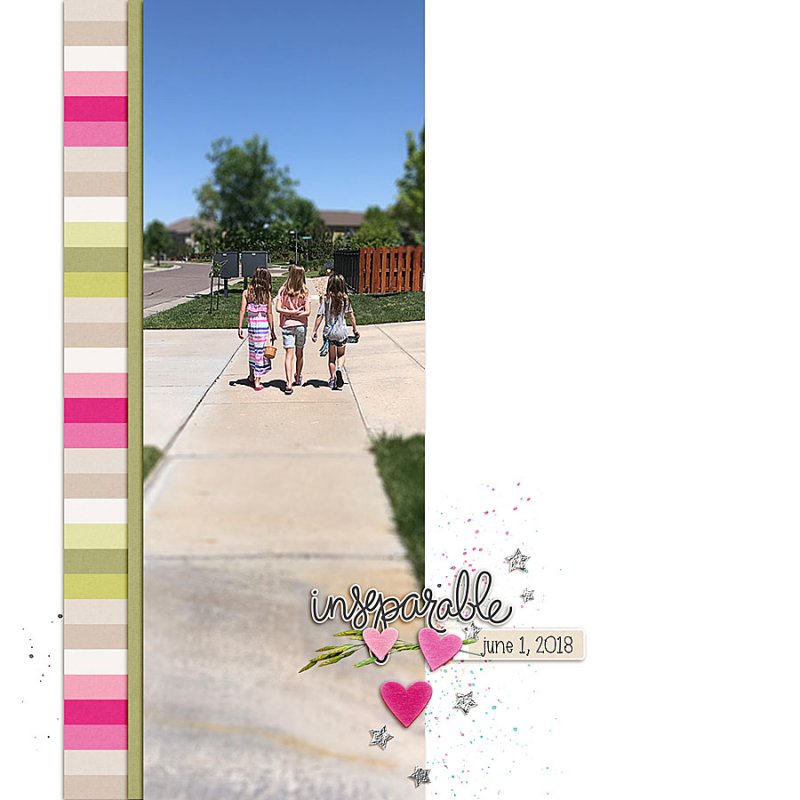
Hello! Welcome to 2019 and the SECOND challenge of MOC Seven, the first Photography Challenge. Today's challenge is to scrap a NEW photo with shallow depth of field.
This is a PHOTOGRAPHY challenge. The point of the challenge is to take a NEW photo AFTER I posted the challenge, which wasn't until Jan 2, 2019 at 12:01 am Eastern time. Sorry for any confusion about what is considered "NEW" and PS...you don't have to put a date on it")
Depth of field (DOF)
Depth of field is the distance between the nearest and farthest objects in a scene that appear acceptably sharp in an image. Although a lens can precisely focus at only one distance at a time, the decrease in sharpness is gradual on each side of the focused distance, so that within the DOF, the unsharpness is imperceptible under normal viewing conditions. Courtesy of Wikipedia
In simple terms, Depth of field is the term given to the zone of sharpness in a photograph. Learning how to control the amount of the depth of field is crucial to successful image making. Using it creatively allows you to highlight key elements of the picture, while downplaying potential distractions. Ultimately it leads to images that have greater clarity and impact.
Three photography elements that affect the Depth of Field (DOF):
Here are the few simple things you need to know to begin putting DOF to work for you.
1. The F/stop of Your Lens
The most common way to control the depth of field is to change the lens aperture (f/stop). Generally speaking, wide apertures (small f/stop) produce shallow depth of field, and narrow apertures (large f/stop) produce deep depth of field – think small number small depth of field, big number big depth of field.
2. The Focal Length of the Lens
One way to change the appearance of depth of field is to change the focal length of the lens. Generally speaking, wide-angle lenses produce deeper depth of field and telephoto lenses produce shallow depth of field
3. The distance between camera and the subject
The closer you focus the lens, the shallower the depth of field is. So if you are using a 50mm lens at f/8 and you focus on an object two feet away the depth of field will be shallower than if you use the same lens and aperture and focus on an object 10 feet away. Macro photography is a good example of getting close to the subject for a shallow depth of field.
Don't have a super camera? No problem!
Digitally Add Shallow Depth of Field
Taking photographs that have shallow depth of field usually requires a nice lens, or at least, an expensive camera. However, it is possible to digitally simulate shallow depth of field digitally.
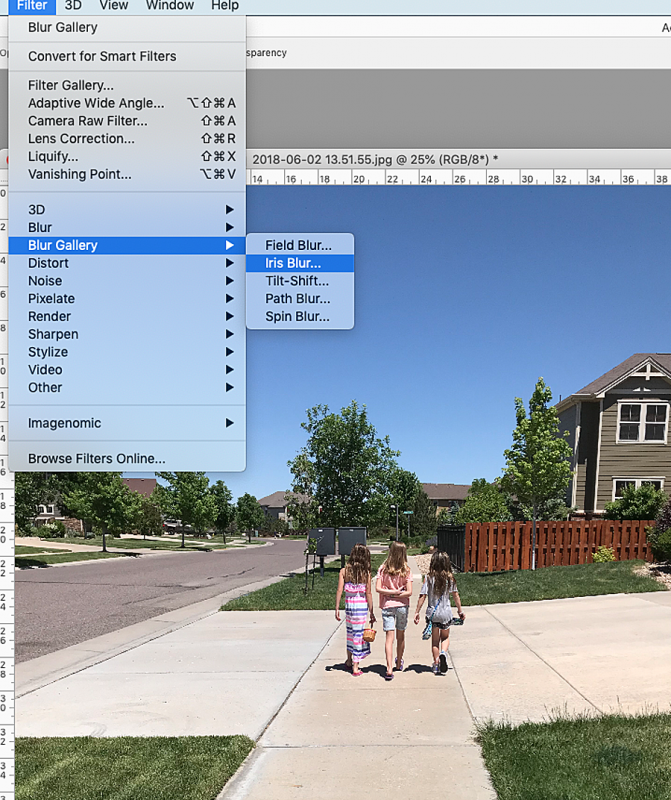
1. Iris Blur
The Iris Blur tool is the quickest way to give your photographs the appearance of shallow depth of field. This technique does not offer as much customization as the other two methods; however, it does a pretty good job, and it only takes about 2 minutes.

Step 1: Right-click the layer “Background” in the Layer’s box. Select “Duplicate Layer” and name the new layer “Blur Effect.” Select Filter > Blur > Iris Blur This will open the Blur Gallery tool with the Iris Blur tool selected and a default Iris Blur will be placed on your image. Move the circle in the center to the part of your image that you want to stay sharp.
Step 2: Click and drag the outer edge of the selection to change the size of the blur. Click outside of the selection and drag diagonally to rotate the selection. Everything outside of the selection is called the “Blur Area,” since this part of the image will receive the full intensity of the blur effect. If you want more of your photo to be intensely blurred, make the selection smaller and the area outside of the selection bigger. Make the selection touch the edges of your image, leaving only the corners outside of the selection, for a gradual, more subtle effect. Move the little white square in the upper-right to make the selection more rectangular or elliptical. I chose to keep the selection elliptical so that the corners would be more intensely blurred. Adjust the handles that look like little white circles to frame which part of the photo you want to stay sharp. The area between these handles and the selection is called the “Fade Area.” In the Fade Area, the photo will gradually change from sharp to blurry. The area within the handles is the “Sharp Area,” and will remain in full focus. The smaller you make this area, the shallower the depth of field will appear.
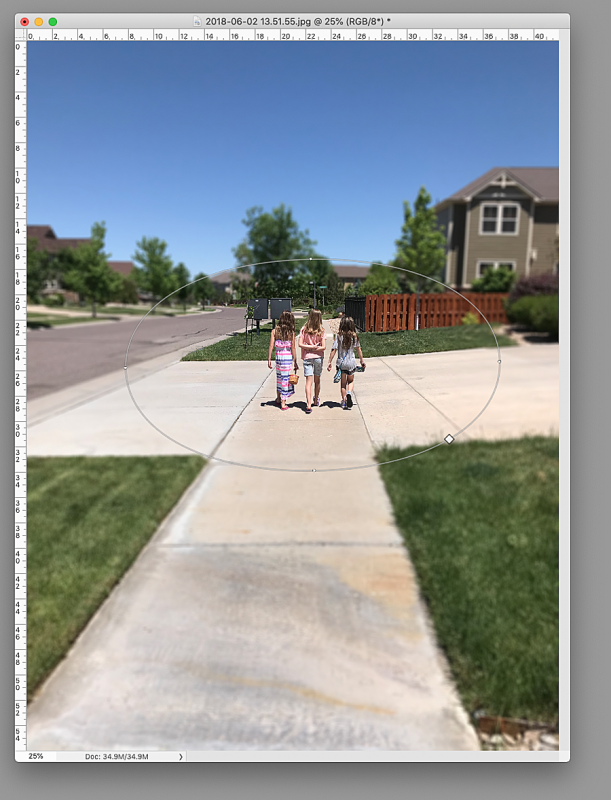
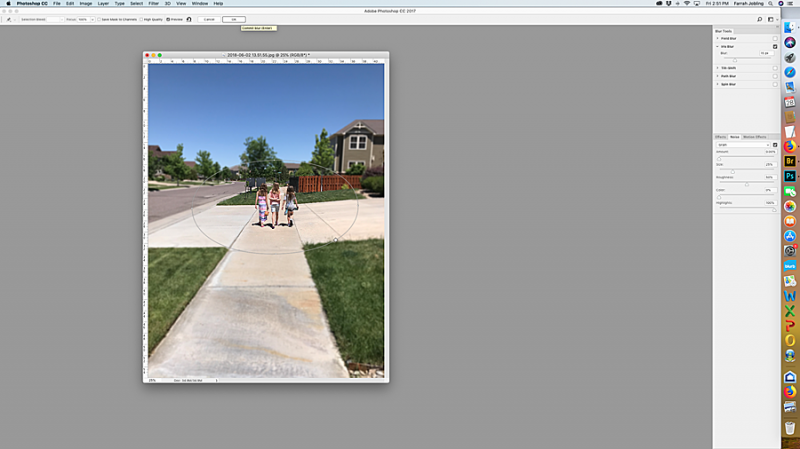
Step 3: Click the box at the top next to “High Quality” so that Photoshop will render a full-quality blur. You can click anywhere else on the image if you would like to create additional Iris Blur filters. Once you are happy with your settings, click OK.
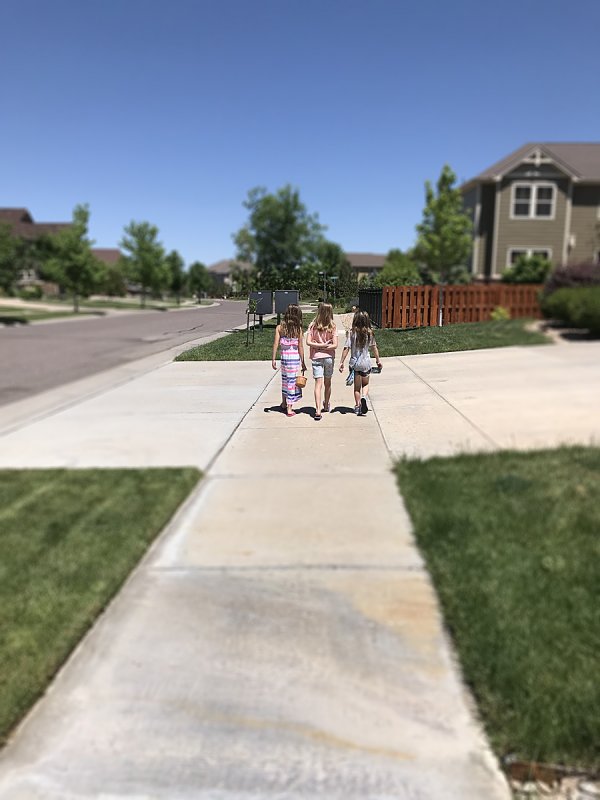
Voila! Instant shallow depth of field!
after
Other tips:
The rules for this scrap:
Your page must be a new page in order to count for the Month of Challenges. Your page must be posted in three places:
This is a PHOTOGRAPHY challenge. The point of the challenge is to take a NEW photo AFTER I posted the challenge, which wasn't until Jan 2, 2019 at 12:01 am Eastern time. Sorry for any confusion about what is considered "NEW" and PS...you don't have to put a date on it
Depth of field (DOF)
Depth of field is the distance between the nearest and farthest objects in a scene that appear acceptably sharp in an image. Although a lens can precisely focus at only one distance at a time, the decrease in sharpness is gradual on each side of the focused distance, so that within the DOF, the unsharpness is imperceptible under normal viewing conditions. Courtesy of Wikipedia
In simple terms, Depth of field is the term given to the zone of sharpness in a photograph. Learning how to control the amount of the depth of field is crucial to successful image making. Using it creatively allows you to highlight key elements of the picture, while downplaying potential distractions. Ultimately it leads to images that have greater clarity and impact.
Three photography elements that affect the Depth of Field (DOF):
Here are the few simple things you need to know to begin putting DOF to work for you.
1. The F/stop of Your Lens
The most common way to control the depth of field is to change the lens aperture (f/stop). Generally speaking, wide apertures (small f/stop) produce shallow depth of field, and narrow apertures (large f/stop) produce deep depth of field – think small number small depth of field, big number big depth of field.
2. The Focal Length of the Lens
One way to change the appearance of depth of field is to change the focal length of the lens. Generally speaking, wide-angle lenses produce deeper depth of field and telephoto lenses produce shallow depth of field
3. The distance between camera and the subject
The closer you focus the lens, the shallower the depth of field is. So if you are using a 50mm lens at f/8 and you focus on an object two feet away the depth of field will be shallower than if you use the same lens and aperture and focus on an object 10 feet away. Macro photography is a good example of getting close to the subject for a shallow depth of field.
Don't have a super camera? No problem!
Digitally Add Shallow Depth of Field
Taking photographs that have shallow depth of field usually requires a nice lens, or at least, an expensive camera. However, it is possible to digitally simulate shallow depth of field digitally.
1. Iris Blur
The Iris Blur tool is the quickest way to give your photographs the appearance of shallow depth of field. This technique does not offer as much customization as the other two methods; however, it does a pretty good job, and it only takes about 2 minutes.
before
Step 1: Right-click the layer “Background” in the Layer’s box. Select “Duplicate Layer” and name the new layer “Blur Effect.” Select Filter > Blur > Iris Blur This will open the Blur Gallery tool with the Iris Blur tool selected and a default Iris Blur will be placed on your image. Move the circle in the center to the part of your image that you want to stay sharp.
Step 2: Click and drag the outer edge of the selection to change the size of the blur. Click outside of the selection and drag diagonally to rotate the selection. Everything outside of the selection is called the “Blur Area,” since this part of the image will receive the full intensity of the blur effect. If you want more of your photo to be intensely blurred, make the selection smaller and the area outside of the selection bigger. Make the selection touch the edges of your image, leaving only the corners outside of the selection, for a gradual, more subtle effect. Move the little white square in the upper-right to make the selection more rectangular or elliptical. I chose to keep the selection elliptical so that the corners would be more intensely blurred. Adjust the handles that look like little white circles to frame which part of the photo you want to stay sharp. The area between these handles and the selection is called the “Fade Area.” In the Fade Area, the photo will gradually change from sharp to blurry. The area within the handles is the “Sharp Area,” and will remain in full focus. The smaller you make this area, the shallower the depth of field will appear.
Step 3: Click the box at the top next to “High Quality” so that Photoshop will render a full-quality blur. You can click anywhere else on the image if you would like to create additional Iris Blur filters. Once you are happy with your settings, click OK.
Voila! Instant shallow depth of field!
after
Other tips:
- If you use a point and shoot camera or use your camera in auto mode, use the macro mode (looks like a little flower)
- If you use a cell phone, there are many free iPhone and Android apps, such as Focos or Snapseed, that will simulate shallow depth of field
- If you use a software other than Photoshop, try using the blur tool to blur the background slightly. Also, in Artisan, the filter is called Focus
The rules for this scrap:
- You must create a LO using at least one NEW photo that demonstrates shallow Depth of Field.
Your page must be a new page in order to count for the Month of Challenges. Your page must be posted in three places:
- Uploaded to the TLP Gallery (not an outside hosting site).
- Posted in your page thread you created in the MOC Layouts Folder. You should have one post per completed challenge page. If you complete all 31 challenges, your thread should contain 31 posts. Please do not comment in the participants’ page threads so we can keep them clean.
- Posted in this thread. People can comment here if they wish.
Last edited:
")
