TrishD
Well-Known Member
- Joined
- Dec 20, 2016
- Messages
- 337
CHALLENGE CLOSED-WINNER ANNOUNCED
On behalf of NBK Designs I would like to thank all who participated in this challenge. There has been some fantastic designs and effects with changing colors using Hue/Saturation and it looks like some have learned a new technique.
The two winners for this challenge are GARRYNKIM and CHARLOTTE-M. Congratulations ladies, your coupon will be sent to you by PM soon
Welcome to the first NBK Design challenges of the year. I hope you've had a happy Christmas and New Year celebrations.
Last year we noticed that some of you were having difficulties with some of the challenges because of software limitations. So this year we're doing something different. There will now be something for everyone - every month! We will have 2 challenges running at the same time, for the entire month. Easy Peasy will be for those who just want to do something quick and simple, or don't have more complex software. Advanced will be for those who enjoy a bit more of a challenge and want to expand their skills, and have the necessary software. You can of course take part in both challenges each month and in addition there will now be 2 winners for each challenge.
Let's start off with using the Hue/Saturation Adjustment feature in Photoshop or PSE to change the color of something in a photo to a different color altogether. Here's a video to give you some idea what I mean, we will be using the first method shown in the video but I will be doing a step by step with screen shots right here. I would rate this method as intermediate so give it a go. And if you're feeling adventurous you can go on and try some of the other methods in the video.
https://digitalsynopsis.com/design/...q590BM_Vr-lQEKUPf3pa_BxA8VbeaZpbCGccva7rsBYp4
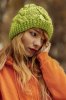
Here's a sample of changing the color of my subject from blue to pink Follow my easy steps with an image that would be easy to extract. My image is from Unsplash free images https://unsplash.com/

Step 1. Make a selection of the part you want to change, eg., jacket, hat, car, kitchen utensil, flower or even hair if you can make a good selection of hair.

Don't be too concerned if you don't get a perfect selection as there are ways to correct that on the mask
Step 2. While the select is still active choose the Adjustment Icon from the bottom of the Layers Panel and choose Hue/Saturation. A mask of your selection will appear above the background layer.

Step 3. Use the HUE slider to change the color and the SATURATION slider to increase the color
If you have missed a bit of the selection or added too much use the mask to correct it by using a white brush on the mask to paint in any parts you have missed or a black brush to fix any overspill.

When you are happy with your results save the image as a JPG and make a layout using your choice of NBK's products. For my layout I used NBK's artCrush #12 https://the-lilypad.com/store/artCRUSH-No12-Artsy-Bits-Pieces-Kit.html
Please include a Before and After image in your layout to show us that the method has worked correctly. I can't wait to see your designs and if you enjoyed this challenge
RULES
This challenge runs from Feb 1st to Feb 29th (One Month)
TWO lucky scrappers will be randomly chosen to win a $5 coupon to the NBK Design store.
You must use 100% NBK Design Products.
Post your layout in the NBK Design Gallery and in this forum, and link your layout to the gallery.

On behalf of NBK Designs I would like to thank all who participated in this challenge. There has been some fantastic designs and effects with changing colors using Hue/Saturation and it looks like some have learned a new technique.
The two winners for this challenge are GARRYNKIM and CHARLOTTE-M. Congratulations ladies, your coupon will be sent to you by PM soon
Welcome to the first NBK Design challenges of the year. I hope you've had a happy Christmas and New Year celebrations.
Last year we noticed that some of you were having difficulties with some of the challenges because of software limitations. So this year we're doing something different. There will now be something for everyone - every month! We will have 2 challenges running at the same time, for the entire month. Easy Peasy will be for those who just want to do something quick and simple, or don't have more complex software. Advanced will be for those who enjoy a bit more of a challenge and want to expand their skills, and have the necessary software. You can of course take part in both challenges each month and in addition there will now be 2 winners for each challenge.
Let's start off with using the Hue/Saturation Adjustment feature in Photoshop or PSE to change the color of something in a photo to a different color altogether. Here's a video to give you some idea what I mean, we will be using the first method shown in the video but I will be doing a step by step with screen shots right here. I would rate this method as intermediate so give it a go. And if you're feeling adventurous you can go on and try some of the other methods in the video.
https://digitalsynopsis.com/design/...q590BM_Vr-lQEKUPf3pa_BxA8VbeaZpbCGccva7rsBYp4
Here's a sample of changing the color of my subject from blue to pink Follow my easy steps with an image that would be easy to extract. My image is from Unsplash free images https://unsplash.com/
Step 1. Make a selection of the part you want to change, eg., jacket, hat, car, kitchen utensil, flower or even hair if you can make a good selection of hair.
Don't be too concerned if you don't get a perfect selection as there are ways to correct that on the mask
Step 2. While the select is still active choose the Adjustment Icon from the bottom of the Layers Panel and choose Hue/Saturation. A mask of your selection will appear above the background layer.
Step 3. Use the HUE slider to change the color and the SATURATION slider to increase the color
If you have missed a bit of the selection or added too much use the mask to correct it by using a white brush on the mask to paint in any parts you have missed or a black brush to fix any overspill.
When you are happy with your results save the image as a JPG and make a layout using your choice of NBK's products. For my layout I used NBK's artCrush #12 https://the-lilypad.com/store/artCRUSH-No12-Artsy-Bits-Pieces-Kit.html
Please include a Before and After image in your layout to show us that the method has worked correctly. I can't wait to see your designs and if you enjoyed this challenge
RULES
This challenge runs from Feb 1st to Feb 29th (One Month)
TWO lucky scrappers will be randomly chosen to win a $5 coupon to the NBK Design store.
You must use 100% NBK Design Products.
Post your layout in the NBK Design Gallery and in this forum, and link your layout to the gallery.
Last edited:


") Such a great job on the challenge! And it looks like a lovely place to hike.
Such a great job on the challenge! And it looks like a lovely place to hike.