lmccandless
The Force is strong with this one.
- Joined
- Mar 9, 2009
- Messages
- 20,894
Ever wonder how to edit your signature? Here is a relatively simple tutorial to get you rolling...
First, you can create an image in whatever program you normally use to scrap. These instructions are for Photoshop, first and then for relatively any other program towards the bottom. Adding your signature to the forum will be the same for any program as it is TLP software specific.
============================================
FAQs ABOUT IMAGES:
A. What size do you all create your siggy images? Do you create full size then scale down, or do you start with your small-scale canvas?
TO CUT AN IMAGE FOR LINKING: PHOTOSHOP
If you use a program such as PS that has a slice tool, follow these steps to cut up your image...
1. Select the slice tool under the crop tool

2. Use the slice tool to cut up your image into however many slices (these will be individual images) as you desire. For this example, I will use three (to be three links once done).

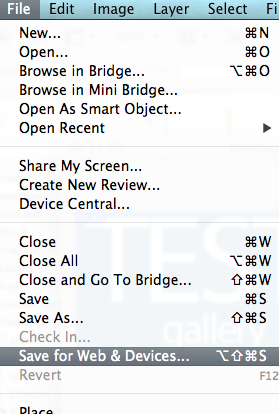
3. Save your image for Web...
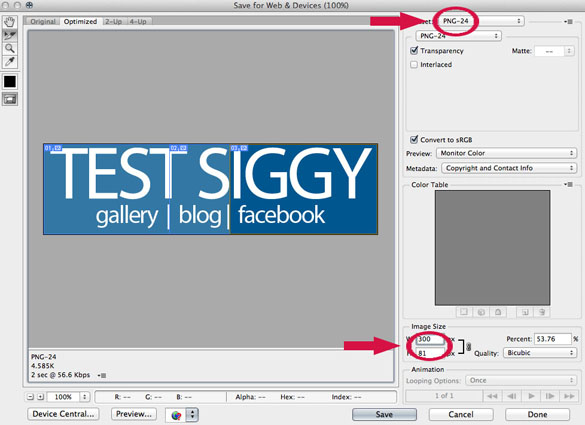
4. There will be three files saved in this example because the image was divided into three slices. Make sure that you have the Format selected as PNG; here is where you can resize the image to a more manageable web size if you desire and haven't already done it. If you have already resized your image, simply leave the Image Size section at its default. Click Save. Select a folder location where you can easily find these saved files.
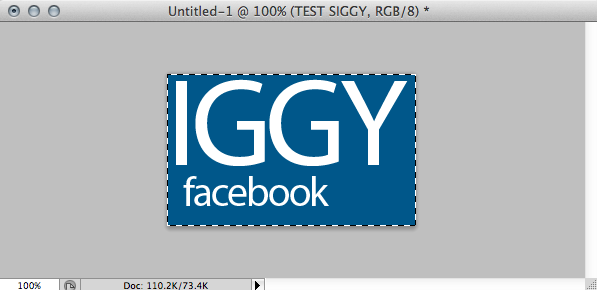
5. The images will then be saved to whatever specified file location you selected in a folder titled Images. In this folder, you will see the images you saved and that will compose your siggy (in this case, there are three).


6. Upload each of the saved images (testsiggy1.jpg, testsiggy2.jpg and testsiggy3 .jpg) to whatever host you typically use (ie Photobucket).
7. Proceed to "To Add Your Image & Links to Your Forum Signature" below.
============================================
TO CUT AN IMAGE FOR LINKING: RELATIVELY ANY PROGRAM
If you don't have the slice tool in the program you use to scrap, you can still cut it up (you can use this in PS, as well).
For this example, I will show a siggy with three parts (the same procedure follows for any amount of image cuts)...
1. First, you need to resize your image for the web if you created it at full-size (ie. 3600x1800). Flatten your image and then do this as you would normally resize any image.


2. Drag your image into your web browser to double check the size - does it display as you wish it to? Once you have resized it appropriately, proceed to Step 3.
3. Select the far left side of your image w/ a selection tool, as far over as you want that to be linked.

4. Crop the image to just that far left side

5. Save that image for web (like siggypart1.jpg)
6. Uncrop or go back a step so you're back to your full siggy but don't deselect.
7. Invert the selection on the image

8. Crop again so now you should have just the right side of the image
remaining (if you cut out that left portion or 1/3).

9. Again, select the far left side of your image w/ a selection tool, as far over as you want that to be linked.

10. crop the image to just that selection

11. Save that image for web (like siggypart2.jpg)
12. Uncrop again or go back a step so you're back to the remaining portion of your image (the remaining 2/3) but don't deselect.
13. invert the selection on the image

14. Crop to the remainder which should give you the remaining image to be saved.
15. Save that remaining image for web (like siggypart3.jpg).
16. Upload each of the saved images (siggypart1.jpg, siggypart2.jpg and siggypart3.jpg) to whatever host you typically use (ie Photobucket).
17. Proceed to "To Add Your Image & Links to Your Forum Signature" below.
NOTE: the same rules apply if you want to cut up your image horizontally vs vertically.
============================================
TO ADD YOUR IMAGE & LINKS TO YOUR FORUM SIGNATURE
To add your new signature to the forum, complete the following steps:
1. Make sure you have at least 5 posts.
2. Upload your siggie. If it meets the Lilypad Gallery Requirements, you can load it here. If not, use an alternate hosting site.
3. (TLP Gallery) After uploading your signature to the gallery, simply copy the Share BB Code link.
(Alternate Gallery) Copy the image URL of your signature at the hosting site.
4. Look up to the right hand corner where your name is, and click on your name. The second link down is "Signature". Click it.
Now you will see a blank box. You can type in this box or add the signature image you created.
5. (TLP Gallery) Simply paste in the code from Share BB Code box that you copied earlier.
(Alternate Host) Click the icon with the mountain. Insert the URL from the above step.
6. Once you hit "Insert", you have the option of pressing "Preview" or "Save Changes". Make sure you Save Changes before you leave this screen.
============================================
As always, if you have any questions, find an error in this tutorial or need help, feel free to PM me! I'm happy to help. Or, if you have any questions that may benefit others, please feel free to post them in reply to this post, and I will do my best to get them answered!
First, you can create an image in whatever program you normally use to scrap. These instructions are for Photoshop, first and then for relatively any other program towards the bottom. Adding your signature to the forum will be the same for any program as it is TLP software specific.
============================================
FAQs ABOUT IMAGES:
A. What size do you all create your siggy images? Do you create full size then scale down, or do you start with your small-scale canvas?
I always create at a full-sized-ish canvas (3600x1800) - makes it that much easier to use whatever elements desired because they [the elements] are all full-sized. Then, I typically flatten my image, select only the graphics and crop to just the visible area so there isn't a lot of padding around the image. Then, I downsize the original image down to a more manageable web-size. You can downsize a couple of ways - you can either do it in your main program window or you can do it in PS when you Save for Web and Devices... (see below - Step 4 for PS).
Our forum rules say that images may NOT BE LARGER than 600x300 but that is still pretty big. Typically, I stick with around 300x115 for mine - don't want to make for a lot of scrolling in the forums! I would recommend exporting your image as a jpg then dragging and dropping that entire image into your browser to see exactly what size it will appear; then, proceed to cutting it up.
B. What type of files do I export for the web?Our forum rules say that images may NOT BE LARGER than 600x300 but that is still pretty big. Typically, I stick with around 300x115 for mine - don't want to make for a lot of scrolling in the forums! I would recommend exporting your image as a jpg then dragging and dropping that entire image into your browser to see exactly what size it will appear; then, proceed to cutting it up.
If you do not have a solid image (meaning something with a rectangle of background paper), you will need to export the files as PNGs so they appear with transparent backgrounds when displayed on the site (see steps below). If you have an image with a full background, you can just as easily use JPGs - the example below could easily be used with JPGs.
============================================
TO CUT AN IMAGE FOR LINKING: PHOTOSHOP
If you use a program such as PS that has a slice tool, follow these steps to cut up your image...
1. Select the slice tool under the crop tool
2. Use the slice tool to cut up your image into however many slices (these will be individual images) as you desire. For this example, I will use three (to be three links once done).
3. Save your image for Web...
4. There will be three files saved in this example because the image was divided into three slices. Make sure that you have the Format selected as PNG; here is where you can resize the image to a more manageable web size if you desire and haven't already done it. If you have already resized your image, simply leave the Image Size section at its default. Click Save. Select a folder location where you can easily find these saved files.
5. The images will then be saved to whatever specified file location you selected in a folder titled Images. In this folder, you will see the images you saved and that will compose your siggy (in this case, there are three).
6. Upload each of the saved images (testsiggy1.jpg, testsiggy2.jpg and testsiggy3 .jpg) to whatever host you typically use (ie Photobucket).
7. Proceed to "To Add Your Image & Links to Your Forum Signature" below.
============================================
TO CUT AN IMAGE FOR LINKING: RELATIVELY ANY PROGRAM
If you don't have the slice tool in the program you use to scrap, you can still cut it up (you can use this in PS, as well).
For this example, I will show a siggy with three parts (the same procedure follows for any amount of image cuts)...
1. First, you need to resize your image for the web if you created it at full-size (ie. 3600x1800). Flatten your image and then do this as you would normally resize any image.
2. Drag your image into your web browser to double check the size - does it display as you wish it to? Once you have resized it appropriately, proceed to Step 3.
3. Select the far left side of your image w/ a selection tool, as far over as you want that to be linked.
4. Crop the image to just that far left side
5. Save that image for web (like siggypart1.jpg)
6. Uncrop or go back a step so you're back to your full siggy but don't deselect.
7. Invert the selection on the image
8. Crop again so now you should have just the right side of the image
remaining (if you cut out that left portion or 1/3).
9. Again, select the far left side of your image w/ a selection tool, as far over as you want that to be linked.
10. crop the image to just that selection
11. Save that image for web (like siggypart2.jpg)
12. Uncrop again or go back a step so you're back to the remaining portion of your image (the remaining 2/3) but don't deselect.
13. invert the selection on the image
14. Crop to the remainder which should give you the remaining image to be saved.
15. Save that remaining image for web (like siggypart3.jpg).
16. Upload each of the saved images (siggypart1.jpg, siggypart2.jpg and siggypart3.jpg) to whatever host you typically use (ie Photobucket).
17. Proceed to "To Add Your Image & Links to Your Forum Signature" below.
NOTE: the same rules apply if you want to cut up your image horizontally vs vertically.
============================================
TO ADD YOUR IMAGE & LINKS TO YOUR FORUM SIGNATURE
To add your new signature to the forum, complete the following steps:
1. Make sure you have at least 5 posts.
2. Upload your siggie. If it meets the Lilypad Gallery Requirements, you can load it here. If not, use an alternate hosting site.
3. (TLP Gallery) After uploading your signature to the gallery, simply copy the Share BB Code link.
(Alternate Gallery) Copy the image URL of your signature at the hosting site.
4. Look up to the right hand corner where your name is, and click on your name. The second link down is "Signature". Click it.
Now you will see a blank box. You can type in this box or add the signature image you created.
5. (TLP Gallery) Simply paste in the code from Share BB Code box that you copied earlier.
(Alternate Host) Click the icon with the mountain. Insert the URL from the above step.
6. Once you hit "Insert", you have the option of pressing "Preview" or "Save Changes". Make sure you Save Changes before you leave this screen.
============================================
As always, if you have any questions, find an error in this tutorial or need help, feel free to PM me! I'm happy to help. Or, if you have any questions that may benefit others, please feel free to post them in reply to this post, and I will do my best to get them answered!
Last edited by a moderator:
")


 I spoke too soon... the links are jacked up and linking to photo bucket!