- Joined
- Sep 17, 2012
- Messages
- 13,842
January 8 | Technique: Make Your Own Paint Mask
Hi Everyone! Welcome to MOC 11! Can't believe we are at 11, such an accomplishment! I'm thrilled to be hosting a technique challenge this year! Don't be too worried, this is meant to be fun, and a little messy! Trying to get you to use paint layers to show off your photos in a different way! Please tag me for any questions or help, I’m here.
Just as a reference, here is my image at the start of my scrap page! I hope you like how it turns out all painty!

First, you will start out with a layer of paint, and your image layer. Then you clip the paper to the paint layer.
At times the paint will be out of the image - like the black area on the top and bottom part of my image. You can either re-size the paint smaller, turn it or crop it. I prefer to re-size or turn it, as cropping loses the paint edges at times.

When I make my images into a painted mask, I use MANY layers of the same image, and MANY layers of different paint, gesso, splatters, etc. The image layers must remain right on top of each other so that the images line up perfectly for your mask. I tend to copy the image within my layout.
When I bring the paint in under my image, and once I have the paint in the right position, I clip the image to the paint. Highlight the layers you want linked together, then clicking on the little link layers icon. This way they move as one. Here is the little link icon:

I change the blend modes, size of the paint, and then at times I even add a style! Blend modes change how the images work together and how they appear. You can scroll through them - have the layer selected, the move tool selected, press the shift key, and then the + key. Hold the shift key, and keep pressing the + key to rotate between all the blend modes. You can see how they react live. To get the look you want, you must play around!
As a reference, Adobe has a list of each blend mode and what it is capable of. Found here.

As you add more paint and photo layers, and you change up the blend modes, you start to see your image change. Sometimes water spots appear, streaks, and fun layers you don't expect. Here is what I have so far. I think I have approx. 3 layers of photos and paint layers.

Continue to add layers of paint, and layers of images. Here is my image after about 11 layers of paint and images. I just love how some of the layers blend and interact with each other. Something one single mask doesn't usually do, though it is possible.

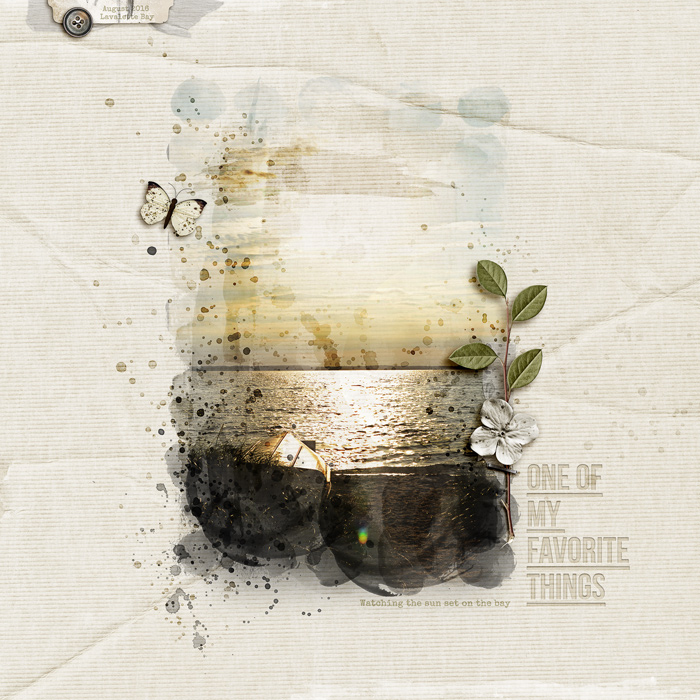
I kept playing, added more layers of paint, more layers of splatter, changed up blend modes, styles, and moved things around. This is my final layout:

Your page for this challenge must include:
1. A single photo blended into the background using layers of paint, watercolor, gesso, etc.
2. Please only have a small cluster on your page, so the painted image is the main focus.
Here is another layout I did a couple years ago. Again, all paint and all playing with blend modes.

Here are some other software how to for masks and use:
Affinity
Paint Shop Pro
Photopea
GIMP
Pixelmator
Pixlr (Video)
In addition to the specific instructions above, your page must be a new page in order to count for the Month of Challenges. Your page must be posted in three places:
Hi Everyone! Welcome to MOC 11! Can't believe we are at 11, such an accomplishment! I'm thrilled to be hosting a technique challenge this year! Don't be too worried, this is meant to be fun, and a little messy! Trying to get you to use paint layers to show off your photos in a different way! Please tag me for any questions or help, I’m here.
Just as a reference, here is my image at the start of my scrap page! I hope you like how it turns out all painty!
First, you will start out with a layer of paint, and your image layer. Then you clip the paper to the paint layer.
At times the paint will be out of the image - like the black area on the top and bottom part of my image. You can either re-size the paint smaller, turn it or crop it. I prefer to re-size or turn it, as cropping loses the paint edges at times.
When I make my images into a painted mask, I use MANY layers of the same image, and MANY layers of different paint, gesso, splatters, etc. The image layers must remain right on top of each other so that the images line up perfectly for your mask. I tend to copy the image within my layout.
When I bring the paint in under my image, and once I have the paint in the right position, I clip the image to the paint. Highlight the layers you want linked together, then clicking on the little link layers icon. This way they move as one. Here is the little link icon:
I change the blend modes, size of the paint, and then at times I even add a style! Blend modes change how the images work together and how they appear. You can scroll through them - have the layer selected, the move tool selected, press the shift key, and then the + key. Hold the shift key, and keep pressing the + key to rotate between all the blend modes. You can see how they react live. To get the look you want, you must play around!
As a reference, Adobe has a list of each blend mode and what it is capable of. Found here.
As you add more paint and photo layers, and you change up the blend modes, you start to see your image change. Sometimes water spots appear, streaks, and fun layers you don't expect. Here is what I have so far. I think I have approx. 3 layers of photos and paint layers.
Continue to add layers of paint, and layers of images. Here is my image after about 11 layers of paint and images. I just love how some of the layers blend and interact with each other. Something one single mask doesn't usually do, though it is possible.
I kept playing, added more layers of paint, more layers of splatter, changed up blend modes, styles, and moved things around. This is my final layout:
Your page for this challenge must include:
1. A single photo blended into the background using layers of paint, watercolor, gesso, etc.
2. Please only have a small cluster on your page, so the painted image is the main focus.
Here is another layout I did a couple years ago. Again, all paint and all playing with blend modes.
Here are some other software how to for masks and use:
Affinity
Paint Shop Pro
Photopea
GIMP
Pixelmator
Pixlr (Video)
In addition to the specific instructions above, your page must be a new page in order to count for the Month of Challenges. Your page must be posted in three places:
- Uploaded to the TLP Gallery (not an outside hosting site).
- Posted in your page thread you created in the MOC Layouts Folder. You should have one post per completed challenge page. If you complete all 31 challenges, your thread should contain 31 posts. Please do not comment in the participants’ page threads so we can keep them clean.
- Posted in this thread. People can comment here if they wish.
Last edited:


")
")