- Joined
- Apr 2, 2010
- Messages
- 11,303
JANUARY 13: Create a Shaker Box
Hello scrappers,
Today we are going to "shake things up a bit".... digitally, and create a shaker box for our scrapbook layouts.
What's a shaker box, you ask? It's a portion of your layout that is a clear window filled with tiny elements that move around when you shake it.
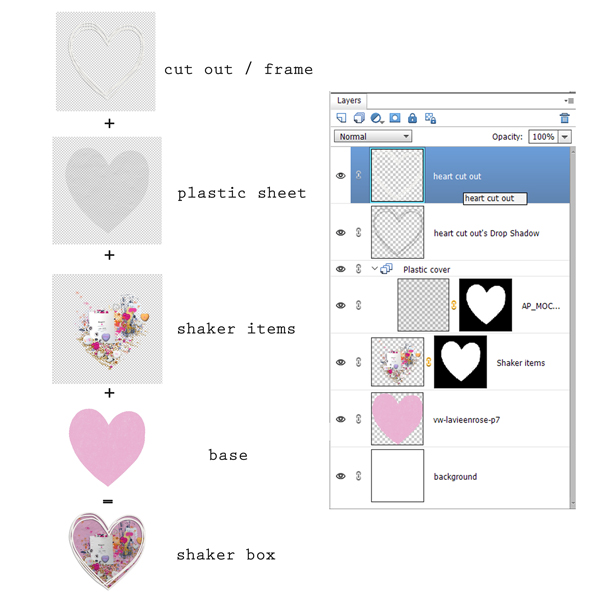
In paper scrapping shaker boxes are made with a cardstock shape as the base, frame/cut out for the top, acetate/plastic sheet to create a window and keep the contents inside, tiny items to shake (which usually consists of confetti, scatters, sequins, beads, glitter, etc) and strips of foam mounting tape to build up the edges of the box so the items have room to shake.
Allison Pennington has made a plastic sheet freebie that you can use to create the window for your shaker box if you want.
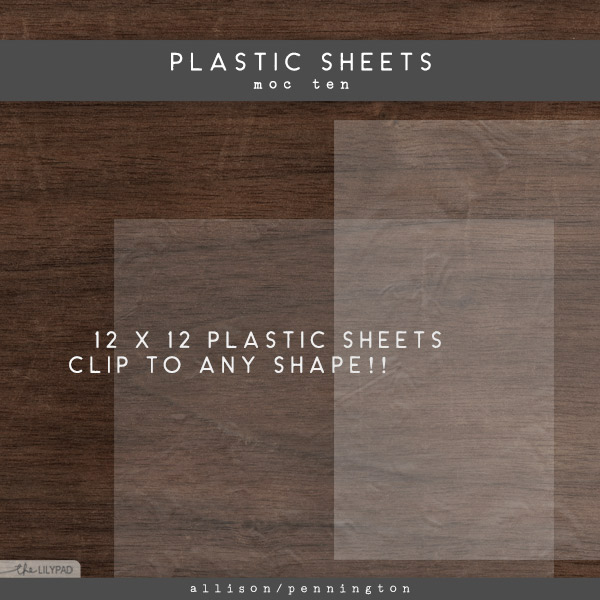
click image to download
Things to consider when making your shaker box
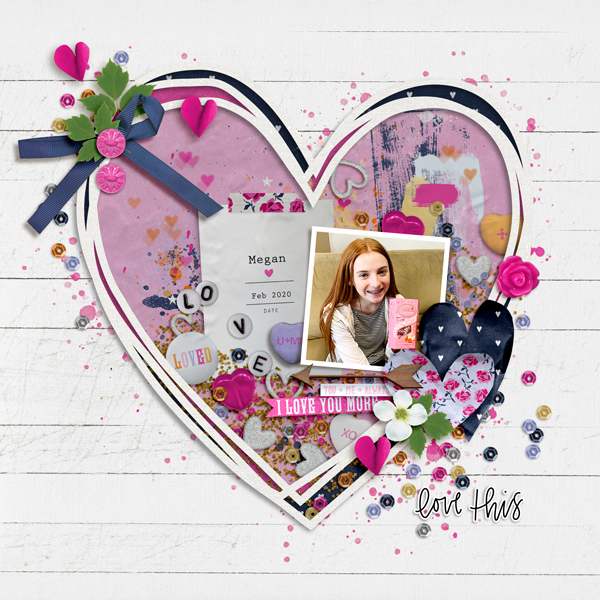
Layout I made for this challenge
As you can see, the BIG, filled heart is my shaker box. Note: I inverted (ctrl i) the plastic sheet cover so it would show the subtle ripples of the plastic on my light colored shaker box.
Shaker Box Layout Requirements
1. Create at least 1 shaker box on your layout - any size, please make sure I can easily see it.
You may use templates, but you CANNOT USE a premade shaker box as your shaker box. Premade scatters, confetti, whimsies, etc ARE allowed.
2. Fill your shaker box with tiny items so it's at least 1/3 full - It needs filled with LOTS and LOTS of elements so it can SHAKE!
Remember gravity - the bottom of your shaker box should have a higher concentration of lots of elements piled in there and will get more spread out as they go up. Also, if you want to vary the drop shadow depths/distance on several of the shaker items it will help them appear to be stacked inside the shaker box.
3. Finish your layout as desired. No photos are required, but you can have as many as you want.
4. Have fun and keep scrappin.
General MOC requirements
Your page must be a new page in order to count for the Month of Challenges. Your page must be posted in three places:
Hello scrappers,
Today we are going to "shake things up a bit".... digitally, and create a shaker box for our scrapbook layouts.
What's a shaker box, you ask? It's a portion of your layout that is a clear window filled with tiny elements that move around when you shake it.
In paper scrapping shaker boxes are made with a cardstock shape as the base, frame/cut out for the top, acetate/plastic sheet to create a window and keep the contents inside, tiny items to shake (which usually consists of confetti, scatters, sequins, beads, glitter, etc) and strips of foam mounting tape to build up the edges of the box so the items have room to shake.
Allison Pennington has made a plastic sheet freebie that you can use to create the window for your shaker box if you want.
click image to download
Things to consider when making your shaker box
- Shaker boxes are 3D and pop off the page since they use foam mounting tape around the edges. Use deep shadows on the frame to get that popped effect.
- Frames and cut out shapes are a quick way to start your shaker box.
- Don't have a frame or cut out, use a wide stroke on a separate layer to create your frame/top.
- Try width: 65 px (adjust as needed for your size of box) with location: center for your stroke. Remember the foam mounting tape in paper scrapping is hidden by this frame, so make it wide enough to look it's hiding foam mounting tape.
- You may have to play with blend modes & opacity to get the plastic cover ripples to show up on dark backgrounds (lighten) and possibly need to invert (ctrl i) the plastic cover & play with opacity on light backgrounds.
- Feel free to move the plastic sheet around so you can get the ripples to show how you want.
- Hide the plastic sheet layer while you're adding the shaker items so it doesn't get in the way.
Layout I made for this challenge
As you can see, the BIG, filled heart is my shaker box. Note: I inverted (ctrl i) the plastic sheet cover so it would show the subtle ripples of the plastic on my light colored shaker box.
Shaker Box Layout Requirements
1. Create at least 1 shaker box on your layout - any size, please make sure I can easily see it.
You may use templates, but you CANNOT USE a premade shaker box as your shaker box. Premade scatters, confetti, whimsies, etc ARE allowed.
2. Fill your shaker box with tiny items so it's at least 1/3 full - It needs filled with LOTS and LOTS of elements so it can SHAKE!
Remember gravity - the bottom of your shaker box should have a higher concentration of lots of elements piled in there and will get more spread out as they go up. Also, if you want to vary the drop shadow depths/distance on several of the shaker items it will help them appear to be stacked inside the shaker box.
3. Finish your layout as desired. No photos are required, but you can have as many as you want.
4. Have fun and keep scrappin.
General MOC requirements
Your page must be a new page in order to count for the Month of Challenges. Your page must be posted in three places:
- Uploaded to the TLP Gallery (not an outside hosting site).
- Posted in your page thread you created in the MOC Layouts Folder. You should have one post per completed challenge page. If you complete all 31 challenges, your thread should contain 31 posts. Please do not comment in the participants’ page threads so we can keep them clean.
- Posted in this thread. Please copy & paste the Share BB Code so we can easily find your layout in the gallery. People can comment here too, if they wish.
Last edited:


") Glad I only have to work a partial day today - but I have to finish because we leave town tomorrow and I have to be caught up. LOL
Glad I only have to work a partial day today - but I have to finish because we leave town tomorrow and I have to be caught up. LOL