FarrahJobling
FarrahJobling
- Joined
- Dec 17, 2012
- Messages
- 6,974
Hello friends! Happy April Fools day! It really is NO JOKE that I'm hosting a technique challenge today and boy, do we have a toughie today. Today we are going to be making typographical portraits. I tried several of the techniques floating around the web, but I really wanted to find a way to re-create the same look with fewer steps and easier instructions. I especially wanted to be able to share this technique with our members who use a variety of scrapping software.
Please post your completed layout in The Lilypad gallery. GALLERY RULES: Layouts must contain at least 50% TLP products. (Templates count as 15%.) Uploads must be less than 250k. List all credits; no off-site linking allowed.
Ok...here goes.
1. Start with a plain white canvas.
2. Add a large photo...you will want to pick a photo with a lot of contrast...preferably a portrait of a person or animal or even a flower will work...but the point is that you need contrast between the shadows, midtones, and highlights.
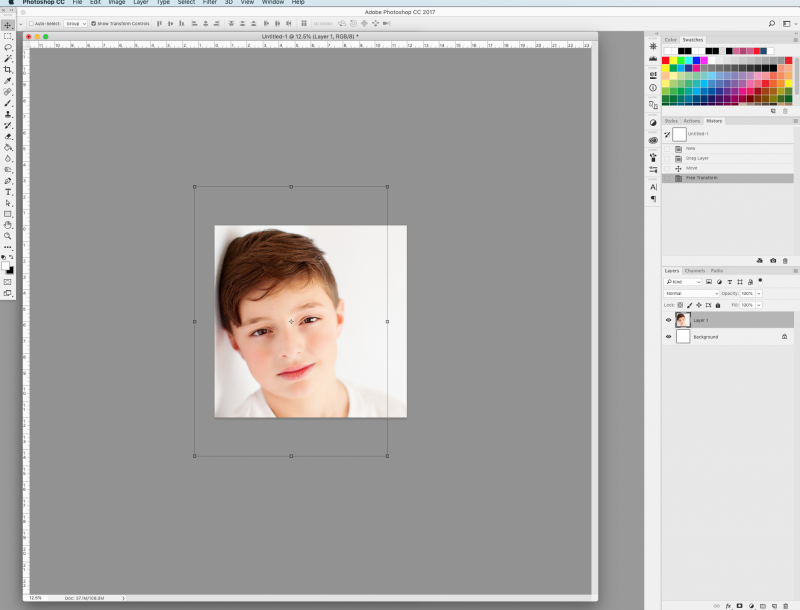
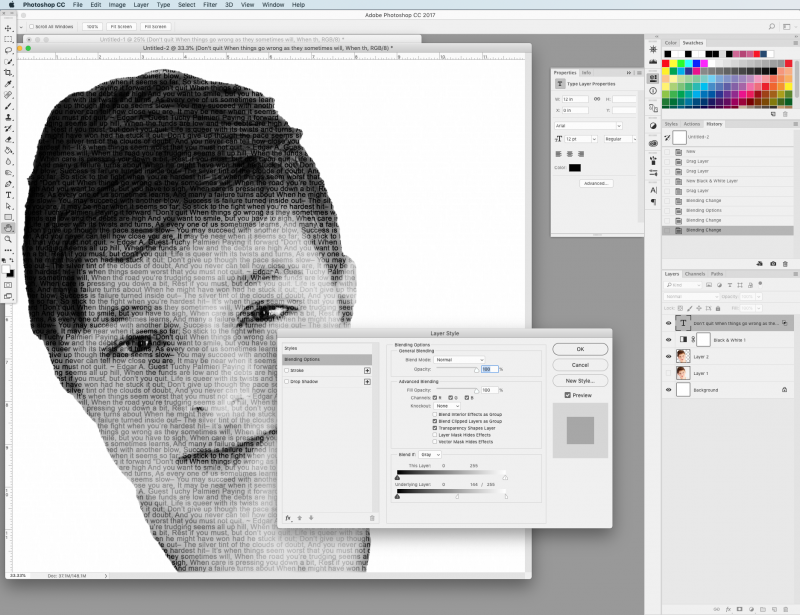
3. Make a quick selection of the person or object as if you were making a cut-out. You DO NOT need to be precise. You can use the lasso tool as well...it doesn't have to be super detailed. Copy this selection onto a new layer. ***Note:
It needs to be on a separate layer so we can use it as a template for the mask for the text layer later***
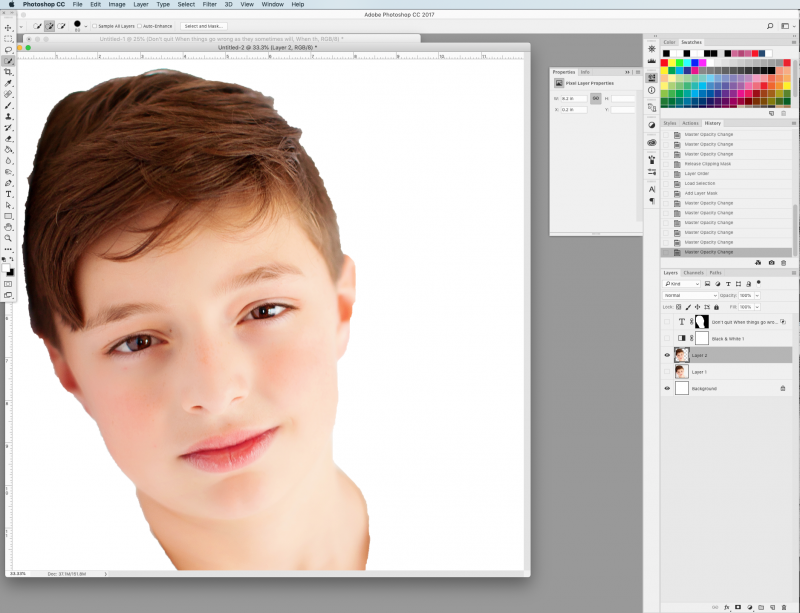
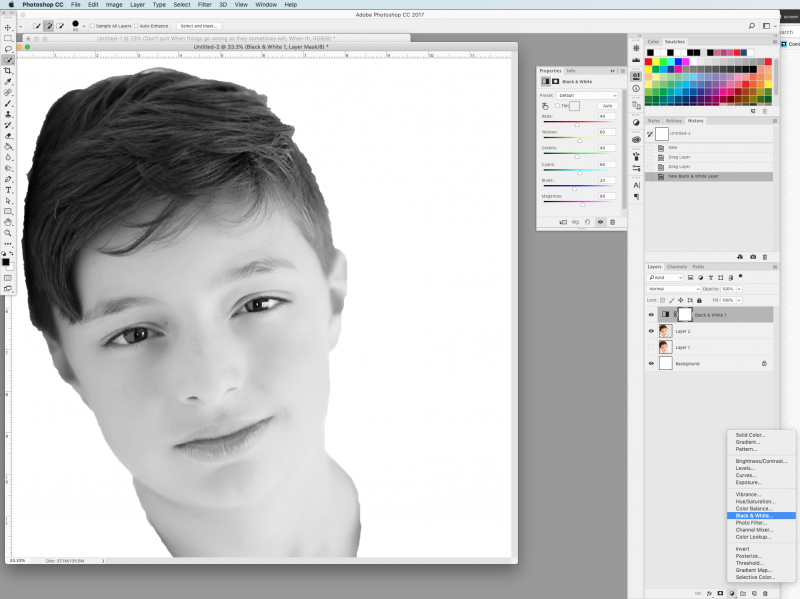
4. Convert the photo to Black and White. You can simply desaturate or add a Black and White layer style. ***NOTE: I have a BW layer on top of both the original and the cut out so everything below it is BW. You may have to convert both photo layers to BW in your software.***
5. Add a text layer, making sure that you cover AT LEAST the area of the cutout part of the photo. You can use a repeating name, a poem, song lyric, or even subway art. (I used a repeating poem called "Don't Quit" and it was just as easy to make the text layer over the whole canvas) ***NOTE: You may want to come back later to play around with the font and size once you see how the final product looks***
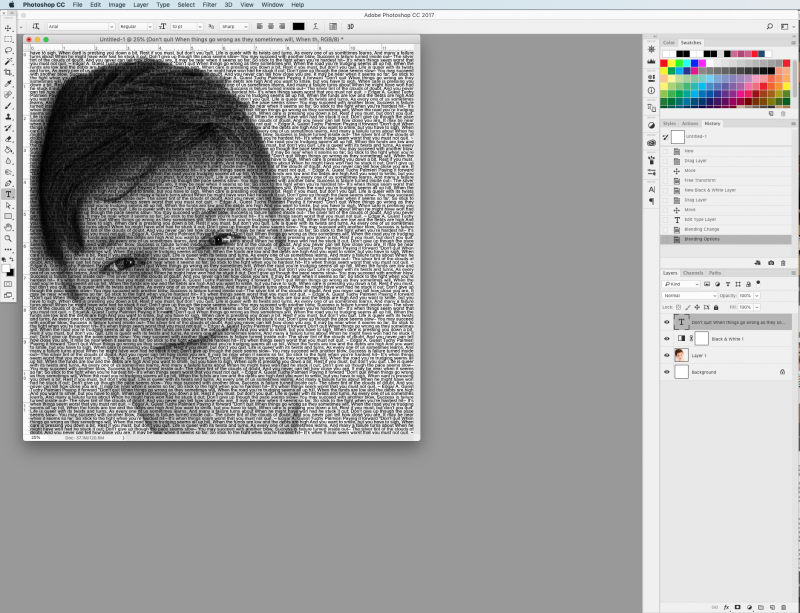
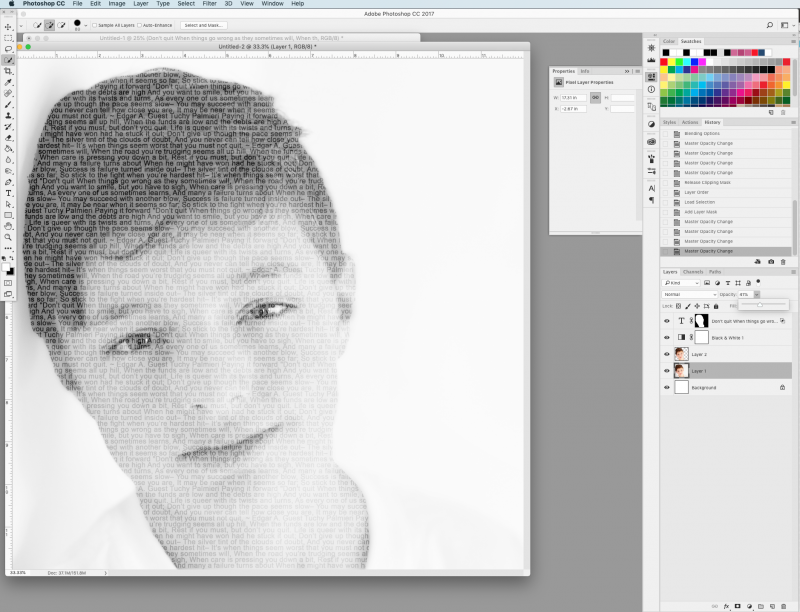
6. Right click on the layer with the thumbnail of the cutout version of your item and click "select pixels". Click on the text layer and add a layer mask (the icon at the bottom of the layers palette that looks like a black rectangle with a white circle in the middle). Alternatively you can just clip the text to the cut out layer.
***NOTE: Depending on you software, you may have to manually brush over a rough area where you want the words to appear***
7. Play around with the opacity and blending options (under the fx tab) of the text layer until you you like what you see. Also play around with the opacity of the cut out layer and the photo layer to find a balance between the dark and lighter areas of the object vs. text. ***TIP: To separate the sliders for the blending options, hold down the alt/option key***
***NOTE: If you clip directly without adding a layer mask, the text reacts to the change in opassity of the cut out, so you may just want to add a layer mask and brush lightly over certain areas.***
***NOTE: if you original photo has a background, then you can either keep it some or use a mask and brush over areas you don't want to see***
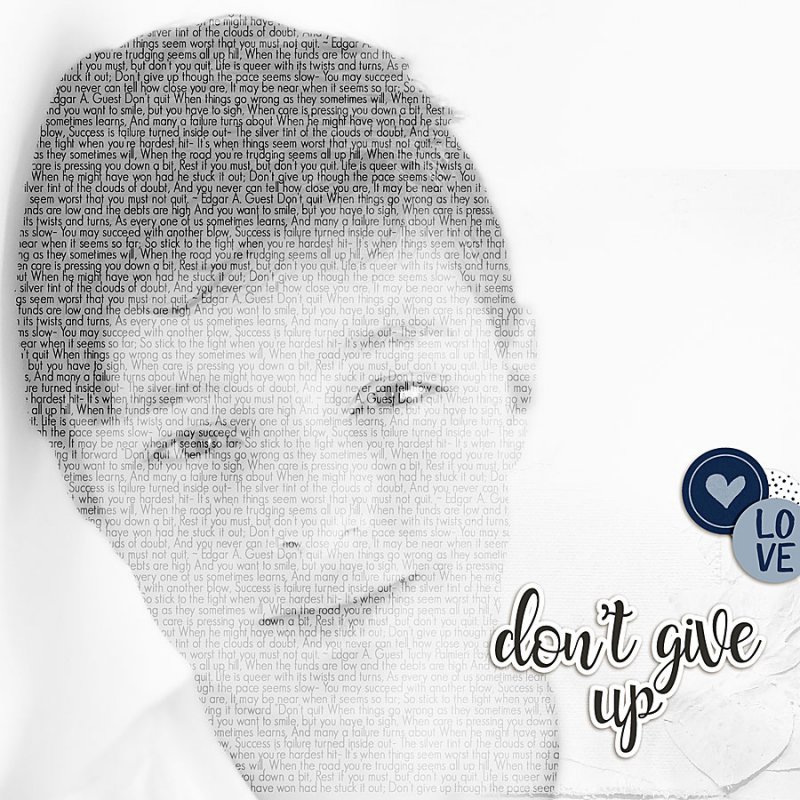
8. The last thing is to make the layout your own...do anything you'd like to make it your style. =)
PS...here is another method, posted by Christa: https://the-lilypad.com/forum/threads/portrait-typography.52167/
This is a speed scrap, you have 1 hour to finish!
April Fools!!!!!!!
Just kidding! This is a technique slow scrap so you have 24 hours to finish your pages. Layouts are due April 2, 2019 at 1pm Eastern time. Please load you pages to THIS gallery and post them below. Have fun!!! I can't wait to see what you come up with.
Here is my example:
Please post your completed layout in The Lilypad gallery. GALLERY RULES: Layouts must contain at least 50% TLP products. (Templates count as 15%.) Uploads must be less than 250k. List all credits; no off-site linking allowed.
Ok...here goes.
1. Start with a plain white canvas.
2. Add a large photo...you will want to pick a photo with a lot of contrast...preferably a portrait of a person or animal or even a flower will work...but the point is that you need contrast between the shadows, midtones, and highlights.
3. Make a quick selection of the person or object as if you were making a cut-out. You DO NOT need to be precise. You can use the lasso tool as well...it doesn't have to be super detailed. Copy this selection onto a new layer. ***Note:
It needs to be on a separate layer so we can use it as a template for the mask for the text layer later***
4. Convert the photo to Black and White. You can simply desaturate or add a Black and White layer style. ***NOTE: I have a BW layer on top of both the original and the cut out so everything below it is BW. You may have to convert both photo layers to BW in your software.***
5. Add a text layer, making sure that you cover AT LEAST the area of the cutout part of the photo. You can use a repeating name, a poem, song lyric, or even subway art. (I used a repeating poem called "Don't Quit" and it was just as easy to make the text layer over the whole canvas) ***NOTE: You may want to come back later to play around with the font and size once you see how the final product looks***
6. Right click on the layer with the thumbnail of the cutout version of your item and click "select pixels". Click on the text layer and add a layer mask (the icon at the bottom of the layers palette that looks like a black rectangle with a white circle in the middle). Alternatively you can just clip the text to the cut out layer.
***NOTE: Depending on you software, you may have to manually brush over a rough area where you want the words to appear***
7. Play around with the opacity and blending options (under the fx tab) of the text layer until you you like what you see. Also play around with the opacity of the cut out layer and the photo layer to find a balance between the dark and lighter areas of the object vs. text. ***TIP: To separate the sliders for the blending options, hold down the alt/option key***
***NOTE: If you clip directly without adding a layer mask, the text reacts to the change in opassity of the cut out, so you may just want to add a layer mask and brush lightly over certain areas.***
***NOTE: if you original photo has a background, then you can either keep it some or use a mask and brush over areas you don't want to see***
8. The last thing is to make the layout your own...do anything you'd like to make it your style. =)
PS...here is another method, posted by Christa: https://the-lilypad.com/forum/threads/portrait-typography.52167/
This is a speed scrap, you have 1 hour to finish!
April Fools!!!!!!!
Just kidding! This is a technique slow scrap so you have 24 hours to finish your pages. Layouts are due April 2, 2019 at 1pm Eastern time. Please load you pages to THIS gallery and post them below. Have fun!!! I can't wait to see what you come up with.
Here is my example:
Last edited:
