- Joined
- Jun 12, 2011
- Messages
- 8,204
February Winners
Thank you so much for playing along in the Feb challenge I loved all of your pages!
The winners are . . . .
$10 coupon goes to @cookingmylife $6 coupon goes to @A-M
  - I'll get your coupons to you a little bit later
 ")
March 2019 Challenge
Each month I host a different Mixed Media Challenge
This month we are blending background papers.
I'd like you to create a page where your main background is blended with at least one other paper. There are a few ways to do this, the simplest ways are by experimenting with the blending modes for the different paper layers until you come across a look that you like, or you could have a go at adding a layer mask to your paper layer and use the erasing technique using a soft brush.
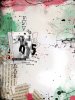
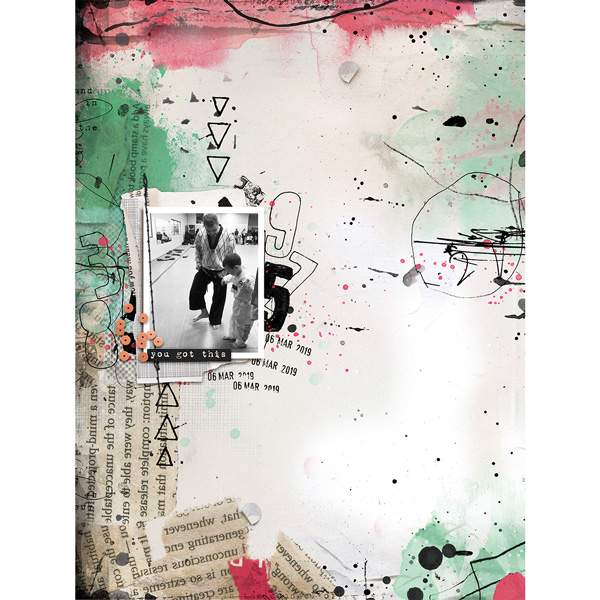
Here is my page for your inspiration
I used the following from the Rachel Jefferies shop:
Make Art & Journal Lovers Edition - Artist Miscellany
Make Art & Journal Lovers Edition - Confetti Papers
Make Art & Journal 1 - Artist Miscellany
Make Art & Journal 2 - Artist Miscellany
Make Art & Journal 2 - Confetti Papers
Sunshine In Her Soul - Mixed Media Artistry
Eucalyptus - Impasto
Messy Marks: Dates 2018
Inked 2 - Layered Template
Everybody works differently but let me walk through some of my steps just in case you need a little help. To create my background I did the following:

At this point I decided that I wanted a painted area behind my photo and this is where I started to make decisions about the paper blending and started erasing. The paint behind my photo is mostly from a paper, the top, bottom and sides of the paper that were not wanted were erased with a layer mask and I did the same for the sprinkles at the bottom with the confetti papers.
Challenge Requirements:
It feels great to scrap with fresh new releases, if you are scrapping with a product released during March 2019 you'll bag yourself a bonus entry for an extra chance to win a coupon should you not be the $10 coupon winner. One winner from the bonus entries will be picked from random to win a $6 coupon to my shop.
I can't wait to see your March blended backgrounds! Hope you enjoyed the tutorial and please let me know if you have any questions or need help
More Inspiration
The Captivating Sistas and special guests had fun with this one and have written up some brief notes about how they put their pages together!
Gaelle - @Ga_L used three papers and a combination of the blending mode technique (darken) and layer masks. She used Captivating Basics bundle 1 ; Sacred time for ourselves (Newsletter freebie) ; Make Art & Journal - template No1 ; Messy Marks date 2019 in her layout.
Adryane - @bensmom used four papers and adjusted the blending modes plus added stitched collages and blending those in too (The background behind Naomi is Sunshine In Her Soul pp no.1 (Normal) + Silent Battles pp no.4 (Overlay) + a variety of the new stitched paper stacks set to Multiply and Color Burn (bottom). The main background is Silent Battles pp no.1 (Normal) + Silent Battles pp no.1 (Overlay)).

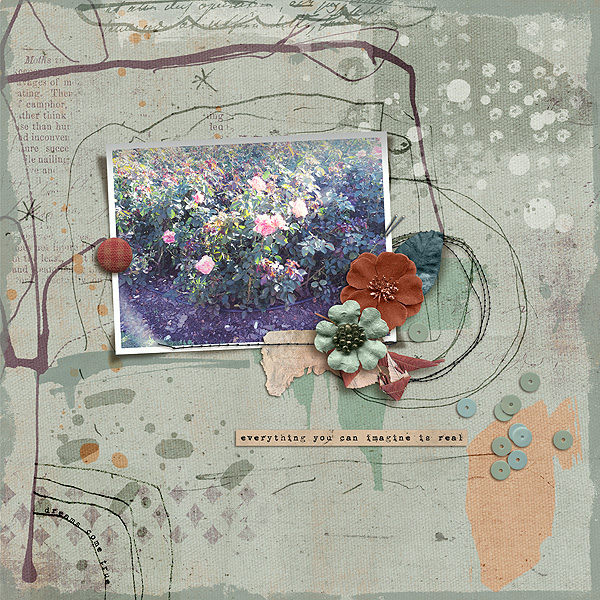
Marilyn - @mcurtt used a base of Eucalyptus - Mixed Media Paperie #5, then a couple of different papers from Make Art & Journal Lover’s Edition Confetti masked together to make them fit her paper size of 8.5x11" (with a blend mode of MULTIPLY), then topped it all off with a couple of like papers also from the Lover's Edition (blended together to keep the shape, and masked out the overlap, then used a blend mode of DIFFERENCE. Added some word art/elements from Sacred Time For Ourselves, Tiny Problems, Sunshine in her Soul, and called it done. The vibrant blue in the lower right hand corner was an accident caused from her blend mode choices. At first she was going to mask it out, but then sheI decided to run with it and add more blues to my page to match.

Ferdy - @Ferdy used a lot of blending modes and also adjusted her opacity and fill layers. She used the M3 nov add ons, all 4 packs - a lot of blending modes here, specially with the paints from the artsy pack for her background, and 2 papers for background.
She used the blending modes, hard light, soft light, darken, mostly and changed opacity and fill, for every layer of paint, brushes and scribble added, to blend as her background. She did the same with the 2 background papers she used.
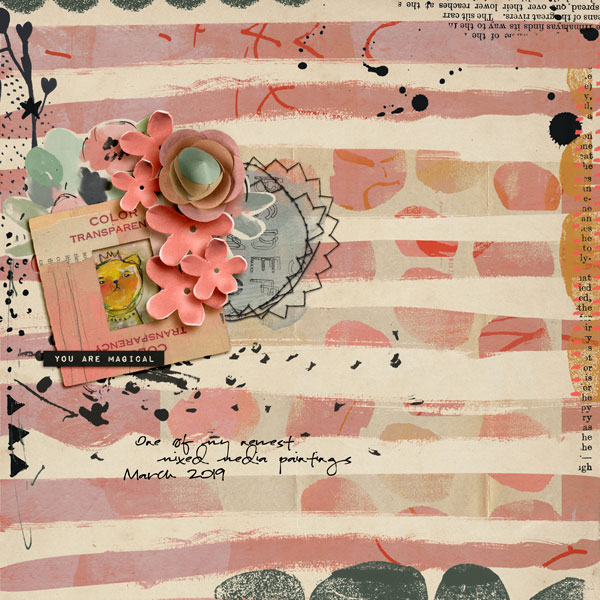
Diane - @dvhoward blended four backgrounds together, she used 4 papers from You Are Magical. The base paper (08) is at blend mode NORMAL. The next layer was a green paper (19) at SATURATION, the red striped paper (06) at LIGHTEN, and a reduced polka dot paper (07) set at LIGHTEN. The elements are from You Are Magical and Sunshine in Her Soul.
Thank you so much for playing along in the Feb challenge I loved all of your pages!
The winners are . . . .
$10 coupon goes to @cookingmylife
$6 coupon goes to @A-M - I'll get your coupons to you a little bit later March 2019 Challenge
Each month I host a different Mixed Media Challenge
This month we are blending background papers.
I'd like you to create a page where your main background is blended with at least one other paper. There are a few ways to do this, the simplest ways are by experimenting with the blending modes for the different paper layers until you come across a look that you like, or you could have a go at adding a layer mask to your paper layer and use the erasing technique using a soft brush.
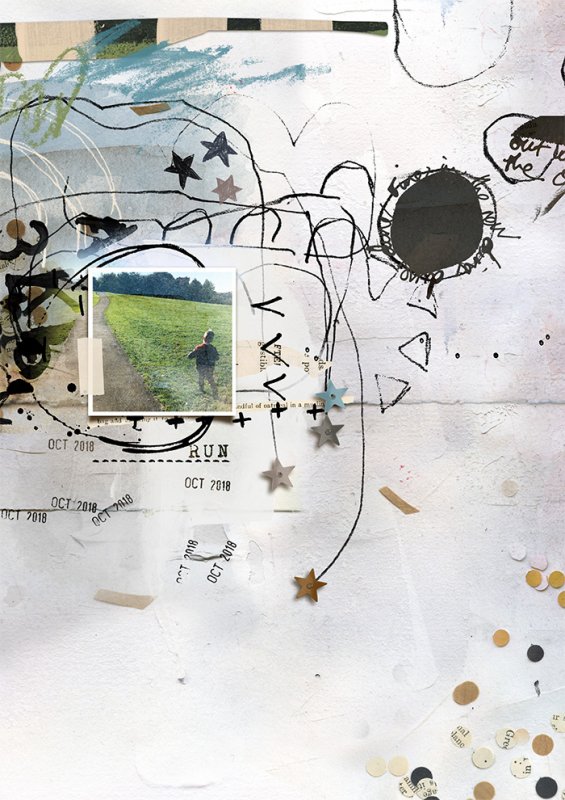
Here is my page for your inspiration
I used the following from the Rachel Jefferies shop:
Make Art & Journal Lovers Edition - Artist Miscellany
Make Art & Journal Lovers Edition - Confetti Papers
Make Art & Journal 1 - Artist Miscellany
Make Art & Journal 2 - Artist Miscellany
Make Art & Journal 2 - Confetti Papers
Sunshine In Her Soul - Mixed Media Artistry
Eucalyptus - Impasto
Messy Marks: Dates 2018
Inked 2 - Layered Template
Everybody works differently but let me walk through some of my steps just in case you need a little help. To create my background I did the following:
- I decided upon a plain background for my base layer and then thought about what design aspects from other papers I wanted to include on my page. I wanted a painted area that would sit behind my photo, I wanted extra texture and I wanted confetti sprinkles.
- The next phases were very experimental and I changed my mind several times. I pulled in the papers that I wanted to work with and pasted my next paper of interest over my base paper. I applied a layer mask to this new paper by clicking the button highlighted with the arrow in the screen shot below.
- A layer mask is a non destructive way to erase part of an element or paper because you can return to it and make adjustments. Once you have created a layer mask ensure your foreground and background colours are set to black and white. Choose the brush tool from the toolbox and select a soft round brush.
- When using your brush if you wish to erase have black set as your foreground colour, if you wish to paint areas back in have white set as your foreground colour. Before you start erasing ensure you have clicked on the white layer mask thumbnail in the layers palette or you'll just get a big black blob on your layout! You can toggle between activating the paper or the mask but just clicking on the thumbnails.
- With your foreground colour set to black and your soft brush selected just start using your brush to erase the parts of paper you don't want visible.
- If you look through my layers in the screenshot above you will see that I turned some of my papers around and erased parts away and changed my mind on one layer and left it hidden.
At this point I decided that I wanted a painted area behind my photo and this is where I started to make decisions about the paper blending and started erasing. The paint behind my photo is mostly from a paper, the top, bottom and sides of the paper that were not wanted were erased with a layer mask and I did the same for the sprinkles at the bottom with the confetti papers.
Challenge Requirements:
- Challenge layouts must use 100% of Rachel Jefferies Designs currently available at my TLP store.
- Upload your layout to the Rachel Jefferies Designs Gallery at TLP
- Please also reply to this thread for your challenge entry to be counted, with the image of your finished layout linked to the gallery.
- No double dipping for other challenges, I'd like to see brand new pages
- The challenge will be open throughout the rest of March and I'll pick a random participant to win a $10 coupon to my shop who will be announced with the April 2019 Challenge.
- It would be helpful when posting your page in this thread that you note you are eligible for the New Release Bonus Entry and you make a note of which March 2019 New Release you used. This would make it faster for me cross checking all the entries when making the random draw for winners!
It feels great to scrap with fresh new releases, if you are scrapping with a product released during March 2019 you'll bag yourself a bonus entry for an extra chance to win a coupon should you not be the $10 coupon winner. One winner from the bonus entries will be picked from random to win a $6 coupon to my shop.
I can't wait to see your March blended backgrounds! Hope you enjoyed the tutorial and please let me know if you have any questions or need help
More Inspiration
The Captivating Sistas and special guests had fun with this one and have written up some brief notes about how they put their pages together!
Gaelle - @Ga_L used three papers and a combination of the blending mode technique (darken) and layer masks. She used Captivating Basics bundle 1 ; Sacred time for ourselves (Newsletter freebie) ; Make Art & Journal - template No1 ; Messy Marks date 2019 in her layout.
Adryane - @bensmom used four papers and adjusted the blending modes plus added stitched collages and blending those in too (The background behind Naomi is Sunshine In Her Soul pp no.1 (Normal) + Silent Battles pp no.4 (Overlay) + a variety of the new stitched paper stacks set to Multiply and Color Burn (bottom). The main background is Silent Battles pp no.1 (Normal) + Silent Battles pp no.1 (Overlay)).
Marilyn - @mcurtt used a base of Eucalyptus - Mixed Media Paperie #5, then a couple of different papers from Make Art & Journal Lover’s Edition Confetti masked together to make them fit her paper size of 8.5x11" (with a blend mode of MULTIPLY), then topped it all off with a couple of like papers also from the Lover's Edition (blended together to keep the shape, and masked out the overlap, then used a blend mode of DIFFERENCE. Added some word art/elements from Sacred Time For Ourselves, Tiny Problems, Sunshine in her Soul, and called it done. The vibrant blue in the lower right hand corner was an accident caused from her blend mode choices. At first she was going to mask it out, but then sheI decided to run with it and add more blues to my page to match.
Ferdy - @Ferdy used a lot of blending modes and also adjusted her opacity and fill layers. She used the M3 nov add ons, all 4 packs - a lot of blending modes here, specially with the paints from the artsy pack for her background, and 2 papers for background.
She used the blending modes, hard light, soft light, darken, mostly and changed opacity and fill, for every layer of paint, brushes and scribble added, to blend as her background. She did the same with the 2 background papers she used.
Diane - @dvhoward blended four backgrounds together, she used 4 papers from You Are Magical. The base paper (08) is at blend mode NORMAL. The next layer was a green paper (19) at SATURATION, the red striped paper (06) at LIGHTEN, and a reduced polka dot paper (07) set at LIGHTEN. The elements are from You Are Magical and Sunshine in Her Soul.