mommatrish
mommatrish
- Joined
- Dec 29, 2010
- Messages
- 2,199
((since I was asked to share...))
These directions were done in PS CS 3, but should give you a basic idea of how to do this.
One of the things that I find make coloring in stamps go quickly is to download some paint brushes and using those to color in the big areas with my main color first. Karah has tons of awesome of awesome brushes (that I use all the time) in her Finishing Touches collections.
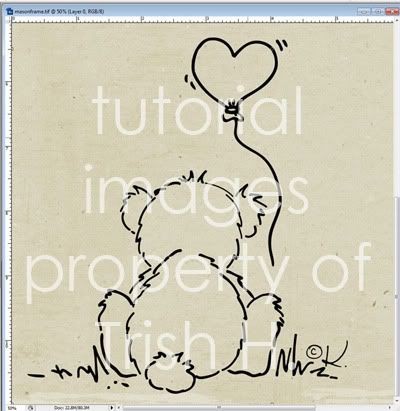
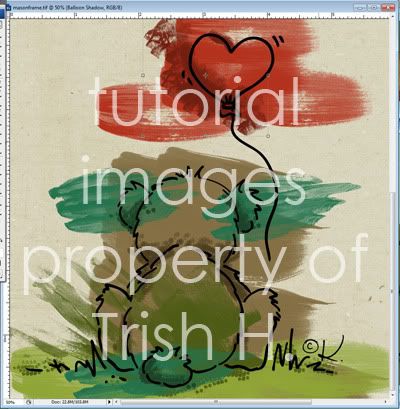
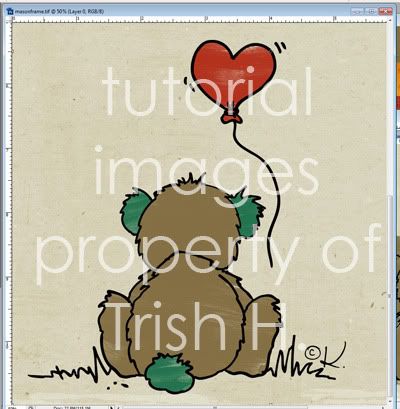
First open your stamp/doodle and place it where you would like it to go:
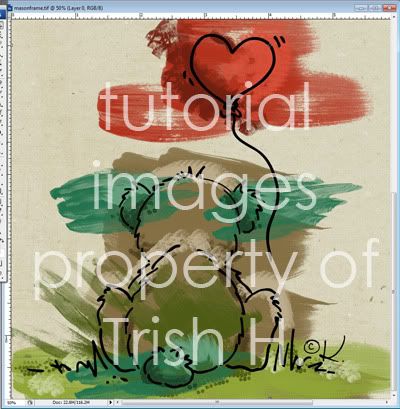
Create a new layer under your stamp select the brush you want to use and then select the color you want to use. (I generally open papers of all the colors in whatever kit I am working with and use my color dropper tool to select my colors from those) Use a large brush and fill in your main colors (making sure to put each color on a NEW layer)
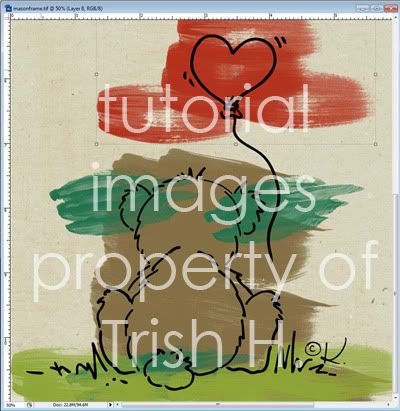
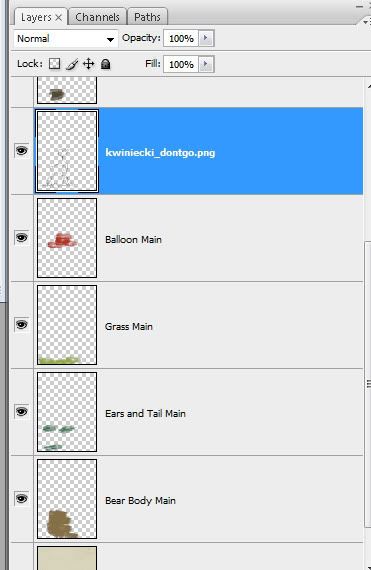
Rename all your color layers with what the parts are plus the word MAIN.
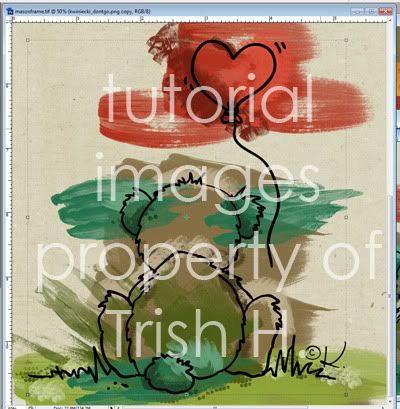
Hide all of your color layers except one and create a new layer on top of it (adding layer name and replace MAIN with SHADOW). Select that layer color and then go down some to get a darker version of the color. Using a small brush color over where your shadows would go:
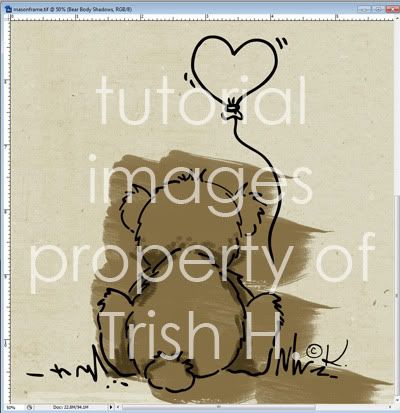
Then go through one color at a time and add your shadows to each color layer.
Hide your main colors and shadows again (except one main color) and we're going to do what we just did again, only with lighter colors and labeling the layers with HIGHLIGHT.
Now right now this just looks like a hot mess right?
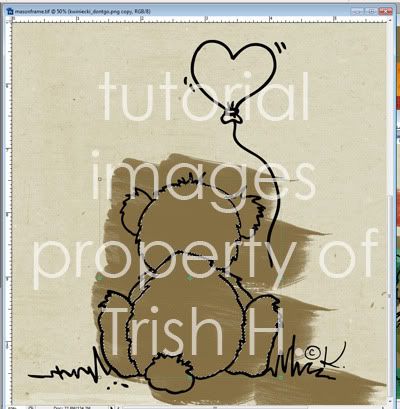
If your doodle doesn't haven't any open areas, or lines that don't connect you can skip this part. If your doodle is like mine, and it has areas that don't fully connect you do need to do this.
Duplicate your doodle and hide the original. Take a small circular brush (try to match it to the line size) and go through and connect your areas.
Hide all of your layers except your main layer for your largest color. Select your magic wand tool, select your doodle layer, and click inside the doodle to where that color belongs.
Once it is selected go to Select>Modify>Expand. Change your number to about 5 or 6, and then go to Select>Inverse. Select the color layer you are working with and then go to Edit>Cut (or just CTRL+X). Do this for all your main colors. ((note: if you want it to go slightly more out of your doodle/stamps lines you can set it to about 8, but for the most part I don't recommend going higher than that))
Go to your first shadow layer, and then go to Filter>Blur>Gaussian Blur. Set your blur to about 10. Set your layer blending mode to Multiply and set the opacity to about 50%. (or what looks best to you) Select the doodle (the copy that leaves no gaps in the doodle) and select all the areas your shadow is not supposed to be, and then reselect your shadow layer and cut. Go through and do this to all of your shadow layers.

Do the same with your highlights as your did your shadows only set those to Screen with an opacity of about 45%.

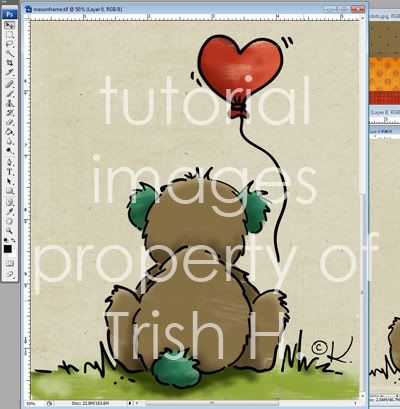
Hide your modified doodle and reshow your original doodle, and admire your work!
Doodle is Don't Go created by Kaye Winiecki. Kaye has several other stamps available in her store.
These directions were done in PS CS 3, but should give you a basic idea of how to do this.
One of the things that I find make coloring in stamps go quickly is to download some paint brushes and using those to color in the big areas with my main color first. Karah has tons of awesome of awesome brushes (that I use all the time) in her Finishing Touches collections.
First open your stamp/doodle and place it where you would like it to go:
Create a new layer under your stamp select the brush you want to use and then select the color you want to use. (I generally open papers of all the colors in whatever kit I am working with and use my color dropper tool to select my colors from those) Use a large brush and fill in your main colors (making sure to put each color on a NEW layer)
Rename all your color layers with what the parts are plus the word MAIN.
Hide all of your color layers except one and create a new layer on top of it (adding layer name and replace MAIN with SHADOW). Select that layer color and then go down some to get a darker version of the color. Using a small brush color over where your shadows would go:
Then go through one color at a time and add your shadows to each color layer.
Hide your main colors and shadows again (except one main color) and we're going to do what we just did again, only with lighter colors and labeling the layers with HIGHLIGHT.
Now right now this just looks like a hot mess right?
If your doodle doesn't haven't any open areas, or lines that don't connect you can skip this part. If your doodle is like mine, and it has areas that don't fully connect you do need to do this.
Duplicate your doodle and hide the original. Take a small circular brush (try to match it to the line size) and go through and connect your areas.
Hide all of your layers except your main layer for your largest color. Select your magic wand tool, select your doodle layer, and click inside the doodle to where that color belongs.
Once it is selected go to Select>Modify>Expand. Change your number to about 5 or 6, and then go to Select>Inverse. Select the color layer you are working with and then go to Edit>Cut (or just CTRL+X). Do this for all your main colors. ((note: if you want it to go slightly more out of your doodle/stamps lines you can set it to about 8, but for the most part I don't recommend going higher than that))
Go to your first shadow layer, and then go to Filter>Blur>Gaussian Blur. Set your blur to about 10. Set your layer blending mode to Multiply and set the opacity to about 50%. (or what looks best to you) Select the doodle (the copy that leaves no gaps in the doodle) and select all the areas your shadow is not supposed to be, and then reselect your shadow layer and cut. Go through and do this to all of your shadow layers.
Do the same with your highlights as your did your shadows only set those to Screen with an opacity of about 45%.
Hide your modified doodle and reshow your original doodle, and admire your work!
Doodle is Don't Go created by Kaye Winiecki. Kaye has several other stamps available in her store.
Last edited:
") Kaye pointed out they could be easily stolen before so I had to modify them some.
Kaye pointed out they could be easily stolen before so I had to modify them some.  I figured after so many asked how to do it I should just break down and share.
 It seemed like the best compromise for me.
  I'll definitely be doing this again!