- Joined
- Jan 1, 2017
- Messages
- 4,604
Welcome to Kim Jensen’s Designer Challenge for April 2022. This month we are going to do a technique challenge. Your challenge is to create a photo mask using Kim’s paint splatters. She has several kits with gorgeous paint splats. This is a great way to stretch your stash and use them for something a little different. I have included a photo tutorial on how I did this.
Step 1
Open a new document. Open three paint splats (or more, but at least three must be in your mask)

Step 2
Move them (I moved the blue one because there was blank space in the top right) to make a solid fill for most of the center. I also rotated the green splat. Once I liked the look, I merged my three layers into one.

Step 3
Bring your photo in and clip it to your mask
Step 4
Play around with the mask. I transformed my mask and made it slightly longer since my photo was a horizontal photo. I then copied the mask two more times and slightly moved one a little to the left and the other a little to the right until I was satisfied with the shape of my mask in relation to my photo.

Step 5
When you are satisfied with the outcome you can merge all those layers and complete your layout
Wasn’t that fun? Now if you really enjoyed this and want to go a step farther, as an ADDED Bonus prize qualifier you will also need to incorporate at least 3 different Plastic Cliptastic clips as part of your mask. I have added onto the tutorial to show how to do this. Instead of doing Step 5 above, start here with this Step 5.
**Step 5
On my bottom mask layer, I brought in a plastic cliptastic element. I moved it to where I wanted it on the mask then I unclipped my photo and merged the clip to the mask and clipped my photo back onto the mask. I continued doing this until I was satisfied with the results (I ended up adding 6 clips to my mask)


Step 6
Finish off your layout however you see fit
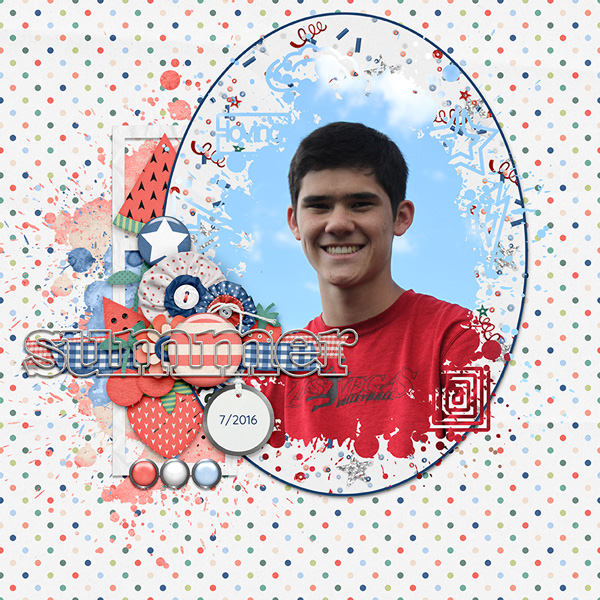
Here is my final layout. I chose to do the bonus challenge. I used Sweet American Summer for the mask and main design and Currently Cliptastic, Plastic Cliptastic 1 and Plastic Cliptastic 4-Weather in my mask
There are no other rules to this challenge.
Rules:
You must create a photo mask using Kim’s splatters. You must use at least three, but you can use more than three. Here are a few kits that have excellent splatters: Emerson, Dino-Riffic, Sweet American Summer, Spring Skies, Winterly, Putting Down Roots, Woodland Friends. Kim has many more kits with paint Splatters in them...these are just a few.
Bonus challenge:
You must include at least 3 Plastic Cliptastics as part of your photo mask. They will be part of the mask. The photo below shows my mask with no cliptastics. The one in the oval has 5 cliptastics added to it.

Challenge Rules:
*Use at least 75% Kim Jensen Designs product (current or retired from TLP) to create your layout meeting the criteria listed above.
*Upload your layout to the Kim Jensen gallery. Please include your credits.
*Post your layout to this thread and link to your gallery post.
*Layouts must be new for this challenge and cannot be combined with other challenges.
*All layouts must be posted by 11:59pm Pacific Time, April 30, 2022.
Prizes:
*One layout will be chosen to receive a $10 coupon for Kim Jensen Designs’ shop!
*All other participants will receive a 20% off coupon for Kim Jensen Designs’ shop!
*You may enter multiple layouts to increase your odds of winning the $10 prize, but each scrapper will only receive one coupon.
*As a BONUS, Kim will be giving away an EXTRA $10 coupon from the entries that include at least three Plastic Cliptastics as part of their photo mask.
Here are some examples from the CT's.
Birgit - did not do the bonus challenge

Christa - did the bonus challenge

Monica - did not do the bonus challenge... see her page in the next post.
Step 1
Open a new document. Open three paint splats (or more, but at least three must be in your mask)
Step 2
Move them (I moved the blue one because there was blank space in the top right) to make a solid fill for most of the center. I also rotated the green splat. Once I liked the look, I merged my three layers into one.
Step 3
Bring your photo in and clip it to your mask
Step 4
Play around with the mask. I transformed my mask and made it slightly longer since my photo was a horizontal photo. I then copied the mask two more times and slightly moved one a little to the left and the other a little to the right until I was satisfied with the shape of my mask in relation to my photo.
Step 5
When you are satisfied with the outcome you can merge all those layers and complete your layout
Wasn’t that fun? Now if you really enjoyed this and want to go a step farther, as an ADDED Bonus prize qualifier you will also need to incorporate at least 3 different Plastic Cliptastic clips as part of your mask. I have added onto the tutorial to show how to do this. Instead of doing Step 5 above, start here with this Step 5.
**Step 5
On my bottom mask layer, I brought in a plastic cliptastic element. I moved it to where I wanted it on the mask then I unclipped my photo and merged the clip to the mask and clipped my photo back onto the mask. I continued doing this until I was satisfied with the results (I ended up adding 6 clips to my mask)
Step 6
Finish off your layout however you see fit
Here is my final layout. I chose to do the bonus challenge. I used Sweet American Summer for the mask and main design and Currently Cliptastic, Plastic Cliptastic 1 and Plastic Cliptastic 4-Weather in my mask
There are no other rules to this challenge.
Rules:
You must create a photo mask using Kim’s splatters. You must use at least three, but you can use more than three. Here are a few kits that have excellent splatters: Emerson, Dino-Riffic, Sweet American Summer, Spring Skies, Winterly, Putting Down Roots, Woodland Friends. Kim has many more kits with paint Splatters in them...these are just a few.
Bonus challenge:
You must include at least 3 Plastic Cliptastics as part of your photo mask. They will be part of the mask. The photo below shows my mask with no cliptastics. The one in the oval has 5 cliptastics added to it.
Challenge Rules:
*Use at least 75% Kim Jensen Designs product (current or retired from TLP) to create your layout meeting the criteria listed above.
*Upload your layout to the Kim Jensen gallery. Please include your credits.
*Post your layout to this thread and link to your gallery post.
*Layouts must be new for this challenge and cannot be combined with other challenges.
*All layouts must be posted by 11:59pm Pacific Time, April 30, 2022.
Prizes:
*One layout will be chosen to receive a $10 coupon for Kim Jensen Designs’ shop!
*All other participants will receive a 20% off coupon for Kim Jensen Designs’ shop!
*You may enter multiple layouts to increase your odds of winning the $10 prize, but each scrapper will only receive one coupon.
*As a BONUS, Kim will be giving away an EXTRA $10 coupon from the entries that include at least three Plastic Cliptastics as part of their photo mask.
Here are some examples from the CT's.
Birgit - did not do the bonus challenge
Christa - did the bonus challenge
Monica - did not do the bonus challenge... see her page in the next post.
Last edited by a moderator:
") in the second photo
in the second photo

