Margje
Well-Known Member
- Joined
- Sep 7, 2014
- Messages
- 318
Welcome to the NBK Design Technique Challenge!
I love to make clippingmasks from all kinds of products. Lets focus for this challenge on making clippingmasks from Magic Lights. I love them for their shapes but also its a great way to color your images at the same time with the use of a blendingmode.
Let me walk you through the proces and give you some tips with my screenshots as an example.

Here is the photo I want to work with. I already turned it to Black and White and used some Artistic Filters on it. I also gave it a lot of contrast. I know that the colors of my Magic Lights blend perfectly in this way. This effect works much better on Black and White photo’s.

I made a new document for my layout and I placed the photo. I always make a duplicate of the photo incase I want to use the same photo again and to have it on the same spot. I also opened the Magic Lights I want to work with.

I duplicated the Magic Light also and filled it with black to make it my clippingmask. (If it is very transparent, you can duplicate it, and then merge it, to get it less transparent.)

I placed my copy photolayer above the mask that I made from the Magic Lights. I made a clippingmask.

As you can see the magic lights under the clipped photo give some color! Depending on your photo and Magic Lights, and the result you are after you have many options to finish your image. You can place your Magic Lights layer above the clippingmask layer and go through the different Blendmodes to see the results.

After you find something interesting that you want to keep you can place your layers in a group,or link them together,because merging them can change the whole effect.
You can duplicate that group and use Blendmodes or use that photo you had duplicated to mask parts back in. And you can also mask parts out in the face that you don't want. You can also change the colors. Use your creativity to finish this layout with lots of other products.
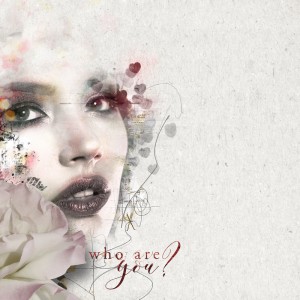
Here is my final page!

December 2015 Megabundle
And here is some inspiration from our talented CT :
From Marie-Claire:

From Anika:

From Trish:

From Cindy:

RULES
Make a layout using a clipping mask from Magic Lights
This challenge runs from April 29 to May 12 2019
One lucky scrapper will be randomly chosen to win a $5 coupon to the NBK Design store.
You must use 100% of NBK Design Products.
You may use a template from a designer at The Lily Pad.
Post your layout here and in the NBK Design Gallery and link your layout.
I love to make clippingmasks from all kinds of products. Lets focus for this challenge on making clippingmasks from Magic Lights. I love them for their shapes but also its a great way to color your images at the same time with the use of a blendingmode.
Let me walk you through the proces and give you some tips with my screenshots as an example.
Here is the photo I want to work with. I already turned it to Black and White and used some Artistic Filters on it. I also gave it a lot of contrast. I know that the colors of my Magic Lights blend perfectly in this way. This effect works much better on Black and White photo’s.
I made a new document for my layout and I placed the photo. I always make a duplicate of the photo incase I want to use the same photo again and to have it on the same spot. I also opened the Magic Lights I want to work with.
I duplicated the Magic Light also and filled it with black to make it my clippingmask. (If it is very transparent, you can duplicate it, and then merge it, to get it less transparent.)
I placed my copy photolayer above the mask that I made from the Magic Lights. I made a clippingmask.
As you can see the magic lights under the clipped photo give some color! Depending on your photo and Magic Lights, and the result you are after you have many options to finish your image. You can place your Magic Lights layer above the clippingmask layer and go through the different Blendmodes to see the results.
After you find something interesting that you want to keep you can place your layers in a group,or link them together,because merging them can change the whole effect.
You can duplicate that group and use Blendmodes or use that photo you had duplicated to mask parts back in. And you can also mask parts out in the face that you don't want. You can also change the colors. Use your creativity to finish this layout with lots of other products.
Here is my final page!
December 2015 Megabundle
And here is some inspiration from our talented CT :
From Marie-Claire:
From Anika:
From Trish:
From Cindy:
RULES
Make a layout using a clipping mask from Magic Lights
This challenge runs from April 29 to May 12 2019
One lucky scrapper will be randomly chosen to win a $5 coupon to the NBK Design store.
You must use 100% of NBK Design Products.
You may use a template from a designer at The Lily Pad.
Post your layout here and in the NBK Design Gallery and link your layout.
Last edited: