Here is a tutorial that will teach you how to create fun lines and frames using almost any geometric shape! (see example in the "bumps" under the orange line in the layout above)1. Select the Brush Tool (B) and set your brush size to about 25 px and the hardness to 100%. The color doesn't matter.2. Find the Toggle Brush Panel icon in the upper left corner of the Photoshop screen.3. In the Brush Panel, set the Spacing to about 150%4. Open a blank canvas in Photoshop. (I'm using 600 x 600 pixels at 72 dpi) Click anywhere on the canvas to create one dot. Then hold down Shift and click somewhere on the opposite side of the canvas. You should get a perfect spaced line of dots.5. Now try the same thing again with your spacing set at about 80%. This time before you even click the first time, hold down Shift and click and drag across the canvas. This is a very cool trick for creating a peek … [Read more...]
Brush Work Across Layers Tutorial by Rebecca
Today’s tutorial focuses on stamping / brushing / writing across multiple layers. This is one of those techniques I use A LOT, and while it may not stand out and be the first thing you notice on a layout, it IS one of those little touches that can bring a greater element of realism to your digital pages. Let’s get started!! When I do layouts, I tend to get all the stuff in place where I want it, then I’ll go back through and do the finishing touches – add shadows, tweak elements here & there, and fix my paint that crosses multiple layers. So for this example, let’s pretend my ‘layout’ is this photo with some brush work over it… like so… So now I have 3 layers – my background, my photo, and my brushed ‘11’ for my title. STEP 1: Duplicate your brush layer. Right click on your brush layer in the layer pallet, and select Duplicate LayerSTEP 2: Cut the brushwork into 2 separate … [Read more...]
Watercolor Look Tutorial by Farrah
I love the look of watercolor. Often times, I'm lazy and just clip my photo to a watercolor paper or element. However, I especially love the look on pages where it looks like an artwork in progress. As if I've stopped halfway though filling in a watercolor version of a drawing, as I have done in this LO:I'll teach you how to create this look too.1- Create a blank document and drag over your photo 2- Duplicate your photo and then add a layer mask to HIDE your bottom copy of your photo3- We're going to turn the TOP copy of your photo into a drawing, so click on the top copy of the photo and go to Filter -> Stylize -> Find edges 4- **optional** I always desaturate the drawing version of my photo, so that it looks like I used a No2 pencil to draw it, otherwise, it will look like colored pencils. The choice is up to you! =) To desaturate, go to Image -> adjustments -> … [Read more...]
Hybrid Tutorial: Dressing Up Card Envelopes
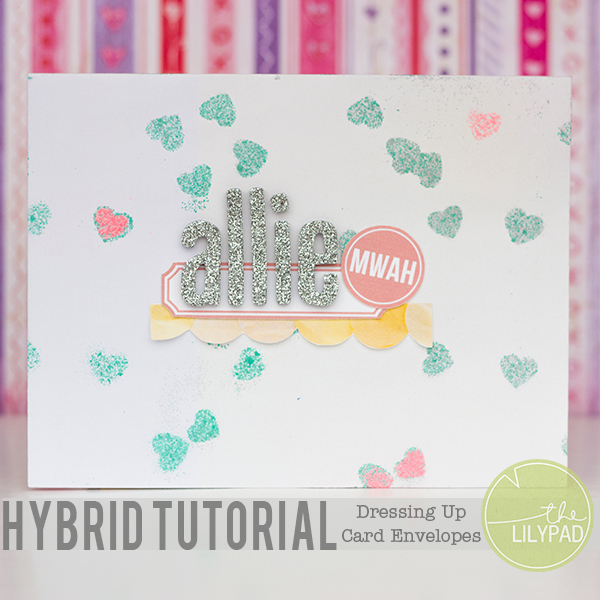
Have your spent loads of time working on a card for someone and then slipped it into a plain old white envelop? I'm guilty of doing this quite often. Today though I have a fun little tutorial for you of how you can "dress up" those boring old envelopes.Supplies Needed:White envelopeMy Story by Laurie AnneJump for Joy by The LilyPad DesignersMade for Each Other by The LilyPad DesignersStencilMistEmbellishmentsAdhesiveIf you have a stencil on hand, go ahead and use it! However, I didn't so I made one. I thought I would share how you can make a stencil using your silhouette.1. Open a new drawing in your Silhouette software. Change the size to letter.2. Open up Sara's heart scatter from Made for Each Other.3. Resize the scatter so that it fits onto the drawing.4. Go to the trace menu and select the trace area. Drag a box around the shape to … [Read more...]
Tutorial: Shadowing Wave
Hi there! Amanda R here today.Many girls are asking me how I shadowing my pages, I will show you how it is really easy!Seven years ago, a friend told me that she'd miss the realistic shadows of her paper pages but she was very lazy to warp them with the warp tool in Photoshop, so she was doing it by the distort filter! And that way, Michelle Filo has changed my scrap, because I was too lazy to warp my shadows too! I use PSCS6 but you can do it in all PS versions.1- do your shadow like always (the color I usually do mine is #2c1901 but you can use any you want)2- create a separate layer for your shadow3- with that layer shadow activate, go to Filter - Distort - Wave:and use these settings:Number of Generations: 5, Type: Sine, Wavelenght: Min.1 Max.999, Amplitude: Min.1 Max.6, Scale: Horiz. 100% Vert. 100%, Randomize: Repeat Edge PixelsAnd voilá, you've done it!!! EASY! … [Read more...]
Hybrid Tutorial — Perpetual Birthday Calendar
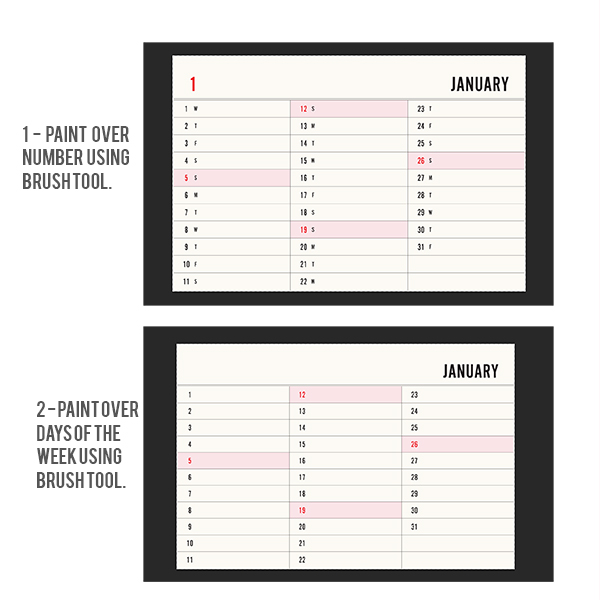
Hey all! How are you enjoying the festivities of TLP's 7th birthday?! Are you enjoying some of the games, or shopping up a storm?! To keep with the birthday theme, I have a very simple hybrid tutorial for you today! My husband and I enjoy sending out birthday cards to our nieces and nephews. We have over 30+ of them! Up until now we have been keeping track of their birthdays on this ragged, crumpled, and ripped piece of paper. I got fed up with this piece of paper this week and decided to create myself a much nicer way to keep track of the birthdays. I decided to create a perpetual calendar! This is what my calendar looks like...Lets get this tutorial under way!Supplies Needed:2014 Calendar Cards (4x6) by Lili NiclassStoryteller January 2014 Journal Cards Extra Patterns by Just JaimeePresentation PaperAdhesiveCutting tool (Precision scissors, Silhouette, … [Read more...]
How Do You Doodle?
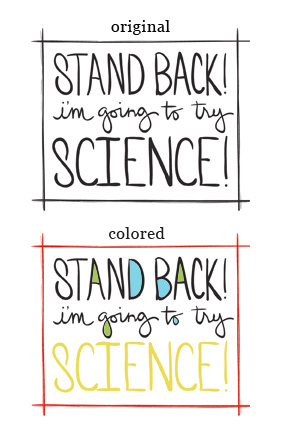
Hello! Hello! If you happened to visit the blog yesterday you read a little information about the incredible selection of doodles available at The Lilypad. Still, some of you might be wondering what to do. Hopefully this will help solve the mystery of doodles and help you incorporate them into your next creation. There are a number of ways to use doodles other than just straight out of the kit. Adding color to doodles will completely change the look. This allows you to customize the object to fit your project. There are different ways to add color to a doodle. A few examples are: flood fill a doodle with any color from the color palette; use the gradient tool to add a variety of color; or clip paper to add both color and texture.Word art in the example above is from Science Lab element pack by One Little Bird.Layer them. Layer a few of your favorite doodles to create a new … [Read more...]
DYD: Confetti Pockets
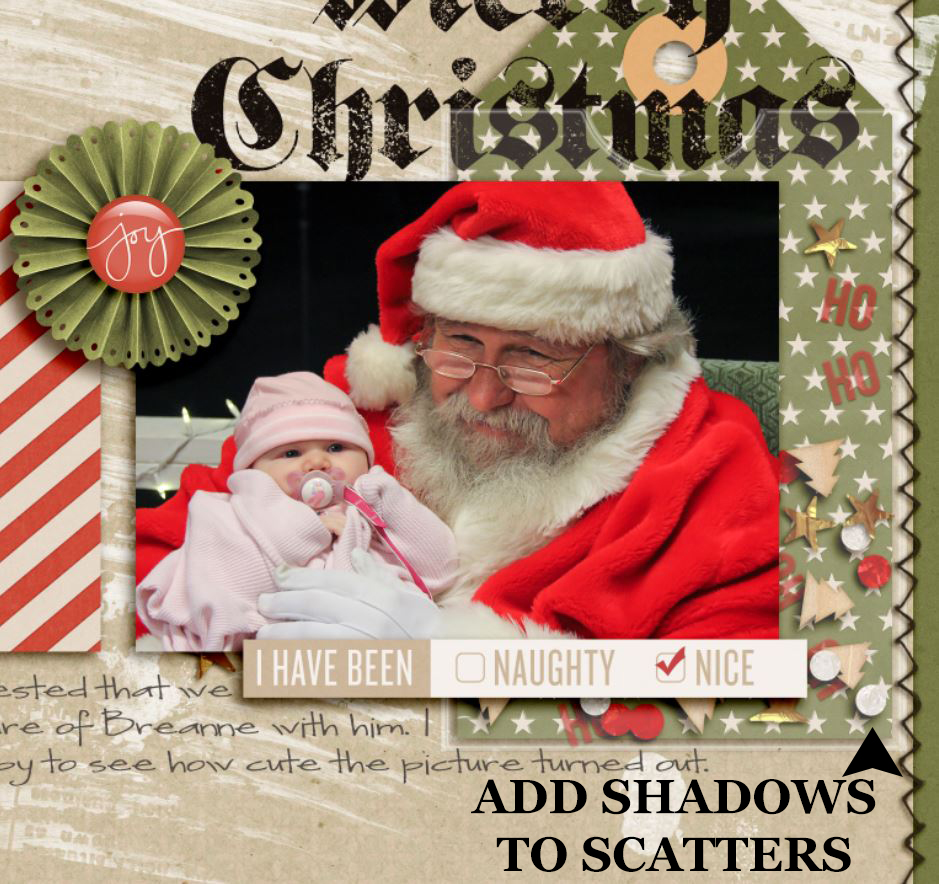
Hey scrappers, Polly Jewelle here! I'm so excited because December 1st is finally here! I along with many other will be starting to document their December today. Before you get started I have another tutorial to share with you. Today I'm going to demonstrate how to make confetti pockets. I'm going to show how to make a confetti pocket for hybrid albums as well as how to make one on a digital layout. Let's get started!Digital Confetti Pocket1 - Compile your layout including a clear pocket for confetti. On my layout below I used the clear 3 x 4 pocket in Pear Tree {confetti} by Sara Gleason. 2 - Add scatters inside of your pocket. To do this all scatter layers should be BELOW your pocket layer. Spend time spreading your scatters out so they aren't all bunched together. 3 - Add shadows to the scatters. Keep in mind how each type of scatter will have a different size … [Read more...]
DYD Prep: Are you a planner or do you fly by the seat of your pants?
Hello scrappers, it's Polly Heather(gw) here with my very first blog post and I'm excited to share with you how Polly Jewelle and I have been preparing for Document Your December. I would be the fly by the seat of my pants kinda girl and I basically just print and cut a bunch of goodies and gather them all together in stacks and piles... Jewelle is a very organized planner and is sharing some of her planning sketches with us today...Do you fly by the seat of your own pants?I was in Nashville all last week, so I didn't get to play much with all the yummy goodies that were popping up before leaving. So, I'm going to share a little bit about what I've been up to the last few days as I get ready to document our December before heading out of town again for Thanksgiving. I'm also excited to share a little bit of a tutorial and some tips for the hybrid crowd too. WOOT WOOT!!! Are you … [Read more...]
Document Your December
BRRRR!!! The air is getting chiller here in the United States. Which is always a great reminder that December is just around the corner! For most people, magical memories take place during the month of December and they want to document them. To help with that the LilyPad designers have gone above and beyond creating the most beautiful holiday collection! For those of you who are new to the Pad the designers call it Document Your December. This weekend only you can pick up over 75 DYD products on sale for 20% off! This year Heather(aka heathergw) and I (aka mrspotts) have teamed up to create tutorials all about Documenting Your December. Heather is a seasoned pro who has created some beautiful DYD's in the past. She will be letting us peek into her DYD process this year. I am more of novice at the whole DYD thing, but I'm excited and ready to show you my own process! … [Read more...]