mocamom
Runs on coffee. And with scissors.
- Joined
- Jan 6, 2017
- Messages
- 2,025
So glad you are here for Document Your December. It’s a great time at The Lilypad as we have some fun challenges, games, and tutorials to get us ready for the holiday season. I’m here today with a tutorial on how you can make a shaker card to send to friends and family. I know some of y’all are already thinking you can’t possibly do a hybrid project, but I promise this one isn’t hard and totally accessible with just a few minor supplies! Let me show you what I mean.
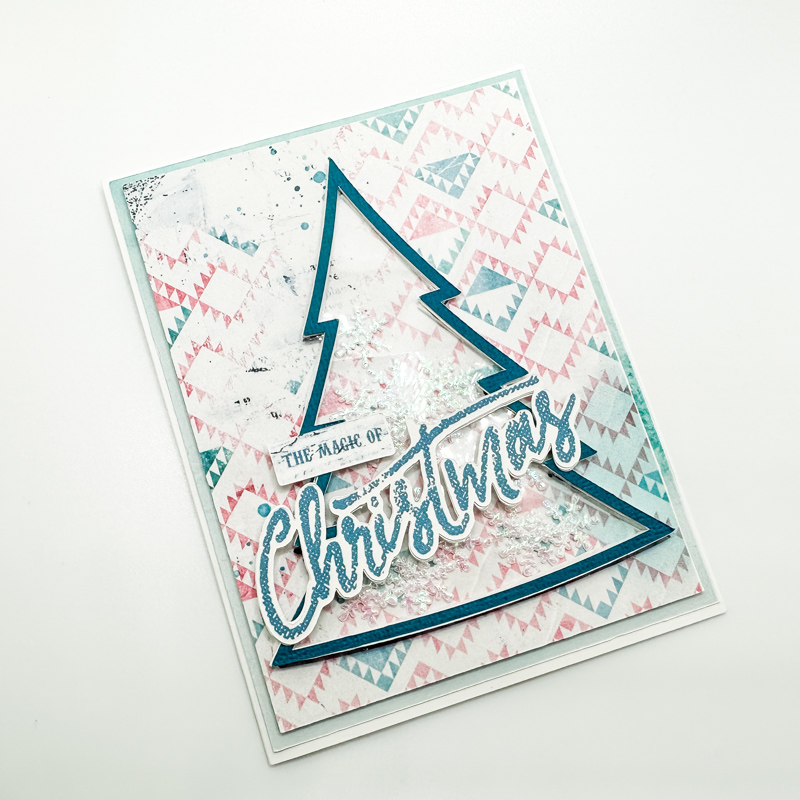
First, I decided to use papers and elements from Famille collection by Lynn Grieveson because I loved the colors of this kit, and the pattern papers were perfect for my needs. I also used an SVG from Tree Cut Outs by Scrapping with Liz. (Not to worry if you don’t have a cutting machine! I repeated this card using a cookie cutter for my shape for those of you who can’t use SVG’s!) I printed off my papers and elements from the kit and gathered everything together including a piece of teal cardstock, some iridescent snowflake scatter, and a small piece of plastic from one of the packing scraps I keep just for this purpose. Here are my supplies (minus glue and foam tape):

Next, I used my Scan N Cut cutting machine to cut out the papers, word art, and trees. I like to layer elements for added dimension, so I cut 2 copies of the Christmas word art and 3 copies of the trees all from scrap white paper. (If you have a cutting machine, I’ll share a hint with you that Karen shared with me. I took my “Christmas” word art and filled it with all black in Photoshop. This way, my Scan N Cut had the exact shape it needed to cut it out perfectly. Before I would mess around with outlines and such, but this way is so much easier!) Anyway, I also traced the tree on the acetate (plastic) with a permanent marker and cut it out as well. Here’s everything all cut out and ready to assemble:

Now for the shaker part of the card… First, I glued all 3 layers of white trees and 1 layer of the teal tree together which made the shaker part nice and sturdy. Next, I glued the acetate onto the back of the tree. I then covered the back of the tree (on the acetate layer) with 1/16-inch-thick foam tape. Once this was done, I put a pile of snowflakes onto the middle of the card and stuck my tree down over this, thus sealing them in! All that was left was to add my two sentiments and then put my card together as shown!
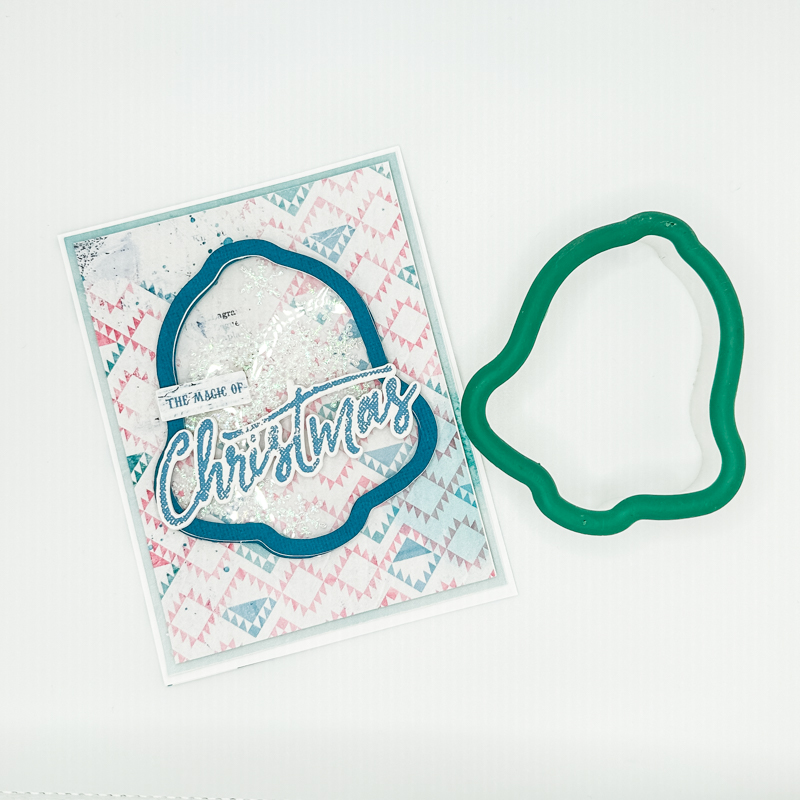
And like I said above, you don’t have to have a fancy cutting machine! For this next card, I simply traced a cookie cutter that I had lying around. I then cut it as I did above with three layers of white bells and one teal layer. I glued them together and backed it with the acetate and foam tape for the final card:
This card was super easy to make! I hope y’all can try one and if you do, let me see it below! Feel free to leave any questions you might have too and I’ll help you out!
I hope this all makes sense and that you enjoy the party here at The Lilypad!
First, I decided to use papers and elements from Famille collection by Lynn Grieveson because I loved the colors of this kit, and the pattern papers were perfect for my needs. I also used an SVG from Tree Cut Outs by Scrapping with Liz. (Not to worry if you don’t have a cutting machine! I repeated this card using a cookie cutter for my shape for those of you who can’t use SVG’s!) I printed off my papers and elements from the kit and gathered everything together including a piece of teal cardstock, some iridescent snowflake scatter, and a small piece of plastic from one of the packing scraps I keep just for this purpose. Here are my supplies (minus glue and foam tape):
Next, I used my Scan N Cut cutting machine to cut out the papers, word art, and trees. I like to layer elements for added dimension, so I cut 2 copies of the Christmas word art and 3 copies of the trees all from scrap white paper. (If you have a cutting machine, I’ll share a hint with you that Karen shared with me. I took my “Christmas” word art and filled it with all black in Photoshop. This way, my Scan N Cut had the exact shape it needed to cut it out perfectly. Before I would mess around with outlines and such, but this way is so much easier!) Anyway, I also traced the tree on the acetate (plastic) with a permanent marker and cut it out as well. Here’s everything all cut out and ready to assemble:
Now for the shaker part of the card… First, I glued all 3 layers of white trees and 1 layer of the teal tree together which made the shaker part nice and sturdy. Next, I glued the acetate onto the back of the tree. I then covered the back of the tree (on the acetate layer) with 1/16-inch-thick foam tape. Once this was done, I put a pile of snowflakes onto the middle of the card and stuck my tree down over this, thus sealing them in! All that was left was to add my two sentiments and then put my card together as shown!
And like I said above, you don’t have to have a fancy cutting machine! For this next card, I simply traced a cookie cutter that I had lying around. I then cut it as I did above with three layers of white bells and one teal layer. I glued them together and backed it with the acetate and foam tape for the final card:
This card was super easy to make! I hope y’all can try one and if you do, let me see it below! Feel free to leave any questions you might have too and I’ll help you out!
I hope this all makes sense and that you enjoy the party here at The Lilypad!