mocamom
Runs on coffee. And with scissors.
- Joined
- Jan 6, 2017
- Messages
- 2,025
Happy August! Here in the States, kids are getting ready to head back to school, so many (including me) are trying to squeeze every last bit of vacation in while I can. Now because I have eleven birthday and anniversary cards to make this month, I’m trying to keep them simple so I can still spend time with my youngest. I started thinking that some of y’all may want a simple card to make too, so here I am with the August Hybrid challenge!
Now I know most of you shudder at the mention of the word, “hybrid”. I promise you there are multiple levels of how “hybrid” one has to be! For instance, this month I’m going to ask you to make a hybrid card, BUT I’d love for you to design it in your digital scrapbooking software. See, it’s simple. Create a card digitally, and then either send it off for printing or print it at home – your choice! Let me show you mine and I’ll explain more:
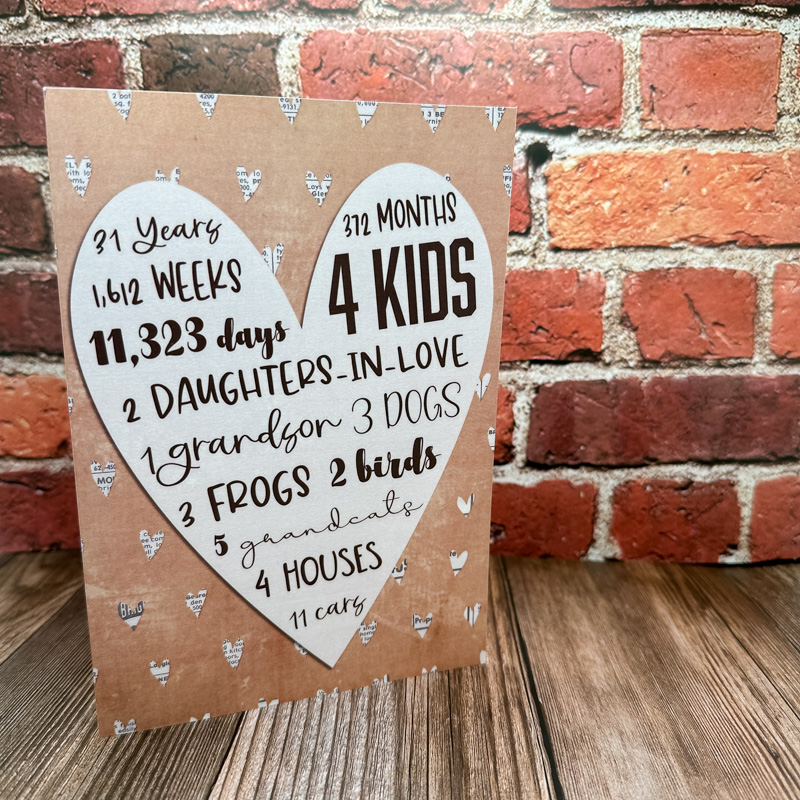
This is my anniversary card for my husband. I designed it in Photoshop using Soulmates by Lynne-Marie. Then I sent it to Walgreens to be printed on a card. The total cost was $1.21 AND that included the envelope too (they always have a 50% off coupon and you can use it on any amount). That’s so much cheaper than buying a regular store-made card!
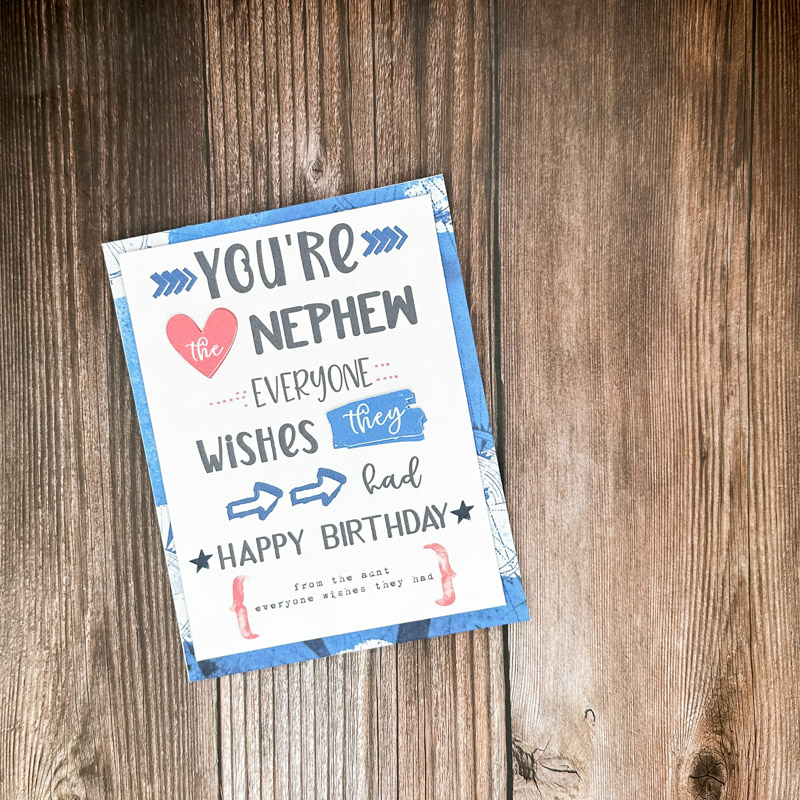
For those of you who like printing at home, here is a card I made for my nephew using Makaleha by Lynn Grieveson. I designed the front in Photoshop but printed the paper out along with the heart and blue blob. I assembled my layers and glued them to an old card I’m recycling.
See how easy it is? It doesn’t have to be complicated I promise. So for this challenge, I want you to make a hybrid card. Truthfully, you can make any type of hybrid card, but I’d love to see you try to design one in your software and then print it. Just show me your card hehe")
Please post your layout to the Hybrid gallery prior to Midnight EST August 31, 2023 and then post it in this thread by copying the code (at the right of your gallery image) from the box under "Share BB Code".
We will draw a random winner at the beginning of next month for a $5 coupon to Becca Bonneville’s store!!
You can use any products in The Lilypad store or retired products from current Lilypad designers, you just have to make sure you follow our gallery guidelines. GALLERY RULES: Layouts must contain at least 50% TLP products (Templates count as 15%). Uploads must be less than 250k. List all credits; no off-site linking allowed.
I can’t wait to see what y’all create!
Now I know most of you shudder at the mention of the word, “hybrid”. I promise you there are multiple levels of how “hybrid” one has to be! For instance, this month I’m going to ask you to make a hybrid card, BUT I’d love for you to design it in your digital scrapbooking software. See, it’s simple. Create a card digitally, and then either send it off for printing or print it at home – your choice! Let me show you mine and I’ll explain more:
This is my anniversary card for my husband. I designed it in Photoshop using Soulmates by Lynne-Marie. Then I sent it to Walgreens to be printed on a card. The total cost was $1.21 AND that included the envelope too (they always have a 50% off coupon and you can use it on any amount). That’s so much cheaper than buying a regular store-made card!
For those of you who like printing at home, here is a card I made for my nephew using Makaleha by Lynn Grieveson. I designed the front in Photoshop but printed the paper out along with the heart and blue blob. I assembled my layers and glued them to an old card I’m recycling.
See how easy it is? It doesn’t have to be complicated I promise. So for this challenge, I want you to make a hybrid card. Truthfully, you can make any type of hybrid card, but I’d love to see you try to design one in your software and then print it. Just show me your card hehe
Please post your layout to the Hybrid gallery prior to Midnight EST August 31, 2023 and then post it in this thread by copying the code (at the right of your gallery image) from the box under "Share BB Code".
We will draw a random winner at the beginning of next month for a $5 coupon to Becca Bonneville’s store!!
You can use any products in The Lilypad store or retired products from current Lilypad designers, you just have to make sure you follow our gallery guidelines. GALLERY RULES: Layouts must contain at least 50% TLP products (Templates count as 15%). Uploads must be less than 250k. List all credits; no off-site linking allowed.
I can’t wait to see what y’all create!
Last edited:
