Hello all my artsy friends! I’m just popping in today with a quick tip for removing distracting backgrounds from photos. Ever have a photo with a background that clashes with the colors on your page, or that is a bit busy for the design? One of my favorite ways to tone down distracting or clashing colors is to convert the photo to black and white. However, there are times when I want the subject to remain in color. On these occasions, I select out the main subject and just convert the background to black and white.
I used the technique on this page:

There are lots of colors and layers going on in the design, so I wanted to tone down the photo a bit, but I didn’t want to remove all the color. Removing just the background color helped to direct attention to the focal point of the photo. Here is a comparison of the original photo, selective coloring and full black and white conversion:
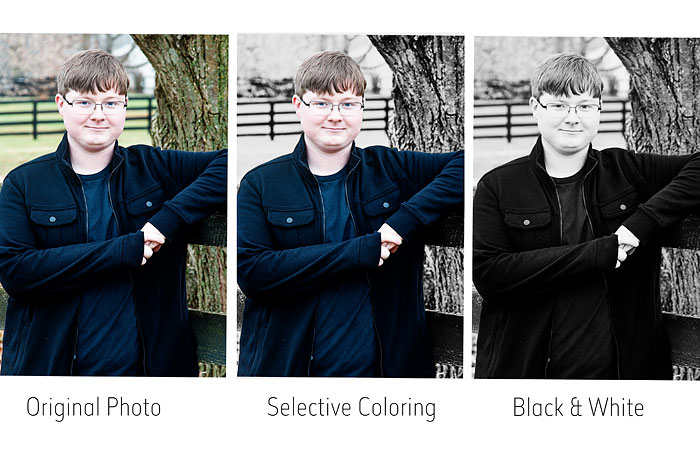
I love the selective coloring here because it really draws attention to the subject of the photo.
Selective Coloring Steps:
1. Select out the focal point of the photo. You can use your selection technique of choice for this step. I used the Quick Selection tool in Photoshop. Because the focal colors are somewhat muted, I didn’t really need a perfect selection, but the Quick Selection tool comes pretty close to one. If you are just learning how to make selections, be sure to check out THIS POST by Polly Cynthia (aka MrsPeel) for an awesome tutorial. (BTW, you can find lots of digi tutorials both on the TLP Blog and in the Learning Pad Forum.)
2. Once you are happy with your selection, soften the edges a bit by feathering them. This will help the selected portion blend more naturally into the black and white background. Go the Select drop down menu and choose Modify/Feather. Then type in 2 pixels in the pop up menu.

3. With the feathered selection still active, copy it to a new layer by hitting Ctrl/J. This will copy the selection onto the layer just above the original photo.
4. Convert the original photo to black and white with your choice of method. I generally use Rad Lab for my black and white conversions. I used the Milk and Cookies filter on my photo. Another quick method for converting a photo to black and white is to apply a Hue/Saturation adjustment layer. Choose Hue/Saturation in the Adjustment Layer menu and then move the saturation slider to -100 in the pop up menu.

5. Now that you have the black and white photo, place it directly under the color selection in the layers palette. And there you have it – a selectively colored photo!
I hope you have fun with this technique!
Until next time ~
Judie

Love this technique! Dont use it nearly enough!