Hello everyone! I have some quick tips for you today for creating your own digital washi tape in either Photoshop or PSE. Have you ever wanted to use a washi tape element on a page but the kit you were using did not have one, or maybe the patterns didn’t really work with your page design? Well, I’m here to show you that washi tape is one of the easiest elements to create on your own.
Take a look at the washi tape elements on this page, that was created with the super awesome Wishi Washi {Dressed Up} templates by Fiddle-Dee-Dee Designs.

All of the washi tape elements to the right of the photo were created by clipping paper to the tape elements included with the template. Because I used the pattern papers from the kit, the tape elements matched the design of my page perfectly. If you love these templates as much as I do, you could just take the different tape elements and use them on your own pages (just be sure to mention the Wishi Washi templates in your credits).
If you want tape elements with different shapes, I can show you how to make them on your own with just few simple steps.
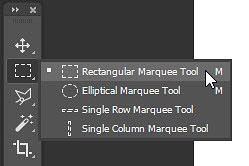
Step 1. Create a new blank layer and use the Rectangular Marquee tool to draw a piece of tape the length and width of your choosing. Fill the tape with any color. You can use the Alt/Backspace or Ctrl/Backspace shortcut to fill the selection with the foreground or background color. You will be using this rectangle as a clipping mask, so the color really doesn’t matter.
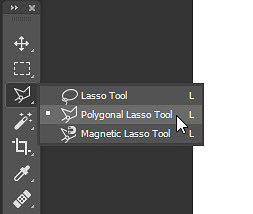
Step 2. Once you have created and filled the rectangle in Step 1, you can proceed with that shape as is, or make the end edges more irregular like a torn piece of tape. If you want a more irregular tape shape, use either the Lasso Tool or Polygonal Lasso tool to “cut out” pieces from the edges. The Lasso Tool will allow you to make a more rounded selection, with the Polygonal Lasso Tool will make straight line cuts. Once you have selected the areas that you want to cut out from the tape edges, close up the selection and delete the selected area with the Delete key.
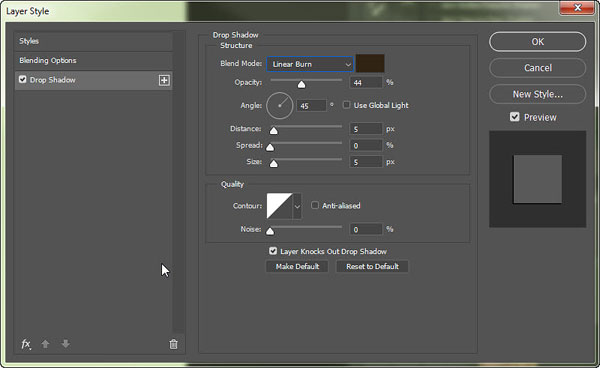
Step 3. Now, you are ready to clip the pattern (or solid) paper to the tape mask. Once you have done this, the last step is to adjust the opacity of the tape mask to make it transparent. The actual amount of adjustment will vary depending on the look you want the paper you choose. Somewhere in the neighborhood of 65% – 75% generally works pretty well, but feel free to go outside these bounds to achieve the look you want for the element. The underlying shadow for washi tape should be very slight. These are the drop shadow settings I generally use for washi tape:
If you just want a few tape-like elements to spruce up your page, this technique will definitely do the trick. However, if you want to add a scrunched up tape look or want more of a tape-like texture, I highly suggest trying Just Jaimee’s Tape Builder Set or Mommyish Designs’ Stylin’ 61: Tape (or both).
Here are some samples of washi tape built with the different techniques discussed in this article:

I will be back next week with a non-destructive method for shaping tape around other elements with the Dodge and Burn tools, so be sure to join me then!
Until next time ~
Judie (HeyJude)

[…] all my artsy friends! I am back with the nondestructive shadowing technique I talked about in my washi tape tutorial from last week. Now that you have your digital washi tape made, you can add some dimension and […]