Hello all my artsy friends! I hope everyone is staying cool in the midst of summer (at least on my side of the world). I have a fun trick today for blending papers with the gradient tool. I used this trick on a recent layout to add some pizazz to some flame shapes.
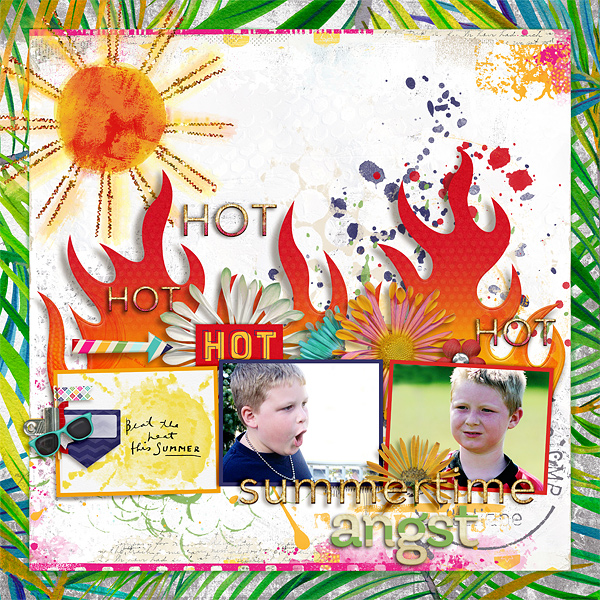
Notice how the flames morph from red hot to bright orange? I actually used three different papers to achieve the effect (plus an embossed plastic style by Mommyish Designs). Those awesome flames were part of Fiddle-Dee-Dee’s Cruel Summer template set (which is in the SOSN sale today for 50% off). You can see the full credits by clicking on the layout.
To make your own morphed out flames, just follow these simple steps:
1. Clip the underlying paper of choice to the flame shape (or whatever shape you have on your page). The easiest way to do this is to activate the paper layer in the layers palette and use the shortcut Ctrl/Alt/G. This will clip the paper to the shaped layer directly beneath it. Once the paper is clipped to the shape layer, activate both the paper layer and the shape layer (Ctrl + click on each layer), Right click on one of the activated layers and then choose “Merge Layers” in the pop up menu. This command will merge only the shape and paper layers.
2. If you want the embossed look that you see at the bottom of my flames, apply an embossing layer style to the flame layer. I used the embossed plastic style from the July 2017 BYOC styles by Mommyish. To allow the orange patterned paper to show through, I turned off the “Satin” and “Color Overlay” effects in the style. You can do this by clicking on the eyeball icon next to each of these effects in the layers palette. (By the way, if you click on the Color Overlay effect a pop up menu with appear where you can change the color to one of your choosing. Because I wanted to use the patterned paper, I turned it off entirely.)
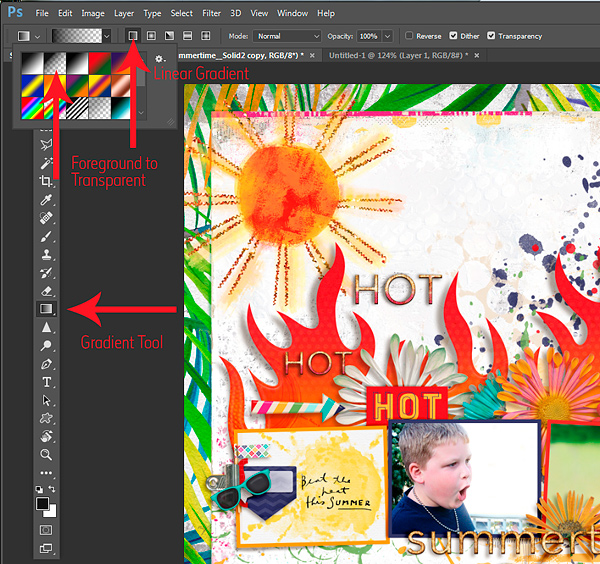
3. Now it is time to blend some papers into the top of the flames. I did this by using the Gradient Tool (located in the left side tool bar in PSCC). Bring the first paper you want to blend onto the page and center it. Now add a blank layer above the patterned paper by clicking on the “Create New Layer” icon at the bottom of the layers palette. (It looks like a square with the bottom left corner folded up.) Activate the new layer, then select the Gradient tool and choose Linear Gradient in the menu at the top of the workspace. Set the gradient to Foreground to Transparent in the drop down menu.
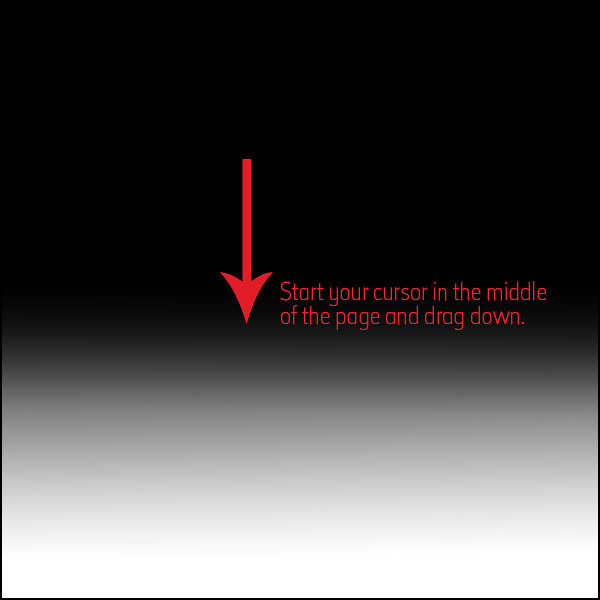
On the blank layer above the patterned paper, drag a line from about the middle of the page to about 3/4 of the way down the page to create a gradual blend. The gradient will appear in the foreground color (it doesn’t matter what color it is, because this layer will be used as a clipping mask). The gradient layer should look something like this:
4. Now move the gradient layer below the pattern paper in the layers palette and clip the pattern paper to it (shortcut: Ctrl/Alt/G). Once the gradient and papers layers are clipped together, Ctrl>Click on each layer to activate them, Right click and choose Merge Layers in the pop up menu. This should merge just those two layers into one. Make sure the pattern gradient layer is just above the shape layer (in my case, the flames) and then clip the gradient layer to the shape. At this point, you can grab the gradient layer on your page and move it up and down until you get the look you want.
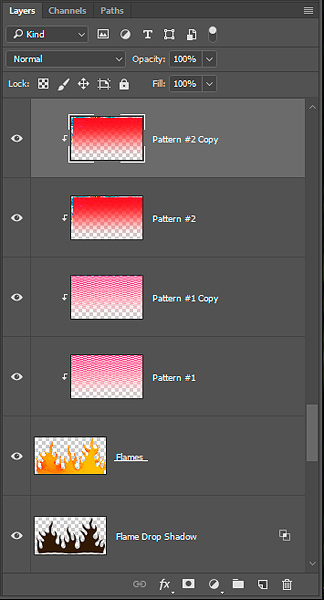
5. Repeat Step #4 on a different paper (if you want to add multiple patterns to the blend). I ended up using two different Gradient patterns and made duplicates of each of those gradient layers to make the flames more vibrant (see screenshot of my layers palette below). If you want to fade the papers over the top of the embossing you created in Step #2, Right Click on the shape layer and choose Rasterize Layer Style from the pop up menu. Otherwise, when you clip the patterned gradients to the shape layer it will retain the bevel throughout the entire shape.
6. Finally, I made the flames look as if they were jumping off the page by putting the drop shadow on its own layer beneath the flame shape layer and using the warp tool to alter the shape of the drop shadow.
Here is what my layers palette looks like:
And that is it! I hope you have fun playing with this technique on your pages. :)
Until next time ~
Judie

Leave a Reply