Hello all my digi-friends! I don’t know about you, but I am always looking for ways to stretch my digital stash. I’m here today with a quick tip on how to dress up open alphas by adding a patterned background to them.
Take a look at this layout (made with supplies from today’s SOSN 50% sale):

I used the Copper Plated Alpha by Pink Reptile Designs and filled it with some patterned paper from Etc. by Danyale’s Sweet Santa Kit. The paper background completely transformed the alpha and helped it to coordinate beautifully with the rest of the page. It is a super simple and quick technique, so let’s get started . . .
Step 1:
Position the wire alpha letters the way you want them to appear on the page. I aligned my letters horizontally.
Step 2:
Merge the letters into one layer by selecting all of them, right click and then choose “Merge Layers” in the pop up menu (make sure you haven’t applied a drop shadow yet, you will do this later in the process). You can also add the paper to each letter individually, but combining them in one layer makes the process a little quicker and keeps your layers palette less crowded. If you want to add different papers to each letter, you should keep them on separate layers.
Step 3:
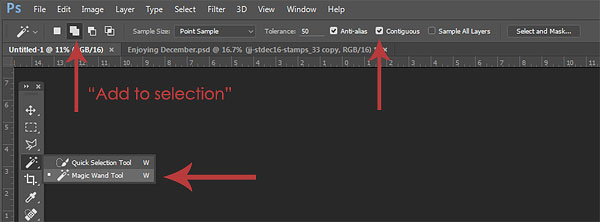
Now you need to create the clipping mask for the paper layer. The easiest way to do this is with the Magic Wand Tool. Activate the tool and make sure the “contiguous” box is checked in the tool bar at the top of the work space. Now click inside the first alpha letter and you should see marching ants surrounding the inside area. Next, click on the add to selection button (it looks like 2 solid squares layered on top of one another) and then continue clicking inside each of the alpha letters until the inside of the entire text is surrounded by marching ants. Now, create a blank layer below the open alpha (Alt>New Layer button will do this automatically). Fill the selection you created on this layer by clicking Ctrl or Alt and the Backspace key to fill with your foreground or background color. Now click Ctrl>D to turn off the marching ants.
Step 4:
Add the paper of your choice in the layer above the selection that you just created. Now clip the paper to the selection by right clicking on the paper layer and choosing Create Clipping Mask in the pop up menu. (There are different short cuts for this function, depending on what version of Photoshop/Elements you have. In the latest version of PhotoshopCC the short cut is Ctrl>Alt>G.)
Step 5:
The last step is to add a drop shadow to the wire alpha and to the paper mask layer. I added a slight shadow the wire alpha and a regular alpha shadow to the paper mask.
And that is it – I hope you have fun filling your open alphas and extending your digital stash!
Until next time ~
Judie (HeyJude)

Leave a Reply